


In today’s competitive real estate market, static photos are no longer enough. Buyers expect dynamic, engaging content that brings properties to life. Enter Reptov, a powerful new platform that transforms ordinary listing photos into professional marke ...


As an Amazon Associate we earn from qualifying purchases.
Lightroom proves to be a total game-changer in image editing. However, you may not be fully utilizing its capabilities. In this free course, you'll learn how to edit photos in Lightroom like a pro and take your real estate images to a whole new level in a matter of minutes.
Quick Navigation
To edit photos in Adobe Lightroom, you need to learn how to navigate the configurations, presets, tools, and adjustment panels. You can use various features for editing exposure, colors, and image sharpness. Importing, exporting, and syncing settings are also essential parts of the photo editing process.
The software offers endless possibilities to take your images to the next level. Therefore, learning the correct editing techniques is essential to create high-quality real estate photos. This tutorial will support you in getting started by showing the basic functionalities of the software.

Adobe Lightroom is a highly robust and useful tool to help achieve your image editing goals with a few clicks. You do not need to spend hours creating effects and edits for your images. With some basic settings and simple steps, you can easily create a masterpiece.
There are different parts to editing photos in Lightroom. Learn these fundamental steps to master the process of image editing in Lightroom, whether you're using the mobile or desktop version. This course shows a complete picture of how the Lightroom workflow goes.

When you are editing pictures in Lightroom, the first thing to do is bring your shots into the application. You can follow any one of the methods below to achieve the same results.
When importing images into Lightroom, the software saves the pictures in the form of Collections. This leads to a more organized and easy-to-manage image catalog.
Furthermore, you can make copies of a picture so that you can apply varying edits to the same shot.
The image editing software market expects to hit $372.5 million by 2025. The demand for high-definition quality visuals, including virtual reality effects, prompts photographers and editors to use photo editing programs.
However, it's vital to create catalogs in Lightroom to edit photos efficiently. A catalog is a database where you view pictures in a single place. Since the software has non-destructive editing, a catalog also keeps the details of the original image intact while also saving edits.
You will accumulate lots of pictures as you photograph several properties. Still, you can delete a Lightroom catalog then create new ones. Likewise, make sure to optimize catalogs, so the program can clean up the database and help Lightroom run faster.
This module provides an all-in-one place for viewing, sorting, managing, and rating photos in Lightroom. It contains several commands to help speed up your post-processing.
More than that, this module is where you can flip a photograph as long you're in the Loupe, Compare, or Survey view.

There are 140.8 million housing units in the USA, with 80.6 million being owner-occupied properties. However, post-processing photos of several properties can be exhausting. It's even more tiresome when you have to sort through thousands of images for sorting.
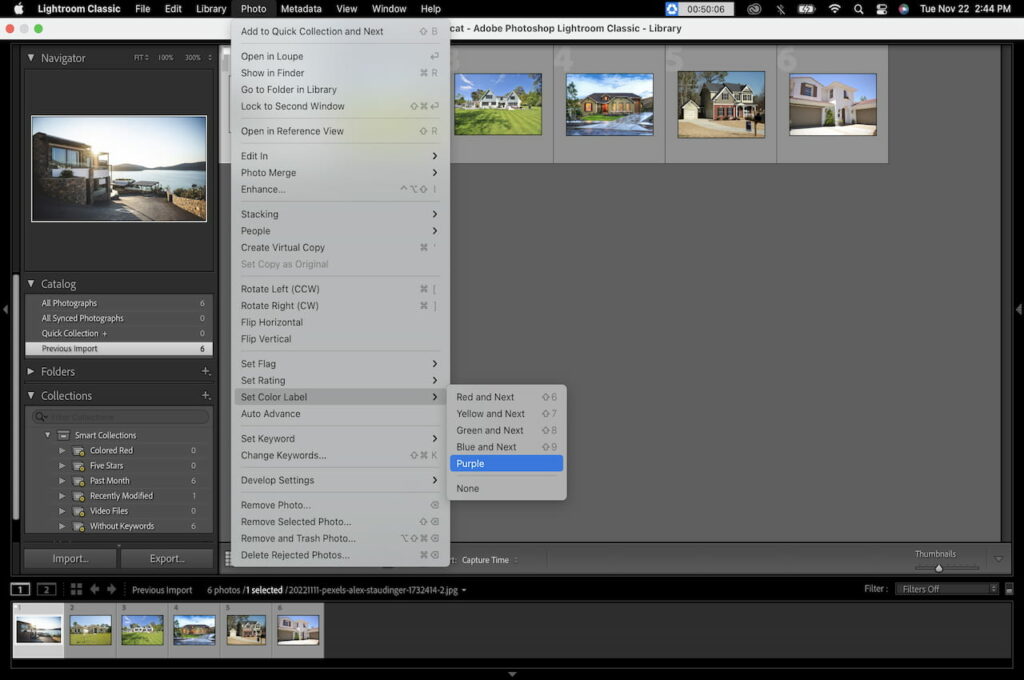
Fortunately, rating photographs serve as a labeling process for culling. Viewing starred, color-rated, or flagged pictures in Lightroom streamlines this tedious part of the process, so can you save time and move on to the actual editing.
Color: Colors allow you to mark pictures for different use, like uploads for Instagram or potential uploads for stock
While the housing market sees an 0.8% decline in new listings across America, there's still a 7.6% growth in the largest cities. With the housing market among the most in-demand industries in the country, there will be opportunities for real estate photographers and editors to secure bookings.
However, it's also crucial for photographers to learn the best way of using Lightroom to enhance pictures. With that said, remember that the Develop feature is among the most significant functions to edit photos. It is where you can select photographs, apply presets, and make various edits.
Press D to show the Develop Module. From the Collections panel, Filmstrip, or Grid view, pick your rated images for editing. Utilize the zoom controls in the Navigator panel to evaluate your shots. From there, you can start editing using these post-processing sliders.

The Tone of an image plays a massive role in its quality and look. It refers to the range between the lightest to the darkest parts of an image. Hence, this is an important tool that can create incredible effects on real estate photos.
You would often encounter this challenge when processing real estate scenes with complex lighting situations. When you edit in Lightroom, there are multiple sliders included in this section through which you can set the tones.
One of the benefits of using Lightroom Classic is its Basic Panel, which contains more functions in enhancing photographs. This is why it's vital that you open RAW files in Lightroom so you'll have all the colors, highlights, and tones.
Color accuracy is crucial in real estate

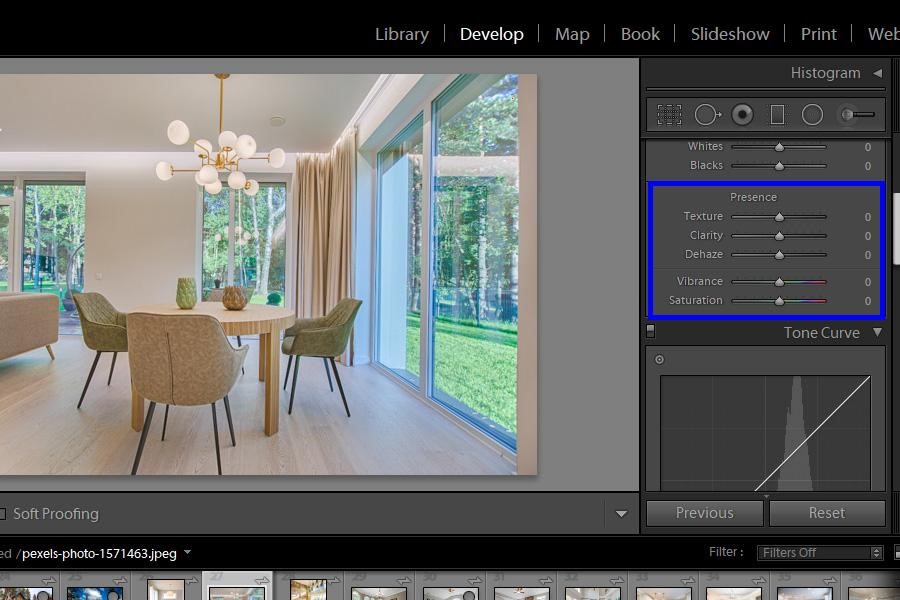
Presence also contains several image editing tools, each of which produces different effects on your image. The first slider is Texture that helps you increase or decrease the ‘feel’ of your image. Second, the clarity slider is used to make your image more sharp, detailed, and focused.
The next slider is ‘Dehaze,’ which is a really unique and useful editing tool. It can help you reduce any haziness or blurriness in your images, which can be a problem in outdoor photos. The last two sliders, Vibrance and Saturation, help you improve the intensity of colors on your image.
The Tone Curve can adjust the overall contrast and brightness levels of your image. With this tool, you can easily make the whole photo brighter or darker with a single click.
You can change the muted tones by adjusting various points of the curve. The Y-axis depicts a tone's lightness, while the X-axis indicates the tone axis. Moving the curve up creates brighter tones, and moving it down results in darker tones.
HSL refers to the Hue, Saturation, and Luminance of images. The HSL editing tool allows you to control and adjust the different colors present on your image, and that too independently.
In effect, you can make the colors pop without affecting the other hues.

The White Balance slider sets the mood of your shots. Using this, you can either make your image have a warmer or a colder appearance.
The first step is to drag the Temp slider to the right for a warmer tint or move to the left to cool down the colors. After that, feel free to adjust the Tint slider to balance out the effect and eliminate color casts.
From there, click on a neutral gray pixel so that the software will adjust the whole photo based on the selected pixel.

Split Toning is one of the most useful and quickest commands for adding a characteristic color to your image. It amplifies an image's overall appearance by adding one color to the highlights and another to the shadows.
In this way, you can change the background color for a more dramatic effect. Likewise, this local adjustment feature enables you to set stark contrasts between a house and the foreground elements.
From there, adjust the Highlights and Shadows to balance the color toning. In addition, you may tweak the Hue and Saturation values a little bit to specify how much of the color you want to emphasize.
About 24% of the workforce are still working from home due to the pandemic, prompting homebuyers to search the market for bigger properties or houses with features that could function as office-like spaces.
Several features in the software can make a huge difference in the way you edit photos. This is why you should use the various local adjustment functions to edit certain parts of an image to enhance a home's features.
From the tool strip under Histogram, pick the appropriate commands from this selection to improve your real estate
It's best to use wide-angle lenses in real estate
To fix lens distortions, check the Enable Profile Corrections box in the Lens Corrections Panel. You can also tick the boxes for removing Chromatic Aberration or Vertical Adjustments.
Distorted lines can derail the quality of your work. This can be among the toughest part of a shoot, especially when you're shooting tight spaces. Spaces can have vertical or horizontal leading lines, and it's your job as a real estate photographer to make them appear straight in the shots.
In times where it's inevitable to capture skewed lines, you can still fix the shots using the program's Straighten tool. From the Crop menu, select the Auto button above the Straighten slider. The program will automatically straighten vertical and horizontal elements.
You can further finetune the changes by using the Upright control from the Geometry tab. Choose either Auto, Vertical, Level, or Full until you achieve the desired effects.
New home sales saw a 43.2% increase in 2020, resulting in homebuilder sentiment at the highest peak in 35 years. This follows a boom in the movement to the suburbs and lower-tax locations, low-interest housing rates, and the ongoing U.S. housing marketing boom.
The key to producing marketable real estate photos for clients is to add or remove elements without making the property unrealistic. Even without Photoshop, you can layer pictures in Lightroom to add dynamics or effects to an image.
Real estate
There are a lot of things you can control during a real estate shoot, except for the weather. While you can plan and reschedule shoots in case of inclement weather, there are still unexpected times of gloomy and overcast skies. Such darkness can make houses look dreary.
Using Adjustment Brushes in Lightroom enables you to paint changes in a photograph. Press K on the keyword to show various brush effects and brush over the parts you want to edit.
After that, modify the Temp value to blue. Brush over the sky until you produce a vibrant sunrise or sunset.
The National Association of Realtors membership continues to grow, reaching an all-time high of 1.46 million members in 2020. Using Lightroom to edit drives your chances to work with realtors and agents for their marketing needs.
HDR editing is among the most in-demand real estate photography services. Simply follow this tutorial to stitch an evenly exposed HDR photo.
The property market hit a 32% increase in first-time homebuyers in January 2020. As agents continue to attract homebuyers, this increases the need to edit in Lightroom to produce visuals.
Masking is another way of enhancing property visuals, especially if you want to focus on certain portions. You would most likely use this when light from the outside is affecting the interior's exposure.
Using Lightroom presets is an excellent way of batch editing your photos by having pre-configured settings that ensure consistency. The best presets for real estate photography allow you to apply the most appropriate effects for night shots, interiors, or HDR pictures.
There's a bunch of free presets in the desktop software and mobile app, although you can still add presets in Lightroom. A good example would be installing VSCO presets inspired by the popular
As you collect different effects over the course of your career, make sure to organize the presets panel, so you can quickly locate and apply settings for your future edits.
Learning how to apply Lightroom presets can streamline your editing workflow. With that said, these are the various ways you can use free Lightroom presets to enhance real estate images and deliver output to clients right away.
The first way is to apply a preset on multiple pictures during import.
The other way is to apply Lightroom presets in the Develop Module and make some tweaks.
After using default Lightroom presets or saved presets from online downloading, you may grow an editing style that's different from the pre-configured settings. In such cases, it's time to create your own presets.
After that, the program will automatically sync the newly-created preset and include it in the Presets panel.
One of the ways to edit in Lightroom efficiently is to know how to apply the presets in whatever device you're using. Learning how to export Lightroom presets offers great flexibility for enhancing real estate photographs anywhere you go.
Besides that, you can export presets for multiple devices or sell Lightroom presets to boost income.
After completing all the editing and being content with the results, it is time to save the edited shots. If you want to share or keep them for later use, you will have to export images from Lightroom.
Aside from that, you may still export RAW photos from the program, particularly when you need RAW files on other editing platforms.
The employment of real estate brokers and agents sees a projected 4% growth from 2020 to 2030. This includes an expected 47,500 openings annually. Consequently, this means more jobs for real estate shoots and post-processing.
Familiarizing yourself with post-production applications is part of ensuring you edit a high-quality real estate image. You can modify these settings before you export all photos from Lightroom.
A Metadata preset contains a predefined set of information that can help organize your files. This aids in searching for files in Lightroom, especially when it's time to clear the cache.
When you edit in Lightroom, the Metadata function allows you to include a watermark in a photo. In this way, you can protect your work and rights in case other people steal your work.
You should take RAW shots if you plan to edit photos in Lightroom Classic. In this way, you can retain all the image data for more flexibility in tweaking settings. Besides, you can convert RAW to JPEG for social media uploading.
Yes, you can use the free Lightroom app on mobile devices to view, organize, and edit photos. You can either move catalogs to an external hard drive then transfer files or sync settings for mobile.
Yes, you can use Lightroom CC Mobile for free. On the other hand, you need an Adobe subscription for the desktop version, especially if you want to use Lightroom 5. Either way, it's best to update to the latest version to maximize the features and ensure stability.
Learning how to edit photos in Lightroom will help transform your shots whichever way you want, and that too with ease and speed. We hope this comprehensive course and free tutorial can take your real estate


