PFRE-Logo-white-bg
Reading
blue-triangle-element

Articles

PFRE is the original online resource for real estate and interior photographers. Since 2006, it has been a community hub where like-minded professionals from around the world gather to share information with a common goal of improving their work and advancing their business. With thousands of articles, covering hundreds of topics, PFRE offers the most robust collection of educational material in our field. The history of real estate photography has been documented within these pages.
All Articles
blue-triangle-element

Latest

Image banner for the March 2024 PFRE Photographer of the Month Winner Alex Vincent, with a featured image of his winning photo titled "Kitchen."

Congratulations Alex Vincent, March 2024 PFRE Photographer of the Month! The theme this month was "Kitchen". Alex Vincent - #906 Yvonne Raaijmakers - #909 Peter Wingfield - #902 Here's what Alex has to say: Thank you for the award of Photographer of th ...

Contest
blue-triangle-element

OVERVIEW

For over a decade, photographers from around the world have participated in PFRE’s monthly photography contests, culminating in the year-end crowning of PFRE’s Photographer of the Year. With a new theme each month and commentary offered by some of the finest real estate & interior photographers anywhere, these contests offer a fun, competitive environment with rich learning opportunities. 

Contest Rules
blue-triangle-element

CURRENT CONTESTS

View / Submit
blue-triangle-element

PAST CONTESTS

View Archive
Resources
blue-triangle-element

Resources

PFRE prides itself on the depth and breadth of the information and professional development resources it makes available to our community. Our goal is to help real estate and interior photographers be successful while bringing the community together and elevating the industry as a whole.
blue-triangle-element

Conference News

No items found

How to Update Lightroom

Published: 20/04/2021

As an Amazon Associate we earn from qualifying purchases.

Every once in a while, Adobe rolls out an updated version of Lightroom Classic CC. As a photographer, it’s a good practice to keep updating the software as it has better features and bug fixes for optimized performance. Today I are going to explain how to update Lightroom so that you can safely move on to the new version.

How to Update Lightroom to the Latest Version

It is vital to upgrade to the most advanced version of Lightroom Classic if you want to improve your workflow and to ensure stability and security. Also, keep in mind that outdated versions of software often have security flaws that may put your device and data at risk.

Even if updating your editing software is optional, I highly recommend you to do so. Because folks at Adobe constantly try to make Lightroom more efficient and user-friendly for you with every new version. 

Upgrading Adobe Lightroom Classic is a straightforward procedure. However, the time it takes to move to the new version depends upon your internet speed and your catalog size. The process requires a few essential steps that you shouldn’t miss to make sure your catalog is safely moved to the new version.

Step 1: Make Sure Your OS is Compatible with the Latest Version Requirements

The most crucial factor to consider while updating Lightroom is to check whether your operating system supports the newest version. If you are a PC user, the latest version of Lightroom requires you to have Windows 10 (64 bit). For Mac users, your OS must be Mojave (version 10.14), Big Sur, or Catalina.

Your system must have a minimum of 8 GB RAM and more than 2GB of space available on the hard disk for installing the new version. Further specifications are stated by Adobe to which you can refer before upgrading Lightroom.

Step 2: Have Your Catalog and Images Backed Up

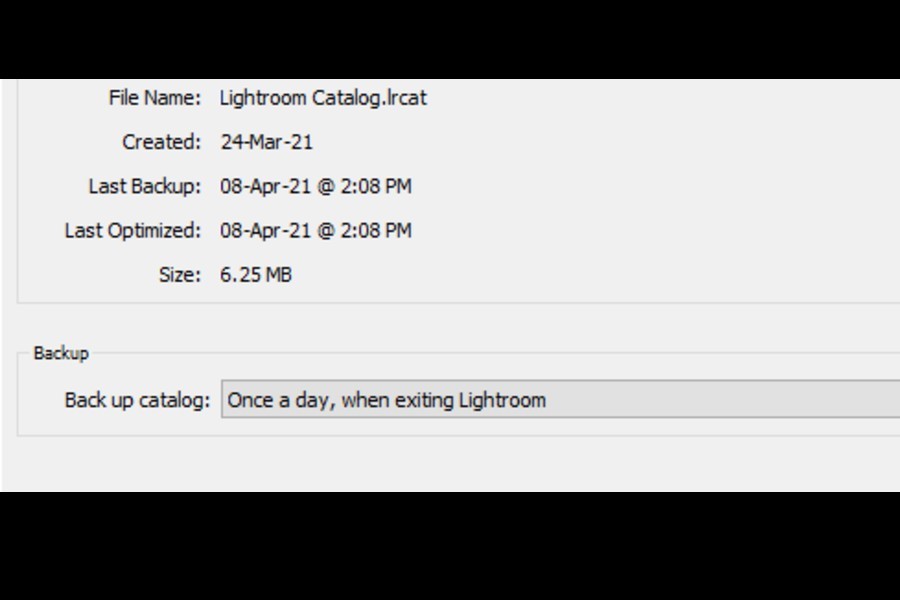
It is recommended to backup your Lightroom catalog and image folders before updating the software. It is a precautionary step to keep the catalog and images safe in case of a glitch in the update process.

Quick tip: You can set the backup schedule of your catalog update in the Catalog Settings to once a day when exiting Lightroom, or once a week. 

Setting the backup schedule of your catalog update in the Catalog Settings

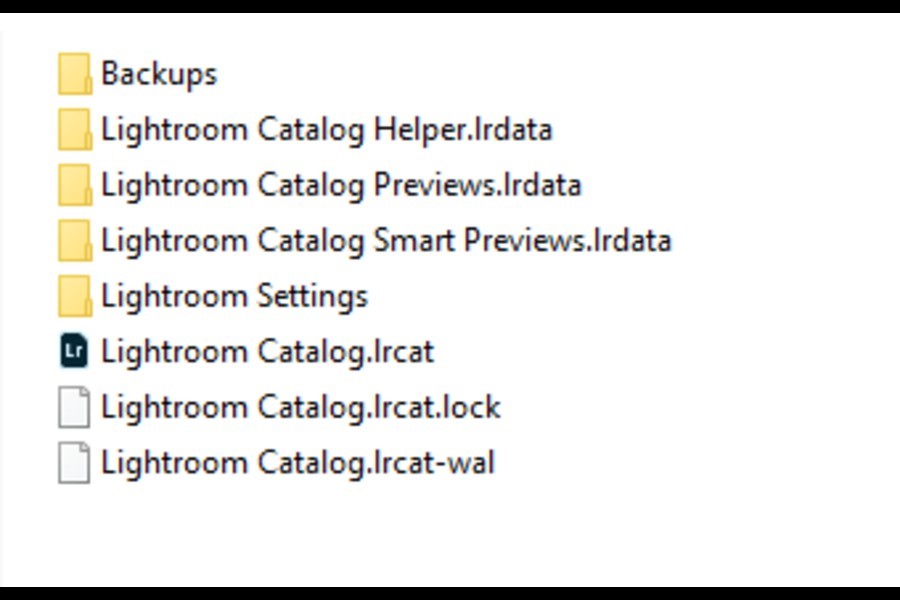
Sometimes, when you update Lightroom, it doesn’t locate your catalog automatically. Therefore, you must know the name of your catalog and where it is saved. 

  1. Go to the Edit menu on Windows and Lightroom Classic Menu on Mac.
  2. Click on Catalog Settings.
  3. Open the General tab in the dialog box.
  4. View the location where your catalog is saved. Note the name of your catalog as well.
Viewing the location where your catalog is saved
  1. Back up your Catalog file with the .lrcat extension. It might take longer if you have a large catalog.
  2. You can also move your catalog to an external hard drive at this point. 

Step 3: Update Lightroom Classic From the Adobe Creative Cloud Application

Whenever Adobe rolls out a new version of Lightroom, you will be notified about it. To get auto-updates, your auto-update checking option should be enabled. Under the Edit menu (PC) or Lightroom menu (Mac), go to the preferences tab. Tick the checkbox for “Automatically check for updates.”

To check for the updates manually, you can go to the Help menu and click on Updates.

Updating Lightroom Classic from the Adobe Creative Cloud Application

After that, go to the Adobe Creative Cloud Installer App.

  1. Sign in to your Creative Cloud account.
  2. Check under the Creative Cloud Manager app window, you will see an Update option besides Lightroom Classic. If you aren’t able to see the update option here, it means that your Operating System needs to be updated to fulfill the requirements of the new version.
  3. Click on it, and the process to download and install the new version of Lightroom Classic will begin.
  4. Once the download is complete, you will be able to see it on your desktop.

Step 4: Upgrade Your Lightroom Catalog to the New Format

The next step in the process to update Lightroom is to convert your Lightroom catalog to the latest database format. 

  1. Launch the new version of Lightroom on your computer.
  2. You will get a notification box asking you to confirm the catalog that you want to upgrade. If it is the wrong catalog go to Choose a different catalog option to open the correct one. 
Upgrading Lightroom catalog to the new format
  1. Here is where taking note of the name of your catalog is helpful. Double-check the name and make sure that it is the same catalog that you wish to use in the latest version. 
  2. Click on Upgrade. After the process is completed without any error, the new version of Lightroom will open.

Step 5: Rename Your Catalog

The upgrade process in the new Lightroom versions changes the name of your catalog by adding a version number to its name. If you want to rename your catalog, here is how to do it.

  1. Under the Edits menu in Windows or Lightroom menu in Mac, go to the Catalog settings.
  2. Click on the General tab.
  3. Select the Show button present besides your catalog location.
  4. A file finder/explorer window will open where your catalog is stored. 
  5. Now exit Lightroom Classic and come back on the explorer window.
  6. You can see that your old catalog is also there in the folder. Rename it by adding anything that tells you that it’s the old one and then move it to the backups folder. 
  7. Now rename your new catalog (by removing the version number attached to it). Make sure not to remove the .lrcat extension accidentally. 
  8. Rename the other folders with the same name as your new catalog name, ensuring that their respective file extensions remain untouched, as shown below.
Rename your catalog when upgrading Lightroom
  1. No double click on the new catalog, and your Lightroom Classic will launch once again.

Step 6: Set the Preferences and Backup Settings in the New Version 

  1. Open the Lightroom Classic menu on Mac, or Edits menu on Windows.
  2. Go to the Preferences.
  3. Choose the General tab.
  4. Set the preference for Default Catalog. Select the catalog that you just renamed a while ago.
  5. Make sure the Auto check for updates option is checked.
  6. Click on Ok if you are a PC user, or close the tab if you are using Mac. 

Conclusion

Updating to the newest version of Lightroom is not a complicated process, though you must make sure you have backed up everything beforehand. Your Operating System must be compatible with the Lightroom Classic’s prerequisites. The new versions have better performance and security, therefore upgrading is highly recommended.

Vendors

Rela Logo
CS6 PSE Logo
HD Photo Hub Logo
FullFrame Logo

Learning Topics

.
magnifiercrossmenucross-circle