PFRE-Logo-white-bg
Reading
blue-triangle-element

Articles

PFRE is the original online resource for real estate and interior photographers. Since 2006, it has been a community hub where like-minded professionals from around the world gather to share information with a common goal of improving their work and advancing their business. With thousands of articles, covering hundreds of topics, PFRE offers the most robust collection of educational material in our field. The history of real estate photography has been documented within these pages.
All Articles
blue-triangle-element

Latest

Image banner for the March 2024 PFRE Photographer of the Month Winner Alex Vincent, with a featured image of his winning photo titled "Kitchen."

Congratulations Alex Vincent, March 2024 PFRE Photographer of the Month! The theme this month was "Kitchen". Alex Vincent - #906 Yvonne Raaijmakers - #909 Peter Wingfield - #902 Here's what Alex has to say: Thank you for the award of Photographer of th ...

Contest
blue-triangle-element

OVERVIEW

For over a decade, photographers from around the world have participated in PFRE’s monthly photography contests, culminating in the year-end crowning of PFRE’s Photographer of the Year. With a new theme each month and commentary offered by some of the finest real estate & interior photographers anywhere, these contests offer a fun, competitive environment with rich learning opportunities. 

Contest Rules
blue-triangle-element

CURRENT CONTESTS

View / Submit
blue-triangle-element

PAST CONTESTS

View Archive
Resources
blue-triangle-element

Resources

PFRE prides itself on the depth and breadth of the information and professional development resources it makes available to our community. Our goal is to help real estate and interior photographers be successful while bringing the community together and elevating the industry as a whole.
blue-triangle-element

Conference News

No items found

How to Resize in Lightroom

Published: 04/05/2021

As an Amazon Associate we earn from qualifying purchases.

Image size and dimension is a vital aspect in photography. Specific uses like print, web, and social media posting require specific sizes that give rise to the need to resize your images accordingly. Understanding how to resize in Lightroom will give you total control over your image and file sizes. 

How to Resize in Lightroom During Export

Cameras these days allow you to capture images in a high number of pixels and resolution. This results in ultra-sharp images. However, the issue with big image files is that they have a negative impact on the loading speed of the website to which you add them. Also, most social media platforms don’t accept these high-resolution photos.

There is a reason why web or social media posting requires specific image sizes. Large images, when compressed automatically, look bizarre. This negates the purpose of compelling visuals. Therefore, it is always wise to check the particular size requirement of every platform before you upload an image

Adobe Lightroom Classic CC is based on the concept of non-destructive editing. This means that resizing your photos using the software won’t affect the original photos. The original file remains safe on your drive, while Lightroom will generate a preview of your desired size, which you can then export and use.

You can even resize multiple photos at once, streamlining your post-production workflow. Let’s walk through the image resizing process in Lightroom.

Step 1: Select Images to Import

In Lightroom, you will have to import the images, make any changes to them using the Develop module, and export them out of Lightroom using the Export dialog where the resizing feature is available.

  1. Open Adobe Lightroom Classic CC.
  2. Click on the Import Button found on the left-hand side.
  3. Select your images from the desired source.
  4. Use the Import dialog for extensive options of preview generation, naming, and file handling.
  5. Click on Import. Your images will be added to the Lightroom catalog. 
Selecting images to be edited and resized in Lightroom

Step 2: Edit the Images Using Develop Module

The resizing option is in the Export dialog. But before that, you can take your images to the Develop module to edit them using basic adjustments. Or, you can apply any preset to all of the images for quick editing. If you want to skip editing, you can go ahead and directly export them. 

Step 3: Export Your Images 

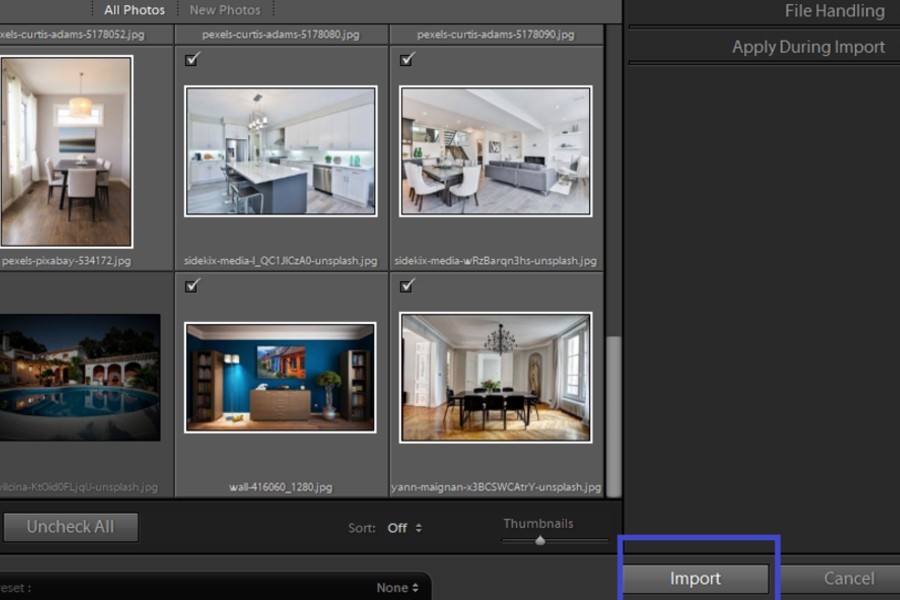
Once you have imported and edited the images, it’s time to export them. Select the images using the options below:

  1. Click on CTRL + A (on Windows) or CMD + A (on Mac) to select all.
  2. Click on an image, hold down SHIFT, and click on the last image to select a consecutive series.
  3. Click on CTRL (on Windows) or CMD (on Mac), and select the desired photos by clicking on them.
  4. Click on Export (the button is present on the left-hand side in the Library module). Or you can use the keyboard shortcut CTRL + SHIFT + E (on Windows) or CMD + SHIFT + E (on Mac).
Select photos to be exported in Lightroom
  1. In the Export dialog that opens, you will find a number of options, including Export Location, File Naming, File Settings, Image Size, Output Sharpening, Metadata, and Watermark. Among these, the file settings and image size sections allow me to resize the images for varying uses.
  2. You can use the File naming section to add the size specification of the images. This will help you identify the image according to the size easily in your drive folder. 

Step 4: Determine File Size

Keeping the boxes for image size and file size separate, Lightroom reminds me that resizing both these settings has a completely different effect on the image.

Resizing the file allows me to determine the quality of the exported image. In the File Settings box, you get the following option to choose:

Determining the quality of the exported image
  • Image Format: Lightroom allows you to convert your images in JPEG, PSD, TIFF, PNG, DNG, and Original formats. The JPEG format is used both for print and web so that you can select it. Also, DNG is the smallest file format among these, plus it is the standard format for Adobe software.
  • Color Spacing: The color spacing allows you to prepare your image's color profile for the web. You can select the sRGB option here as it is supported by all of the best monitors.
  • Quality: Reducing size without affecting the quality is the main objective of resizing. You can increase or decrease the quality of the image using the Quality slider.

Step 5: Determine the Image Size

This is the section where you can manipulate the image size and reduce it from the full-sized version. You will see several measuring options to resize your exported image. First, click on the checkbox Resize to Fit. After that, choose any of the options mentioned below.

Manipulating the image sizing in Lightroom

Measuring Systems

  • Width and Height: You can choose the width and height option when you know the exact dimensions required. Make sure to balance the aspect ratio correctly. 
  • Dimensions: Choosing Dimensions will signal Lightroom to resize each image close to the current aspect ratio. For instance, if the dimensions are 900 x 600 pixels, the images may be lower than that but will not exceed this aspect ratio.
  • Long Edge: In the long edge option, you get to specify the longer edge, and Lightroom will set the size of the other dimension automatically. 
  • Short Edge: Here, you need to set the size for the shorter edge of the image, and Lightroom will choose the other edge's size itself. Both the Long edge and Short edge options are suitable to use for web posting.
  • Megapixels: The megapixels combine both image dimensions into one number. This measurement is used by camera companies to describe their image quality. Remember that reducing the image size with this option will alter the image quality as well. 
  • Percentage: This option allows you to resize your image according to a percentage.

Image Resolution

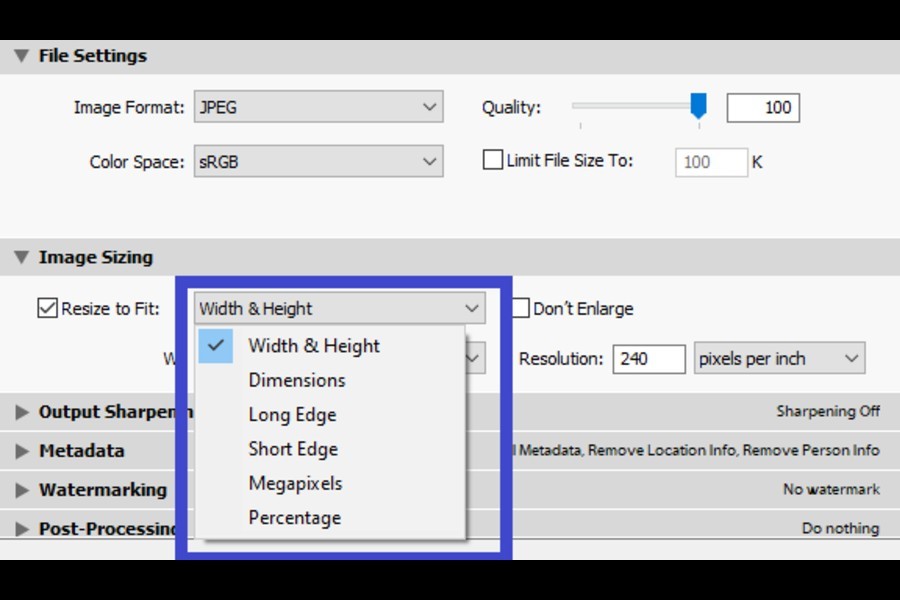
The resolution of an image is simply the number of pixels per inch. If you are exporting your image for print, the suggested resolution is 300. Whereas, 72 is the standard resolution for digital images.

Create Export Preset for Quick Resolution

Anyone new to Lightroom may find it perplexing why the image resize feature is hidden in the export dialog. You may feel that such factors make Lightroom a bit difficult to master, but you can't deny that it actually provides a way better and practical approach to features like resizing. 

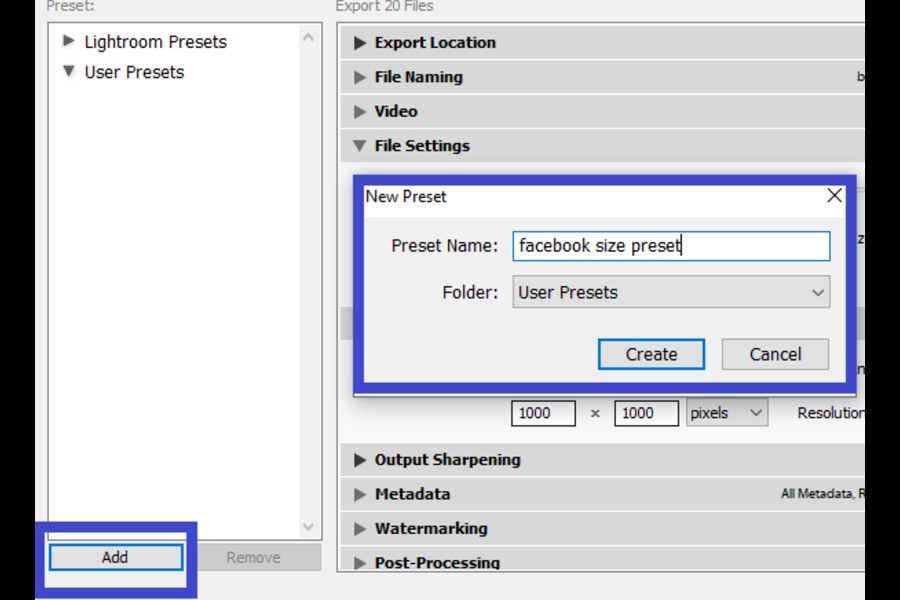
Besides resizing images to your required dimensions, Lightroom gives you the ease of creating these settings as a preset. You can use specified resizing settings for specific uses. For instance, if you adjust the images according to Facebook's recommended size, save them as a "Facebook size" preset.

Click on the Add button below the presets panel in the Export dialog. Name your export preset and click on Create. Next time you need similar resizing, it will be a matter of a click and you'll be done. 

Naming the export preset in Lightroom

Frequently Asked Questions

How Do I Check Pixel Dimensions of An Image in Lightroom?

You can check the actual pixel dimensions of the image when you import it in Lightroom. To do so, select your image in the Loupe view of the Library module. Press I, and you will see the file name, date, time and pixel dimensions of your image.

Press I again to view some more info regarding image capture. Disable the information view by pressing I for the last time.

Does Lightroom Overwrite Original Images While Resizing? 

No, it does not overwrite the original image. Lightroom's non-destructive editing preserves the original photo and applies the resize settings on a preview which you can then export as a separate file. 

Conclusion

The image resizing process in Lightroom is a comprehensive way that gives you higher control on the final exported image. I hope that the in-depth instructions above will simplify the process for you and you will be able to reduce image size accurately.

Vendors

Rela Logo
CS6 PSE Logo
HD Photo Hub Logo
FullFrame Logo

Learning Topics

.
magnifiercrossmenucross-circle