PFRE-Logo-white-bg
Reading
blue-triangle-element

Articles

PFRE is the original online resource for real estate and interior photographers. Since 2006, it has been a community hub where like-minded professionals from around the world gather to share information with a common goal of improving their work and advancing their business. With thousands of articles, covering hundreds of topics, PFRE offers the most robust collection of educational material in our field. The history of real estate photography has been documented within these pages.
All Articles
blue-triangle-element

Latest

Image banner for the March 2024 PFRE Photographer of the Month Winner Alex Vincent, with a featured image of his winning photo titled "Kitchen."

Congratulations Alex Vincent, March 2024 PFRE Photographer of the Month! The theme this month was "Kitchen". Alex Vincent - #906 Yvonne Raaijmakers - #909 Peter Wingfield - #902 Here's what Alex has to say: Thank you for the award of Photographer of th ...

Contest
blue-triangle-element

OVERVIEW

For over a decade, photographers from around the world have participated in PFRE’s monthly photography contests, culminating in the year-end crowning of PFRE’s Photographer of the Year. With a new theme each month and commentary offered by some of the finest real estate & interior photographers anywhere, these contests offer a fun, competitive environment with rich learning opportunities. 

Contest Rules
blue-triangle-element

CURRENT CONTESTS

View / Submit
blue-triangle-element

PAST CONTESTS

View Archive
Resources
blue-triangle-element

Resources

PFRE prides itself on the depth and breadth of the information and professional development resources it makes available to our community. Our goal is to help real estate and interior photographers be successful while bringing the community together and elevating the industry as a whole.
blue-triangle-element

Conference News

No items found

How to Apply a Preset to Multiple Photos in Lightroom

Published: 20/04/2021

As an Amazon Associate we earn from qualifying purchases.

Did you know that in Lightroom, you can apply similar editing effects to many photos within minutes? This is what a quick and efficient editing procedure is all about. You just need to learn how to apply a preset to multiple photos in Lightroom to give them a uniform look in a few clicks. 

How to Apply a Preset to Multiple Photos in Lightroom

Lightroom presets are a fast way to apply the desired editing effects to your photos. For beginners who still need to master the Develop module editing, presets are convenient to edit the photos without struggling with the numerous sliders. Even professional photographers use presets for batch editing photos.

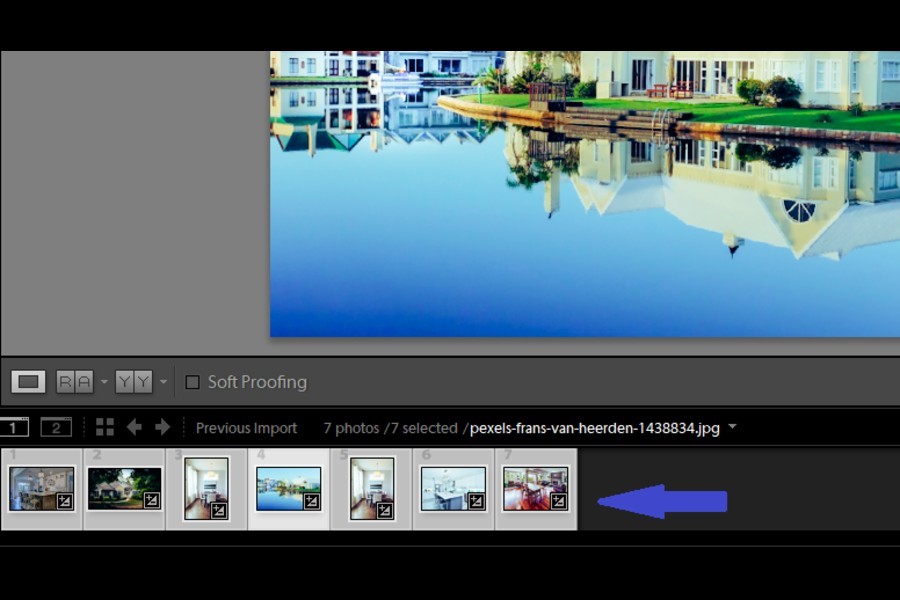
If that wasn’t helpful enough, Lightroom streamlines the editing workflow even more by allowing me to apply a preset to multiple images in one go. You can apply a preset to abundant photos while importing them, in the Grid View of the Library or in the Filmstrip view in Develop module. 

You can download free or paid presets to apply them later on multiple images. Or, you can create one of your own by editing a photo according to your preference and saving the adjustments as a preset. 

Applying Presets to Multiple Photos During Import

  1. Once you are in the Library module of Lightroom, click on the Import button at the bottom left of your window. 
  2. Look for the Apply during Import option on the right-hand side of the import module.
Apply During Import option on the right-hand side of the import module in Lightroom
  1. Under Apply during Import, from the drop-down menu of the Develop Settings, select a preset of your choice.
  2. Click on Import.
  3. Lightroom will automatically import the images with the preset applied to each of them. 

Applying Preset to Multiple Photos in the Develop Module 

The Develop module of Lightroom is where all the editing magic happens. There are a lot of different effects that you can apply to your photos here and save them as a preset. However, it is a tedious process, especially if you edit each image individually.

What you can do instead, to save time, is to apply a preset to one image and then apply the same effects to multiple photos. If you aren't completely satisfied, you can make some tweaks here until you are able to get the desired effect.

After applying the preset and additional editing, follow the steps mentioned below.

  1. Go to the filmstrip view of all your images’ thumbnails under the main editing interface of your Develop module.
Selecting multiple images in filmstrip view before applying presets in Lightroom
  1. Start selecting the photos from the filmstrip on which you want to apply the preset. 
  2. Suppose you want to select all photos, press CMD+A (on Mac) or CTRL+A (on windows). All images will be selected.
  3. If you want to select images in a sequence, click on one image, hold SHIFT, and click on the last image. Consecutive photos will be selected.
  4. If you want to select images that are not placed next to each other in the film strip, hold the CMD key (on Mac) or CTRL key (on Windows) and start clicking on the desired photos one by one. 
Selecting images in Lightroom that are not placed next to each other in the film strip
  1. Click on the Sync button on the bottom right corner.
Sync button in Lightroom
  1. From the dialogue box, choose the edits that you want to apply to the images. 
  2. Click on Synchronize.
Choosing the edits that you want to apply to the images
  1. Your preset will be applied to the images that you have selected. 

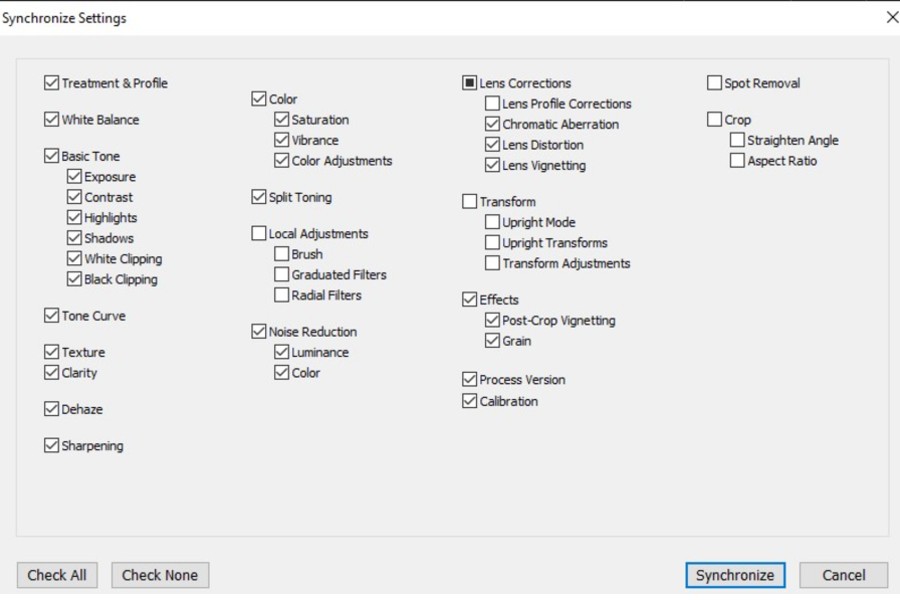
Remember not to copy any local adjustments that you have made in the active image. It won’t make any sense to apply the edits made with the Graduated Filter, Radial Filter, or the Adjustment brush to all images. Just uncheck them in the Synchronization settings. 

Applying Preset to Multiple Photos in the Library Grid 

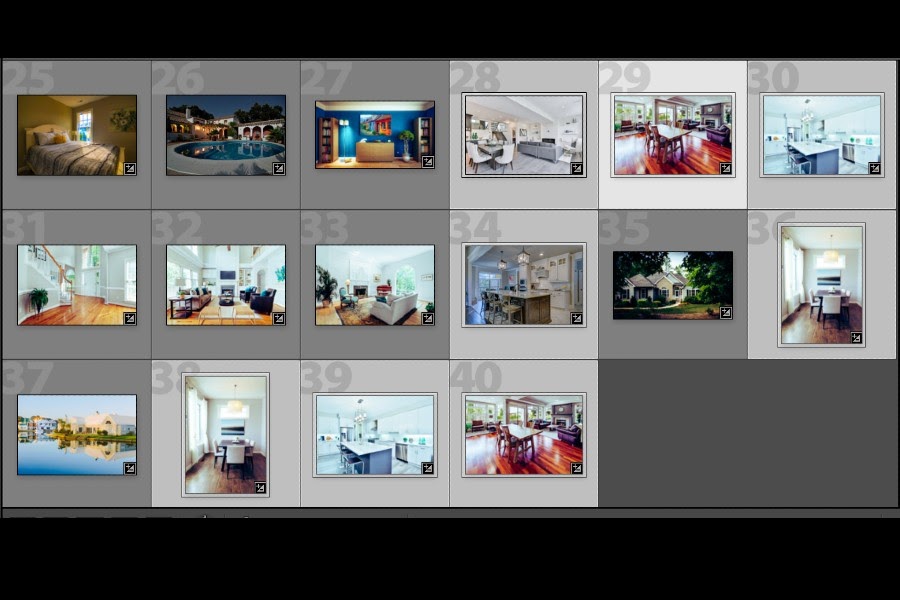
Making the most of the thumbnail grid in the Library module is a trick to become a Lightroom Expert. Here is another quick way to use a preset on a number of photos at once. 

  1. Open the Library module in Lightroom Classic CC.
  2. Click on the Grid View button located on the bottom panel or press G on your keyboard.
  3. Start selecting photos in the grid on which you need to apply a preset.
  4. Refer to point number 3,4, and 5 in the previous section to know how you can select your photos. 
Applying Lightroom preset to multiple photos in the Library Grid
  1. Once you have selected multiple photos, look for the Quick Develop panel on the right-hand side.
  2. Under the Quick Develop panel, you will see the Saved Presets option. 
Saved Lightroom presets in Quick Develop panel
  1. Click on the Saved Presets drop-down menu, and choose a preset.
  2. The editing effects of the preset will be applied to all the photos that you have selected in the Grid View. 

Frequently Asked Questions

What If I Apply The Wrong Preset To The Photos? 

If you accidentally apply a wrong preset on multiple photos, it is very easy to undo your application. First, reset the editing effects made to the photo that you initially worked upon by clicking on the Reset button. 

Now, click on the Sync option again. In the dialogue box, click on the Synchronize button. The previous effects will now be applied again on all the photos you selected. 

How Do You Exclude Any Settings That You Don’t Want To Apply? 

You can easily exclude any settings in the Synchronize Settings. If you apply a preset to your photo and want the same effect on the rest of the images, there may be a few specified editing options that don’t need to be copied. For instance, Spot removal, Local Adjustments, or Radial Filter use

Here is where the checkboxes in the Synchronize Settings dialogue box come into play. Here, you can determine which settings you want to apply to the images and which ones you should exclude.

For example, if you have used the Adjustment Brush to increase exposure in a specific area of a photo. Unless you exclude that local adjustment while syncing the settings, each image will have an unsightly brighter region in that specific area. 

Conclusion

Applying a Lightroom preset to real estate photos will come in handy at times when you need to edit a batch of photos in less time or when you want the whole set of images to get a similar feel. Plus, you don’t have to worry about the number of photos you take as you know that you can edit them in Lightroom Classic CC in very little time. 

Vendors

Rela Logo
CS6 PSE Logo
HD Photo Hub Logo
FullFrame Logo

Learning Topics

.
magnifiercrossmenucross-circle