PFRE-Logo-white-bg
Reading
blue-triangle-element

Articles

PFRE is the original online resource for real estate and interior photographers. Since 2006, it has been a community hub where like-minded professionals from around the world gather to share information with a common goal of improving their work and advancing their business. With thousands of articles, covering hundreds of topics, PFRE offers the most robust collection of educational material in our field. The history of real estate photography has been documented within these pages.
All Articles
blue-triangle-element

Latest

Image banner for the March 2024 PFRE Photographer of the Month Winner Alex Vincent, with a featured image of his winning photo titled "Kitchen."

Congratulations Alex Vincent, March 2024 PFRE Photographer of the Month! The theme this month was "Kitchen". Alex Vincent - #906 Yvonne Raaijmakers - #909 Peter Wingfield - #902 Here's what Alex has to say: Thank you for the award of Photographer of th ...

Contest
blue-triangle-element

OVERVIEW

For over a decade, photographers from around the world have participated in PFRE’s monthly photography contests, culminating in the year-end crowning of PFRE’s Photographer of the Year. With a new theme each month and commentary offered by some of the finest real estate & interior photographers anywhere, these contests offer a fun, competitive environment with rich learning opportunities. 

Contest Rules
blue-triangle-element

CURRENT CONTESTS

View / Submit
blue-triangle-element

PAST CONTESTS

View Archive
Resources
blue-triangle-element

Resources

PFRE prides itself on the depth and breadth of the information and professional development resources it makes available to our community. Our goal is to help real estate and interior photographers be successful while bringing the community together and elevating the industry as a whole.
blue-triangle-element

Conference News

No items found

How to Save Presets in Lightroom

Published: 15/06/2023

As an Amazon Associate we earn from qualifying purchases.

After a long day of photoshoots, you may need to cull and post-process hundreds to thousands of real estate images. You can speed up your workflow by adding consistent edits when you have saved presets. Learn how to save presets in Lightroom to use them whenever you edit.

How to Save Presets in Lightroom

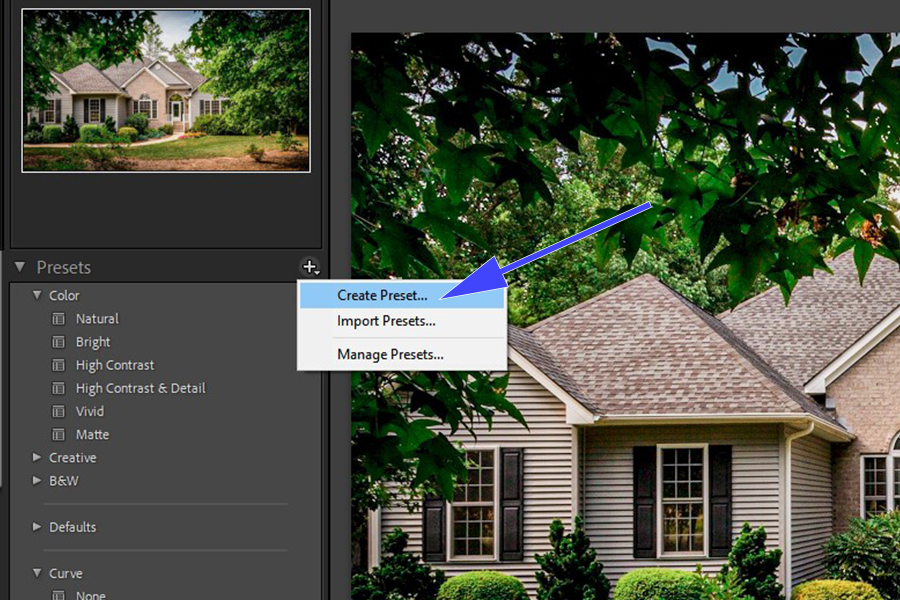
To save presets in Lightroom, go to Lightroom's Presets tab, click the + icon, and select Create Preset from the drop-down menu. However, you must first edit an image using the settings you want to create a preset.

While editing your photos in Lightroom Classic CC is fun, it takes some practice to master the adjustments. It is the art of balancing the exposure, temperature, saturation, and several other sliders to give the right effects on pictures. Once you find your style, you can save and use the settings anytime.

Step 1: Create Your Preset in Lightroom

While several real estate presets are available to buy and download, sometimes they don’t have the specific look you’re trying to achieve. The good news is Lightroom allows you to create your custom presets.

  1. Open Lightroom Classic CC.
  2. Open the Library Module and Import your image.
  3. Switch to the Develop Module, where you will edit the photo.
Develop module in Lightroom

Step 2: Make Adjustments to the Image

Before editing an image, it’s good to have a clear goal regarding what type of look and feel you wish to achieve after editing.

For example, you may want to bring vintage vibes to a vibrant home taken near the ocean. Or, you may wish to change an image’s tone from sharp to soft and dreamy. After you import the image from the library and enter the Develop module, go on to make the adjustments to the picture.

Adjusting sliders in Basic Panel before saving lightroom presets

You can make edits, including adjusting the sliders in the Basic Panel, changing the Tone Curve, moving HSL sliders, and increasing the sharpness of your image.

Create and Save Lightroom Presets With Other Tools

You can also create presets using the Adjustment Brush, the Graduated Filter, and the Radial Filter tool. These tools provide exact effects to areas where you apply the mask. 

If you create presets using these tools, they will be beneficial for giving instant touches to your photo’s specific areas, like brightening the eyes.

  1. Select the Adjustment Brush in the Develop Module.
  2. Make your desired changes by adjusting the sliders and using the brush on the image.
  3. From the Effects dropdown, choose Save Current Settings As New Presets.
Selecting Save Current Settings As New Presets option in Lightroom
  1. Type a name for the Adjustment Brush Preset.
  2. Click Create.
  3. You will now see your new preset in the Effects Dropdown of the Adjustment Brush.

Step 3: Save the Preset

After editing the image to your liking, it’s time to save the edits as a preset. Simply follow these steps to save the preset.

  1. On the right-hand side, you will see a Presets tab under the Navigator. 
  2. Click on the + icon beside the Presets tab. 
  3. From the drop-down, select Create Preset.
Create Preset option from the drop-down menu
  1. A window will allow you to name your preset and select the folder. By default, Lightroom Classic CC saves the presets you create in the User Presets folder. However, you can go on to create a separate folder and save the presets to organize them properly.
Window showing option to name your preset and select a folder
  1. Choose the adjustments you wish to save in the preset by clicking on the correct checkboxes. You can choose to check all of the edits you made to the image, or you can decide only to include specific edits.
  2. Click Create. It will appear in the drop-down of the Presets tab, ready for use.
Newly saved preset appearing under User Presets

Step 4: Update Your Saved Preset

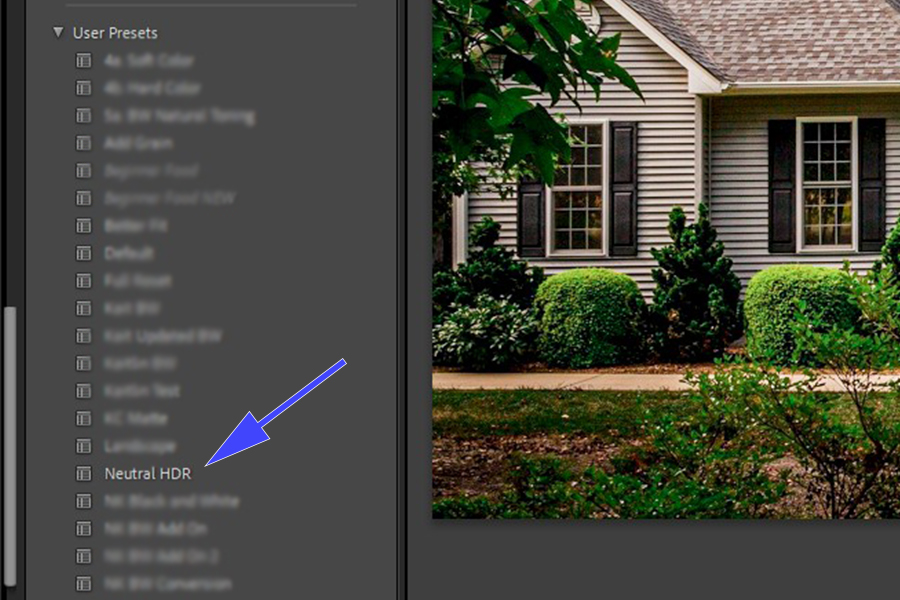
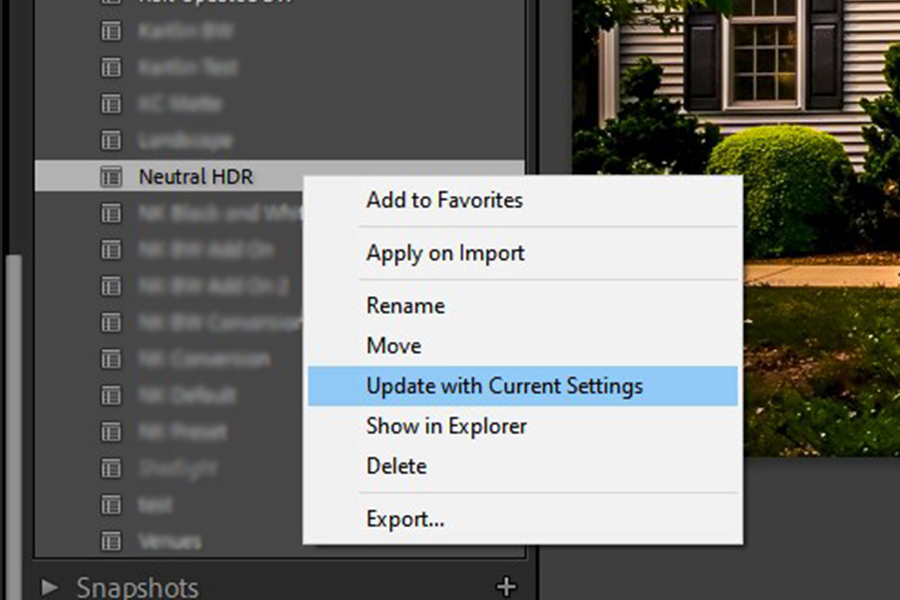
Sometimes, you may wish to make some adjustments to your preset or create a slightly different version to add to your presets pack. Lightroom Classic allows you to update the adjustments very quickly.

  1. Apply the preset to an image.
  2. Make adjustments to the settings to your liking.
  3. In the Presets tab, right-click on the preset you want to update.
  4. A drop-down will appear where you must select the Update With Current Settings option.
Selecting the Update With Current Settings option after saving a preset in Lightroom
  1. Click on Update in the window. Your preset is now updated.

Conclusion

In Lightroom Classic CC, creating and saving a preset is not complicated. If you love the effects you have added to a photo and want to save it, you simply need to follow the steps mentioned above. You can then apply it to images in Lightroom with just a click. 

Vendors

Rela Logo
CS6 PSE Logo
HD Photo Hub Logo
FullFrame Logo

Learning Topics

.
magnifiercrossmenucross-circle