PFRE-Logo-white-bg
Reading
blue-triangle-element

Articles

PFRE is the original online resource for real estate and interior photographers. Since 2006, it has been a community hub where like-minded professionals from around the world gather to share information with a common goal of improving their work and advancing their business. With thousands of articles, covering hundreds of topics, PFRE offers the most robust collection of educational material in our field. The history of real estate photography has been documented within these pages.
All Articles
blue-triangle-element

Latest

Image banner for the March 2024 PFRE Photographer of the Month Winner Alex Vincent, with a featured image of his winning photo titled "Kitchen."

Congratulations Alex Vincent, March 2024 PFRE Photographer of the Month! The theme this month was "Kitchen". Alex Vincent - #906 Yvonne Raaijmakers - #909 Peter Wingfield - #902 Here's what Alex has to say: Thank you for the award of Photographer of th ...

Contest
blue-triangle-element

OVERVIEW

For over a decade, photographers from around the world have participated in PFRE’s monthly photography contests, culminating in the year-end crowning of PFRE’s Photographer of the Year. With a new theme each month and commentary offered by some of the finest real estate & interior photographers anywhere, these contests offer a fun, competitive environment with rich learning opportunities. 

Contest Rules
blue-triangle-element

CURRENT CONTESTS

View / Submit
blue-triangle-element

PAST CONTESTS

View Archive
Resources
blue-triangle-element

Resources

PFRE prides itself on the depth and breadth of the information and professional development resources it makes available to our community. Our goal is to help real estate and interior photographers be successful while bringing the community together and elevating the industry as a whole.
blue-triangle-element

Conference News

No items found

How to Remove Shadows in Lightroom

Published: 17/10/2023

As an Amazon Associate we earn from qualifying purchases.

Harsh shadows can be distracting, drawing attention to areas of a real estate image that are not meant to be the focal point. Here is a step-by-step post-production guide on how to remove shadows in Lightroom to help balance the light and dark tones in real estate photos.

How to Remove Shadows in Lightroom

To remove shadows in Lightroom, you must first make global adjustments, enhance the contrast, and use the Adjustment Brush tool to brighten up shadowed areas. Use the Eraser tool to refine edits, use the Color Grading tool, and balance the Color Temperature. You'll also need to mask out the bright parts and fine-tune the Vibrance.

Incorrect flash output settings and improper camera settings can create dark shadows in your real estate shots. The good thing is that when post-processing images in Lightroom, you have several tools to eliminate hard shadows that obscure the details of your photos.

Step 1: Move the Shadows Slider to Make Global Adjustments

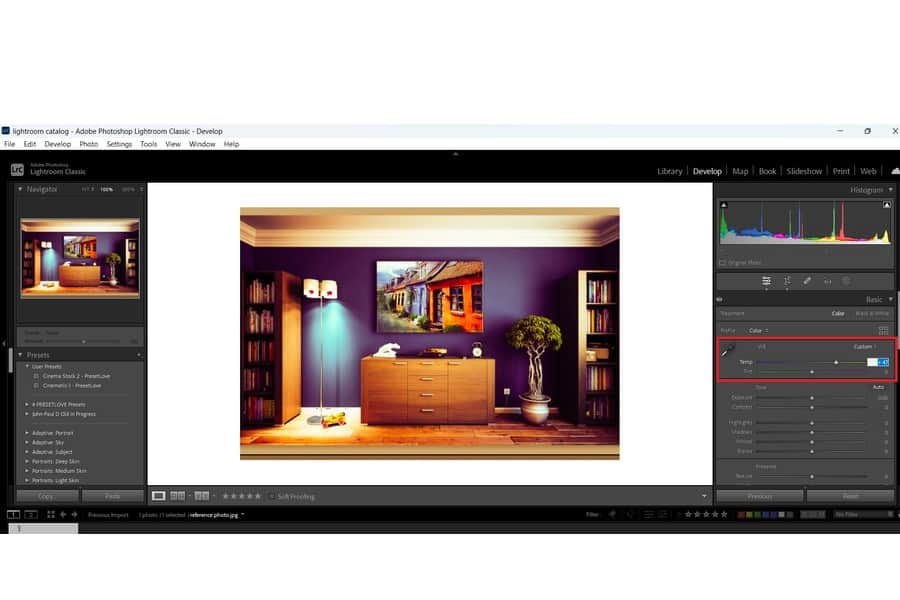
After launching Adobe Lightroom Classic CC, import an image to the Library Module.

Import the image to remove shadows in Lightroom
  1. Click on the Develop Module. This is the editing interface where you will do the shadow adjustment and global adjustments.
  2. On the right-hand side, you will see a panel with a number of sliders. Use the Shadow slider to add or take out details in the dark areas of the image. 
Adjusting sliders in Lightroom Basic Panel
  1. Drag the Feather slider to +100. Turn on Auto-Mask. 
  2. Increase the Shadows slider by setting the value to +100. However, this may create unwanted noise if the shadows are underexposed.
  3. Slightly increase the Blacks slider to minimize the noise. You can also use this slider to save some shadow details.
  4. Decrease the Contrast to bring out some details and original highlights that were otherwise obscured due to the shadows.
  5. Try decreasing the Highlights by moving the slider to -50.
  6. Increase the overall exposure to balance the effects of the highlights. This makes the brightest parts of your image closer in Luminance value to the darker areas of the photo.
Adjusting the sliders to remove shadows in Lightroom

Consider making local adjustments if you still need to achieve your desired results by making global adjustments.

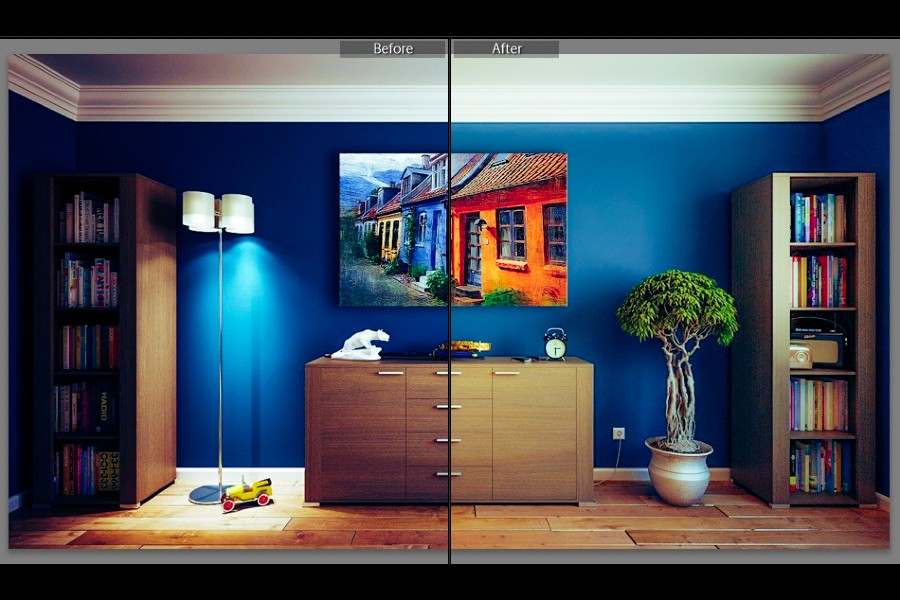
As you can see, I removed the shadow areas' dark look by adjusting the basic sliders. The overall brightness and contrast need some improvement to make the image clearer.

Before and after adjusting brightness and contrast in Lightroom

Step 2: Balance the Highlights and Color Cast Using Local Adjustments

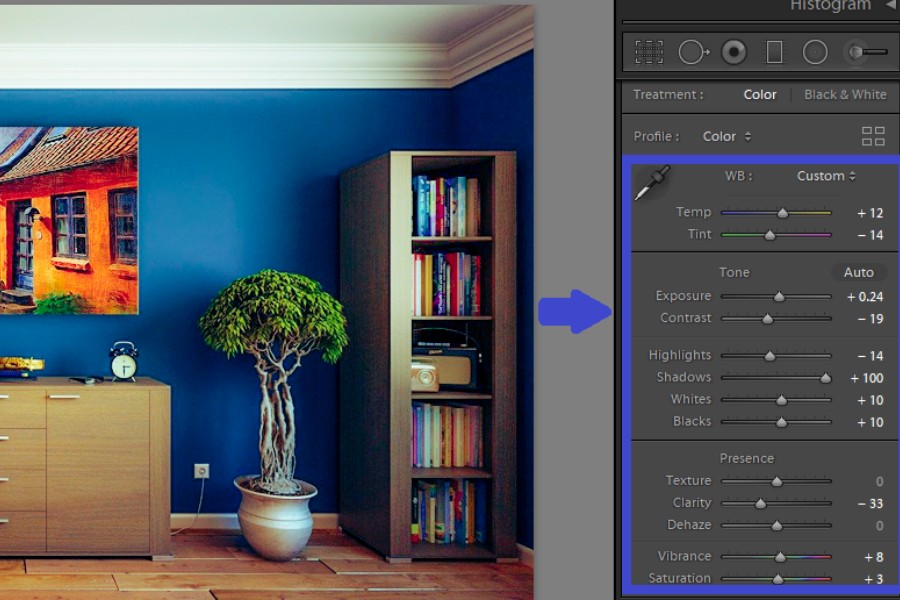
Suppose the shadows you need to remove come from harsh sunlight. The problem is that the bright parts of an image typically have a different color temperature than the shadows. 

If you simply brighten up the shadows, the highlights would have a warmer color toner than the specific areas you just brightened. This is an essential step to enhance the contrast while eliminating unwanted shadows in images.

  1. Adjust the Tone slider to a yellower tone until the two shadow areas blend more naturally.
  2. Decrease the Tint slightly.
  3. Come down to the Presence section of the panel.
  4. Adjust the Clarity and Vibrance to rectify the haziness caused by decreasing the Contrast and Highlights.
Adjusting the Tone and Presence to remove shadows in Lightroom

See how the above changes significantly reduced the shadows.

Before and after slider adjustments in Lightroom

Step 3: Use the Adjustment Brush Tool

When removing shadows, the Brush tool can significantly eliminate darker areas, whether the image was shot in natural light or not.

  1. Under the Local Adjustments, select the Brush under the Histogram at right) from the Develop panel. Simply click on the brush icon to pick it.
  2. Play around with the brush settings until you get the appropriate brush size. 
  3. For the best brush effect when using the brush tool, increase Feather to the maximum limit before brushing.
  4. Turn the Auto-Mask on as it helps avoid selecting unwanted areas in the image. This helps to apply the brush effect much easier. 
  5. Using the slider, increase the Shadows to +100
  6. Press the O key on your keyboard to turn on the overlay. You will now be able to see where the mask is being applied.
Using the Adjustment brush for specific shadowed areas
  1. Start brushing the darker parts of your image. The shadow adjustment allows you to only edit the shadow areas without affecting others. 
  2. Once you are through, turn off the Overlay by pressing the O key on your keyboard to view the effects on the image.
  3. Increase the Exposure slider if you are not happy with the results. However, the Exposure slider can sometimes give your picture an unnatural look. In this case, you may duplicate the brush effect after adjusting the shadows before adjusting the slider.

Remember that the exposure changes you make will affect the overall image. However, you should see more details that were darker in the original image.

Before and after using Global adjustments and Adjustment brush to reduce shadows in Lightroom

Step 4: Erase to Refine the Brushed Parts

Suppose you forgot to switch the Auto-Mask feature and mistakenly used the Brush tool on areas of the image that did not require editing. You can rectify the mistake by changing the brush mode to erase.

  1. Switch off the Auto-Mask, and turn the Overlay feature on.
  2. Using the feathered edge of your brush, start brushing over the areas you did not want to edit.
  3. With most images, the process stops after changing the brush mode to erase. This should let you keep some shadow details while toning down the darker parts of an image.
Split toning panel in Lightroom

Step 5: Adjust the Color Grading Panel

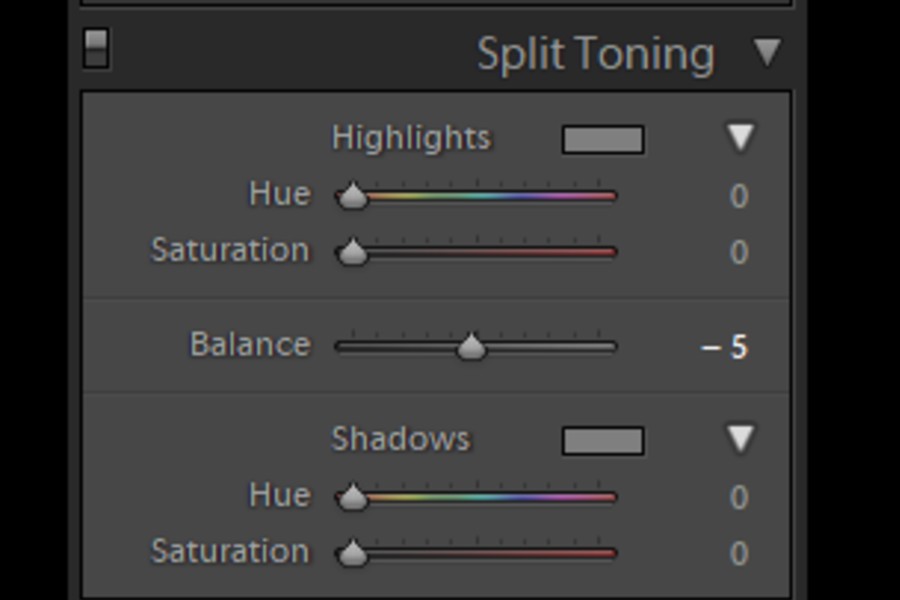
The Color Grading panel can help bring remarkable opacity changes in an image affected by dark shadows. 

Suppose the Basic sliders and using brush adjustment when editing have affected the color of the entire image. Fiddle with Color Grading until you see a noticeable difference. 

  1. Go to the Develop toolbar and look for the Color Grading section.
  2. Pick Orange if you want to create a glowing look. Opt for Brown to create a sepia effect.
  3. Open the Color Picker and use the sliders to select the color you want to add to the shadows.
  4. Use the Balance slider to make your chosen colors more prominent than the others. For example, move the Balance slider to the left side to make the shadow's colors more pronounced. Drag the slider to the right to increase the amount of shadows.
A photo of a room being edited on Lightroom

Learning how to remove shadows in Lightroom involves using the right settings. In this way, you can change the feel of your image without affecting the natural lighting.

Step 6: Balance the Color Temperature

In most cases, an image shot in harsh sunlight will have different color temperatures in its bright areas and darker parts. Typically, brightening up the shadows makes the original highlights appear much warmer in color tone than the parts you brightened. 

A photo of a room being edited on Lightroom software showing the temperature options
  1. Balance the highlights by selecting the Brush adjustment from the Develop Panel again.
  2. Increase the color warmth in specific regions using the Temp slider in the White Balance section of the Basic Panel. You may also bring up the overall exposure of the image, although you need to adjust the Highlights carefully to prevent them from blowing out.
  3. Increasing the warmth requires moving the Temp slider towards the yellow side to make the highlights have the same color temperatures as the shadows. 

Step 7: Mask Out the Bright Parts

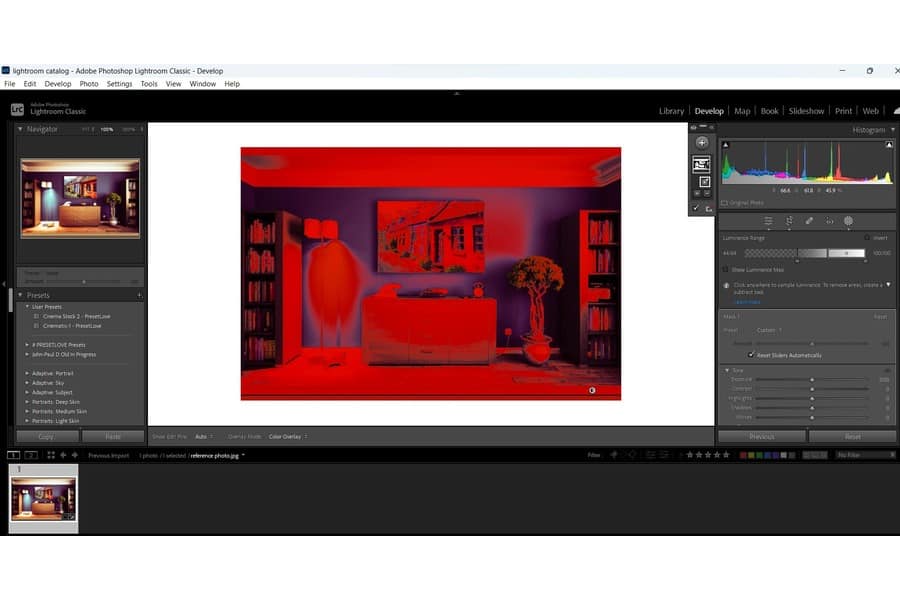
The Range Mask technique protects the brightest parts of your photo from being affected by the Brush tool when making your edits. 

  1. To mask out the highlights, go to the Develop Module.
  2. Select Linear Gradient (formerly the Graduated Filter option) to open up the Range Mask menu.
A photo of a room being edited on Lightroom software showing the luminance range

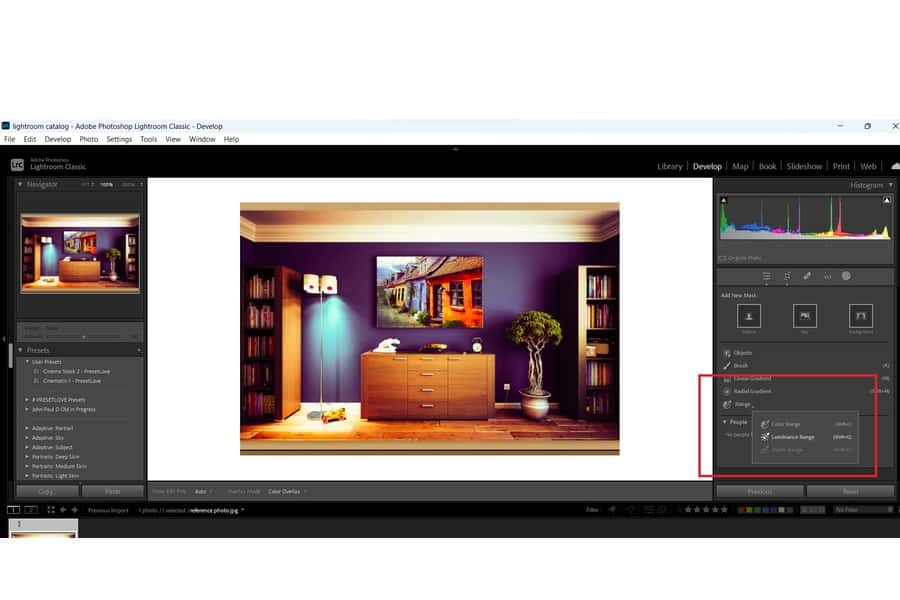
Choose Luminance from the menu to mask out the brightest parts of your image depending on the brightness levels, mainly if the Exposure slider was among the brush settings you used.

Step 8: Improve the Color Vibrance to Balance the Overall Tone

Once you've adjusted the Luminance value, the final touch is to move the Vibrance slider to balance the desaturation in heavily edited images. After that, you can view the before and after photos by clicking on YY.

A photo of a room being edited on Lightroom software showing the vibrance options

With the Range Mask technique, you can also remove the Brush adjustments from the brightest parts of a photo. Lightroom will calculate the luminance value and determine where you should not apply the effect in an image.

Step 9: Fine-Tune Using the Luminance Range Mask

Lightroom can also automatically select the shadows you need to remove in an image using the Luminance Range Mask feature.

  1. Click the Masking icon and select Luminance Range
  2. Wait for the cursor to transform into an eyedropper.
  3. Click on the specific areas of the image with shadows.
  4. Wait for Lightroom to select everything else with a similar luminance value.
  5. Apply the edits to those areas, similar to what you need with the Brush adjustment.
A photo of a room being edited on Lightroom software showing the reset slider options

Related Questions

Why Are There Light and Dark Tones In My Photo?

A photo gets dark and light tones when light doesn't hit every area in a shot the same way. The absence of light forms shadows in specific areas of an image.

What Are Ways To Prevent Shadows In an Image?

You can prevent harsh shadows when taking photos by using the right camera settings and better lighting tools. Consider adding a softbox or external flash to eliminate shadows in an image.

How to Properly Expose A Photo On Adobe Lightroom?

When editing in Lightroom, you can give images the proper exposure by using the Exposure slider in the Develop Module. Slide it to the right to increase exposure or drag it to the left side to decrease exposure.

Conclusion

Lighting imbalances can cause bright areas and harsh shadows in real estate images. The global adjustment, brush adjustment, range mask, and color temperature tools can help you in removing shadows. Learning how to remove shadows in Lightroom will improve your photo editing skills and have a more efficient image post-production.

Vendors

Rela Logo
CS6 PSE Logo
HD Photo Hub Logo
FullFrame Logo

Learning Topics

.
magnifiercrossmenucross-circle