PFRE-Logo-white-bg
Reading
blue-triangle-element

Articles

PFRE is the original online resource for real estate and interior photographers. Since 2006, it has been a community hub where like-minded professionals from around the world gather to share information with a common goal of improving their work and advancing their business. With thousands of articles, covering hundreds of topics, PFRE offers the most robust collection of educational material in our field. The history of real estate photography has been documented within these pages.
All Articles
blue-triangle-element

Latest

Image banner for the February 2024 PFRE Photographer of the Month Winner Art Ibewuike, with a featured image of his winning photo titled "Living Room or Family Room""

Congratulations to Art Ibewuike, February 2024 PFRE Photographer of the Month! The theme this month was "Living Room or Family Room". Art Ibewuike - #895 Paul-Dan Dragoman - #898 Peter Wingfield - #900 Here's what Art has to say: Thank you so much for ...

Contest
blue-triangle-element

OVERVIEW

For over a decade, photographers from around the world have participated in PFRE’s monthly photography contests, culminating in the year-end crowning of PFRE’s Photographer of the Year. With a new theme each month and commentary offered by some of the finest real estate & interior photographers anywhere, these contests offer a fun, competitive environment with rich learning opportunities. 

Contest Rules
blue-triangle-element

CURRENT CONTESTS

View / Submit
blue-triangle-element

PAST CONTESTS

View Archive
Resources
blue-triangle-element

Resources

PFRE prides itself on the depth and breadth of the information and professional development resources it makes available to our community. Our goal is to help real estate and interior photographers be successful while bringing the community together and elevating the industry as a whole.
blue-triangle-element

Conference News

No items found

How to Layer Photos in Lightroom

Published: 26/05/2023

As an Amazon Associate we earn from qualifying purchases.

Lightroom users often question whether layering images is possible in the software, especially when they don’t have Photoshop. Understanding how to layer photos in Lightroom will help combine real estate images for printing or uploading.

How to Layer Photos in Lightroom Using Print Module

You can use the Print Module in Lightroom to lay an image on top of another image. Edit the second image using the Vignette and Feather features so you can add it flawlessly on top of the main image. Make sure to resize the layers, with the second layer likely smaller than the first photo.

Real estate photography often requires editors to layer photos to convey a composite picture. Lightroom Classic doesn’t allow layering photos like Adobe Photoshop does. However, the software has a set of features that you can use to layer images.

Step 1: Select Photos for Layering

Firstly, I must select real estate images to layer. You can pick a picture of any interior space (preferably the central area, like a living room). The other image can be a property's exterior to give a sneak peek at what it looks like from the outside.

You can also use more than two photos depending on the compositional style you wish to create. For instance, use two more images of separate areas of the interior to layer on the main one.

Selecting photos for layering with Lightroom

Step 2: Crop Photos

After carefully selecting the real estate images, start editing by cropping them according to the layout you want in the final image.

  1. Go to the Develop Module of Lightroom Classic CC. 
  2. Open the image you intend to use as an inset first. In this example, it is the exterior view of the house.
  3. From the right panel, look for the Crop Overlay tool. It is present beside the Spot Removal tool under Histogram.
Cropping photos for layering in Lightroom
  1. Make sure to unlock the padlock icon. 
  2. Pull in the sides to crop the image as required.

Step 3: Edit the Second Image for Blending Purposes 

Process the real estate images as you usually do in the Develop Module. Make changes according to the effect you want to achieve. 

Suppose you want a mingled effect of both images. In this case, you must add vignettes and feathering effects to the foreground image. 

  1. Under the Basic panel, take up the Exposure slider slightly to make the image brighter. Don’t go overboard with the Exposure.
  2. Bring down the Clarity slider.
  3. Go to the Effects panel.
  4. Add some Vignette to produce a dreamy effect on the edges.
  5. Bring up the Feather effect.
Editing in Lightroom for blending purposes

Step 4: Edit the Background Photo

For the background image, you'll need a clean and crisp image to spark interest in the property. You'll also need vibrance and the perfect balance of exposure and colors to bring out the lively feel of the interior.

  1. Increase the Exposure and Shadows slightly.
  2. Take up the Vibrance, Saturation, and Dehaze sliders until you achieve a bright, appealing look of a contemporary-style interior.
Adjusting exposure and shadows before layering image in Lightroom
Editing preferences in Lightroom

Step 5: Use the Print Module Page Setup

Go to the Print Module to carry out the layering process.

Selecting Custom Package from the panel
  1. Look for the Layout Style panel on the right-hand side.
  2. Select Custom Package from the panel.
  3. Go to the Page Setup option on the bottom left. 
  4. Select the Landscape option from the page setup dialog box. This will create your workspace. 
  5. Click on OK.
Selecting the Landscape option from the page setup dialog box for layering

Step 6: Manage Sizes

The two real estate photos must have varying sizes to achieve the layering effect.

  1. Drag both images from the filmstrip onto the workspace. 
  2. Select the background photo. Go to the Cells panel on the right-hand side. Increase the Height and Width to the maximum.
Managing image sizes in Lightroom
  1. Select the top layer image and resize it according to your preference. 

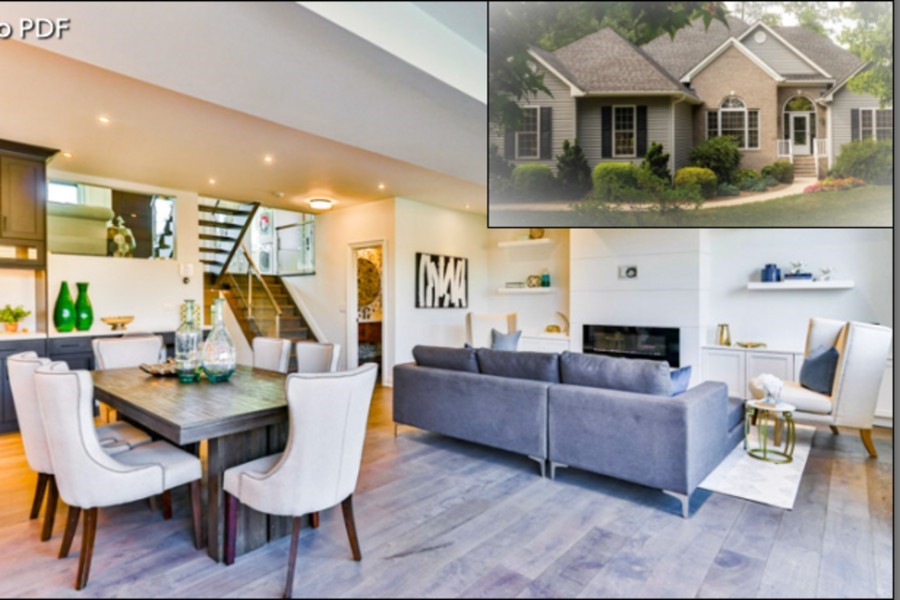
As you can see, the interior looks clear and inviting, plus an ethereal sneak peek of the exterior is there in the corner. Layering these photos allows the viewers to see the complete picture of the house in one image. 

Layered images in Lightroom

Step 7: Add Identity Plates

You may also put some text to the layered photos in the Print Module.  

  1. Go to the Page panel.
  2. Click on the Identity Plate checkbox. 
  3. Click the small arrow below the text section and choose Edit.
  4. Type in the text you want to add. You can choose the font and size of the text from the edit pop-up.
  5. Set the identity plate text on the layered images wherever you want. 
  6. Click Print to File. Save your image as a JPEG file on the chosen destination on your hard drive.

Why Do You Need to Layer Real Estate Photos?

Suppose you need to blend two pictures of the exterior and interior of a real estate property. You can show the interior as the main image and layer the exterior over it as an inset.

Adding layers is an effective element in photography that helps add new dynamics to the images. It is a great way to increase their interest in a particular property. Layering helps bring more interesting results that give a deeper insight to the viewers about a property. 

Rather than showing them only one image, you can show them multiple viewpoints via layering images on top of each other. Having more than one focus helps them better understand a home's layout.

Related Questions

How to Overlay Photos in Lightroom?

To overlay pictures, click on the overlay in the left-hand panel, drag it over the other photo, and then drop it on top. Lightroom will automatically open the overlay as a copy. However, you can change this to open it as a layer instead.

How to Stack Images in Lightroom?

To stack images, highlight the images you want to group. Then, from the Edit drop-down menu, expand the Stacks option, and click on Group Into Stacks.

How to Merge Pictures in Lightroom?

To merge photos in Lightroom, press Ctrl/Command while clicking the images to select them. Then, from the menu that appears, hover over Photo Merge, and click on HDR.

Conclusion

You can layer real estate photos in Lightroom using the Print Module. Make sure to adjust the effects and sizes to achieve precise touches to the outcome. Using this technique, you will be able to tell a comprehensive story using the background and foreground images.

Vendors

Rela Logo
CS6 PSE Logo
HD Photo Hub Logo
FullFrame Logo

Learning Topics

.
magnifiercrossmenucross-circle