


In today’s competitive real estate market, static photos are no longer enough. Buyers expect dynamic, engaging content that brings properties to life. Enter Reptov, a powerful new platform that transforms ordinary listing photos into professional marke ...


As an Amazon Associate we earn from qualifying purchases.
Adobe Lightroom is an all-in-one tool to edit and organize your real estate photos. While it's easy to use, it may look overwhelming at first. Since Lightroom is the industry standard for image editing, I'm focusing this article on tutorials on how to use Lightroom to save time in post-processing.
Quick Navigation
To use Lightroom properly, you need to learn the process of navigating modules, catalogs, import process, and export settings. You must also organize, back up, and sync files for photo editing. The post-production part involves using Lightroom presets, sliders, exposure controls, brushes, and batch processing.
For this article, I'm giving a tutorial on using Lightroom for beginners, as well as tips on improving editing workflow.

Lightroom is an image organization and manipulation software used by professional photographers and editors for post-processing. It has tools that allow you to import, sort, edit, and export pictures in varying ways.
Its retouching process involves copying and pasting edits, and you can enhance thousands of photos with a single click. Aside from that, the program enables you to sync Lightroom presets for mobile.
Note that Adobe Photoshop Lightroom Classic is the renamed version of the program. However, Lightroom Classic is a computer-based application, whereas Lightroom is a cloud-based application. The latter enables you to use Lightroom presets whether you're working on a computer, mobile, or web-based version.

One of the main advantages of Lightroom over other programs is that it boasts a non-destructive editing process. This feature means you can make alterations without altering the original photo for good.
Thus, even when editing RAW files, you get to work on more photo information, and you can still see and access the original image. Besides, when you make image alterations in Lightroom, the changes only show up in the software.
The program will export a new photo without replacing the original file. Additionally, it would keep all the essential export data, such as file type and pixel dimensions. Meanwhile, other editing programs, such as Photoshop, permanently apply the changes to an image.
When using Lightroom, you won't finish a job without encountering a catalog. Creating a new Lightroom catalog serves as a database that records the location and information of your images. The images on your memory card or computer won't automatically move to the catalog, so you must add them yourself.
Whether you rate and view flagged photos, add ICC profiles for printing, or put snow effects on an image, a catalog would store every change in the system instead of the actual picture.
Another advantage of using Lightroom is moving a catalog to an external hard drive for safekeeping. And when you don't need the files anymore, you can simply delete a Lightroom catalog and add new ones.
Anyone who is using a digital camera and wants to enhance photos should use Lightroom. As long as you want to produce professional-looking images that clients would love, you should use Lightroom to make exposure changes, color corrections, and add effects.

The global image editing software market size expects 6.4% growth from 2020 to 2025. From hobbyists, beginners, to seasoned photographers, Lightroom has become a reliable software for photo editing.
Image editing is among the most crucial skills for professional photographers. Property photographers, in particular, should use Lightroom as it's an effective tool in flagging photos to cull images faster. The software is also valuable when removing glare in interior photos with scenes that include mirrors or reflective objects.
The USA takes up 39% of the consumer market in photo editing programs globally. File organization is among the things that make Lightroom appealing to professional real estate photographers.
Moreover, you need to learn how to organize your photos because it can improve how you use the software each time you edit your images.
Remember, having an organized system can also help make Lightroom run faster.
It's vital that you understand Lightroom's interface to use the program effectively. Lightroom contains 7 workflow modules that directly affect how well you can use the software.
Let's focus first on the 2 major modules that you would tend to use often.
The Library Module serves as the primary section to view, sort, manage, and rate photos in Lightroom. It consists of a number of pop-out tabs.
Despite the economic impact of the COVID-19 outbreak on the digital
This is possible thanks to the Develop Module, which lets you modify colors, stitch bracketed images together, and make other corrections. Press the D button on the keyboard, and this section will pop up.
While Library and Develop are the most used modules, it's equally important that you understand the process of navigating the rest of the modules.

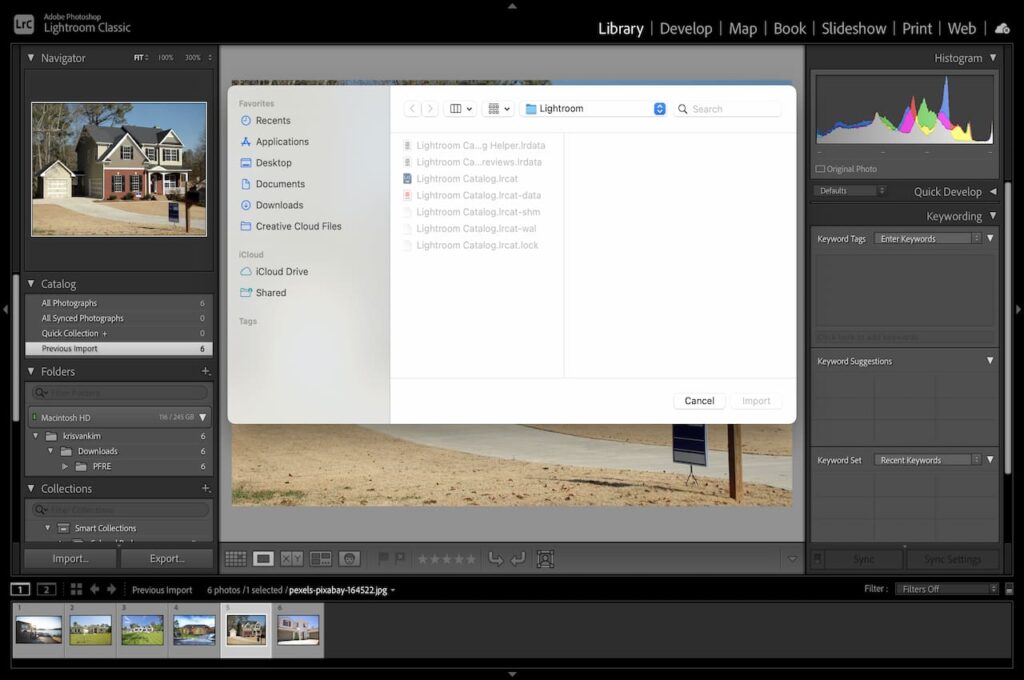
Learning how to import photos is a key step in using Lightroom efficiently. After launching the program, you would see a box at the bottom-left labeled Import. Once you click it, Lightroom would show an Import Dialogue.
Depending on your Lightroom Preferences, the program may automatically open the Import Dialogue once you insert a memory card. From there, there are various ways to import files from your computer.
Presets contain saved edits that you can put on a photo with a click. Using the best presets for real estate photography can significantly enhance your photographs. Likewise, exporting Lightroom presets can help you save time and effort when working on multiple devices.
As you invent an editing style or follow a style guide, you will find yourself applying similar alterations to different projects. This is where presets enter. Having a collection of presets gives you a broad selection of appropriate filters depending on the shoot's theme.
To add presets in Lightroom, go to Edit, then click on Preferences. Select Show Lightroom Develop Presets and paste the downloaded folder into the new folder. Make sure to organize your Lightroom presets so that the presets panel won't get messy.
There's an abundance of Lightroom presets available. This is why the first option is to download and save presets from the web to your computer.
A good example would be installing dreamy VSCO presets for a classic effect on your photos. However, be cautious in downloading as some free Lightroom presets tend to be a bit extreme in the edits. Another option is to buy from other photographers that sell their Lightroom presets.
You can also make your own Lightroom presets, especially if the presets contain your usual edits.
For instance, make a custom preset for gardens, and another prepared preset for interiors. By experimenting with presets, you can form a unique look for your interior and exterior photos.
All you have to do is click on the plus icon on the right-hand side and select Create Preset. Make the adjustments, save the edits, and name the preset so that you can access it easily next time.
According to market analytics company Burning Glass Technologies, 78% of well-paying middle-skill jobs require technological proficiency. For real estate photographers and editors, this covers photo editing skills and expertise in using advanced post-production programs.
While the software offers several tools to post-process images, these are the most common commands you can use to edit in Lightroom like a pro.
There may be times when you want to change the perspective of your shots. Before applying exposure and color corrections, try to crop, straighten, rotate, or flip the photo first.
Cropping photographs let you remove distracting parts. This also allows you to focus on certain subjects as if you're zooming in on the photo.
On the other hand, straightening is vital in real estate
The Develop Sliders impact the whole photo instead of a specific portion. You can experiment with Lightroom's intuitive tools and use them to fix common issues when editing your photos.
There are nearly 133,500 working photographers in America in 2019, giving clients a myriad of options on who to hire. Competition is inevitable, whether you're starting in the real estate
This is why photographers who can also edit are more desirable for potential clients. Among the usual issues you'll encounter as a professional photographer involve lens and color corrections, as well as tonal changes.
Distortion is a typical problem in real estate
Fortunately, you can use Lightroom's Lens Correction function then click the Enable Profile Corrections box. If you're learning how to use Lightroom 5, the program has more options under the Basic tab, including Off, Auto, Vertical, Full, and Level.
You can use these options to apply a perspective correction. These are exceptionally great for shots with defined lines, like interiors and buildings.
There may be instances where the colors of some parts of an image seem off. This may make a picture look a bit intense or unrealistic, affecting the overall quality.
Doing color correction in Lightroom allows you to make colors pop in a photo without changing the entire image. Before anything else, make sure to open the RAW files so you can work on the whole dynamic range.
Head to Basic, click the White Balance selector or the eyedropper icon. Click on the part that should be neutral gray to change the color. Likewise, you may utilize the HSL sliders to tweak the effects a bit more.
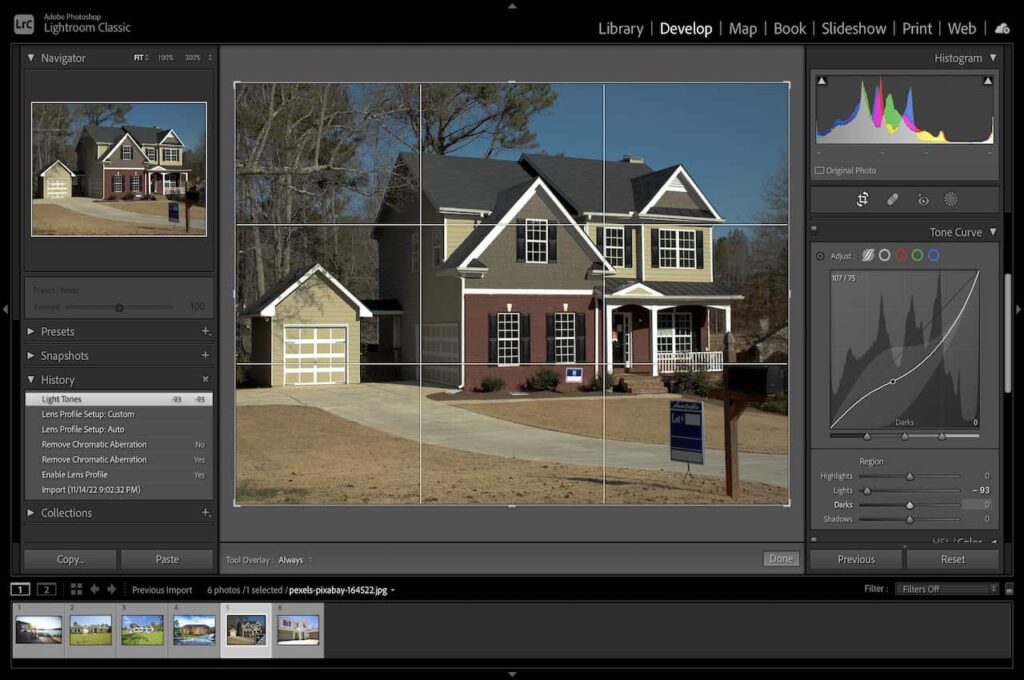
Using the Tone Curve is another excellent feature to master. This tool enables you to adjust the tone of an image accurately, as this element affects the overall brightness and contrast.
From the right-hand corner of the Develop Module, select the Tone Curve to modify highlights and tones. Make sure not to go overboard, as excessive tone adjustment can make real estate images look a bit unreal.
Making local adjustments is among the most typical things you will do in Lightroom. You can do a bit of tweaking without completely changing the picture's mood.
The available tools depend on the Lightroom version you have, although these are the basic functions.

Professional photographers often shoot in the highest resolution available, especially since camera sensors capture an increased number of megapixels.
Camera sensors capture a large number of megapixels, so you must shoot with the highest resolution. However, megapixels consume a massive amount of memory. This is also why you need to convert RAW images to JPEG because they are too big for social media uploads.
The good thing is that you can resize photographs in Lightroom, whether it's in inches, centimeters, or pixels.

One of the great things about Lightroom is that you don't have to close the program and move to Photoshop to fix out-of-focus images.
Instead, you can simply go to the Detail panel and select the Sharpening tool for 7 options to fix blurry photographs. Then, move the Amount slider to modify the sharpening level.
More than that, there's a chance your pictures would have image noise when shooting with high ISO values. From the same panel, use the Noise Reduction slider until you achieve the look you want.
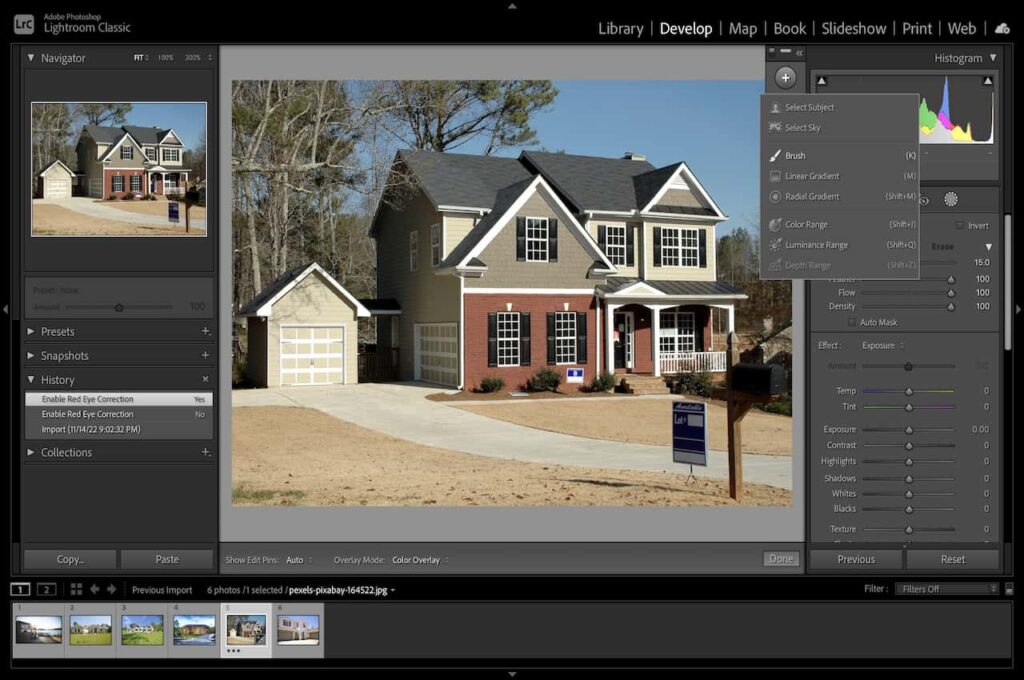
You can change the background color in Lightroom or make the background turn black. Yet among the most useful features in Lightroom is the ability to create a mask and blur parts of an image.
You can either create a custom blur effect or use a preset brush effect. After blurring the image background, you may still alter the effect by changing the Sharpness and Clarity values. You can set the values at -100 for a complete blur.
Furthermore, you can use several brushes from the Develop Module under the Histogram. Once you activate the Mask Overlay, you will see the section where you applied masks. Still, you can use the brush to erase parts of the painted area.
About 84% of home buyers wouldn't consider a property if the listing lacks photos. However, it's not enough for you to only take shots. You should also ensure that your photos have the correct exposure.
In digital
In the unfortunate event that your picture lacks proper exposure, you can use these functions within Lightroom to modify exposure.
When learning how to use Lightroom, it's crucial that you understand the different HSL Sliders. This panel lets you correct colors independently without affecting the rest of the shot.
Hue, Saturation, and Luminance control the color brightness, shade, and intensity. The great thing about these sliders is that they give a preview of the effect so that you can assess how much change you need to apply.
You can flip between these 3 elements by using layers in photos.
There's a 17% expected growth in the employment of photographers between 2020 to 2030. This includes about 12,700 projected job openings every year due to changes in the labor force. With such opportunities, you can maximize several Lightroom functions to secure projects.
Batch processing is one of the most powerful features in Lightroom. Particularly when learning how to use Lightroom presets, it lets you apply edits to tons of pictures at the same time.
You can quickly apply the preset or edits as long as you select multiple photos with similar lighting conditions or white balance.
There would be instances when you want to edit 2 images in the same way. For example, the lighting may not change quickly when photographing the back porch. In effect, you can apply the same settings continuously with minimal to no changes.
Adobe Lightroom automatically saves edits. After making corrections to your images, it's time to export them in your desired format. Go to File, select Export, and a dialogue box will pop up.
Lightroom will provide all the options for saving the edited photos in the available formats. You can either export the files For Print or Sharing on the Web.
You may also put watermark, keywords, and other metadata information to the photos during this stage.
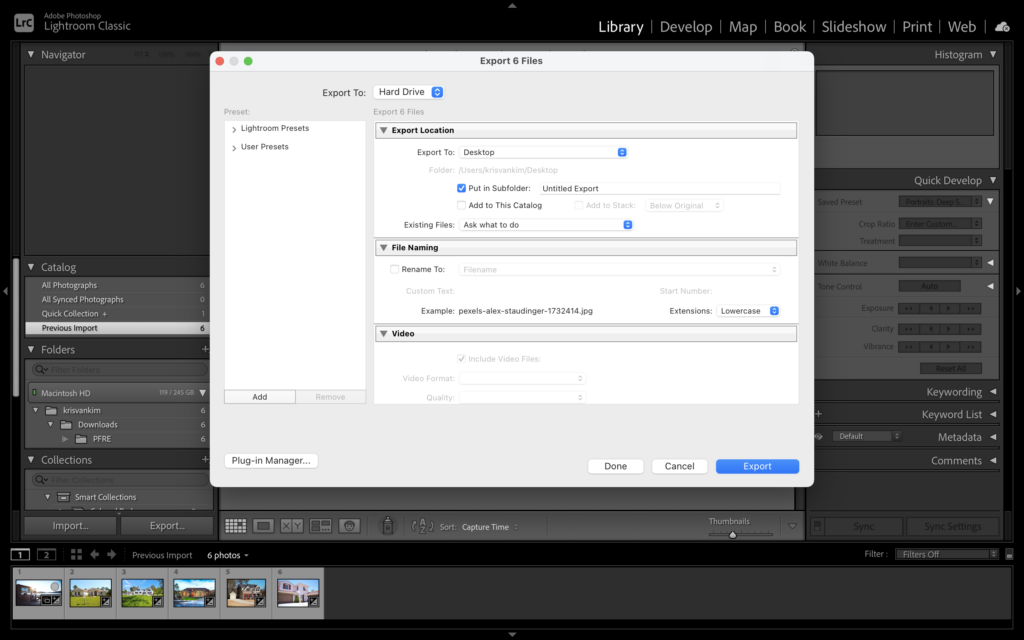
Learning how to export photos is another essential aspect you need to learn to use Lightroom effectively. Basically, exporting means the program won't delete the original copies. Instead, it will create new copies for you to edit and save.
These are the different ways for you to export edited pictures from Lightroom.
When you exit Lightroom, the program will show a Backup Dialogue Box. Make sure to enable this feature by going to Catalog Settings, hover over General, and select Back Up Catalog. After that, click on Every Time Lightroom Exits.
While you don't have to back up photos every time, this is a valuable feature to use because Lightroom only backs up the catalog file, which includes all the edits. Thus, you still need to back up the actual images on your hard drive.
First, try to reset Lightroom for basic troubleshooting. Another option is to clear the cache to purge clogged disk space. Lastly, make sure to update your software to the latest version.
Lightroom can help organize your photos while providing a non-destructive way of enhancing pictures. On the other hand, Photoshop works on image manipulation and graphic creation. They have some similar features, which is why you can jump from Photoshop to Lightroom for your edits.
You should get a Creative Cloud Subscription if you're typically using Adobe Photoshop, Lightroom, and Cloud storage. Statistics show that there are approximately 12 million active Adobe Creative Cloud subscribers. Besides, only Creative Cloud subscribers can get the dehaze tool, which can fix hazy photos shot during unfavorable outdoor conditions.
Lightroom contains several features and tools to streamline your post-processing workflow. While mastering this editing software requires time and patience for beginners, the practice will be worth it as you edit lots of real estate photos. I hope this article on Lightroom tutorials can further enhance your skills.
Make sure to bookmark this article, so you can always come back and get tips on how to use Lightroom.


