PFRE-Logo-white-bg
Reading
blue-triangle-element

Articles

PFRE is the original online resource for real estate and interior photographers. Since 2006, it has been a community hub where like-minded professionals from around the world gather to share information with a common goal of improving their work and advancing their business. With thousands of articles, covering hundreds of topics, PFRE offers the most robust collection of educational material in our field. The history of real estate photography has been documented within these pages.
All Articles
blue-triangle-element

Latest

Image banner for the March 2024 PFRE Photographer of the Month Winner Alex Vincent, with a featured image of his winning photo titled "Kitchen."

Congratulations Alex Vincent, March 2024 PFRE Photographer of the Month! The theme this month was "Kitchen". Alex Vincent - #906 Yvonne Raaijmakers - #909 Peter Wingfield - #902 Here's what Alex has to say: Thank you for the award of Photographer of th ...

Contest
blue-triangle-element

OVERVIEW

For over a decade, photographers from around the world have participated in PFRE’s monthly photography contests, culminating in the year-end crowning of PFRE’s Photographer of the Year. With a new theme each month and commentary offered by some of the finest real estate & interior photographers anywhere, these contests offer a fun, competitive environment with rich learning opportunities. 

Contest Rules
blue-triangle-element

CURRENT CONTESTS

View / Submit
blue-triangle-element

PAST CONTESTS

View Archive
Resources
blue-triangle-element

Resources

PFRE prides itself on the depth and breadth of the information and professional development resources it makes available to our community. Our goal is to help real estate and interior photographers be successful while bringing the community together and elevating the industry as a whole.
blue-triangle-element

Conference News

No items found

How to Save Photos From Lightroom

Published: 21/04/2021

As an Amazon Associate we earn from qualifying purchases.

Many Lightroom users find the software’s specific methods confusing as they are against the generic ones that they are used to. Lightroom does it a bit differently when it comes to saving photos due to its non-destructive design. Understanding how to save photos from Lightroom will make it convenient for you to use them outside the software. 

How to Save Photos From Lightroom Using the Export Option

In other photo editing software like Photoshop, the typical way to save photos is to hit CTRL+S (on Windows) or CMD+S (on Mac). Or, I just go to the File menu and click Save or Save As to save my images. But in Lightroom, you need to Export the photos to use them externally. 

Lightroom is a non-destructive software that doesn’t affect your original file. Instead, any changes you make in a photo are saved as a set of instructions that are applied to the image. When you export the photo, a copy is generated with the changes you have made and is saved on your hard drive.

Here is a synopsis of the process of importing, processing, and saving an image in Lightroom.

  1. Launch Adobe Lightroom Classic CC.
  2. Go to the Library module and import an image into Lightroom from your camera, memory card, external, or internal hard drive using the Import button on the bottom left.
  3. During Import, you can include metadata and keywords to your image.
  4. Go to the Develop module and edit your image using a preset or multiple features included in the Develop module’s panels on the right.
  5. You can also make multiple copies of your image and edit each one differently.
  6. After the editing process, go back to the Library module.
  7. On the bottom left, click on the Export button. Alternatively, select the Export option from the File menu, or right-click on the image and click on Export.
  8. An Export dialog will launch where you need to select the preferred options, which are explained in detail below.
Saving photos from Lightroom using the Export option
  1. Click on Export. Your image will be saved on the hard drive which you can then share or print. 

A Guide to the Export Dialog Options

Let me dive deep into the Export dialog options to see what features are at hand while you are saving your image from Lightroom.

Export Location

When you open the Export dialog, the first option you need to set is the Export Location

  1. The Export to options at the top must be set to Hard Drive, and then you can choose the desired settings for the file saving destination. 
  2. Here are the options you get in the Export to drop down in the Export Location settings.
Setting Export location when saving photos from Lightroom
  1. This is where you can organize your photos in a clean way by making a new folder in a location on your computer, which will help you find your saved images in an appropriately named folder. 
  2. You can also select “Choose Folder later,” especially if you want to create an Export Preset. 
  3. Besides saving the photo on a drive, Lightroom will also keep it in the catalog if you tick on the box to Add to This Catalog.  
Add to This Catalog option in Export Location settings in Lightroom

File Naming

  1. The section to name your file is very useful. You can choose a custom text to be added to all your photos, like your name or your company’s name. 
  2. Also, you can choose the template to name your images. It is a very useful feature to differentiate between original and edited photos. 
File naming before saving images from Lightroom

File Settings

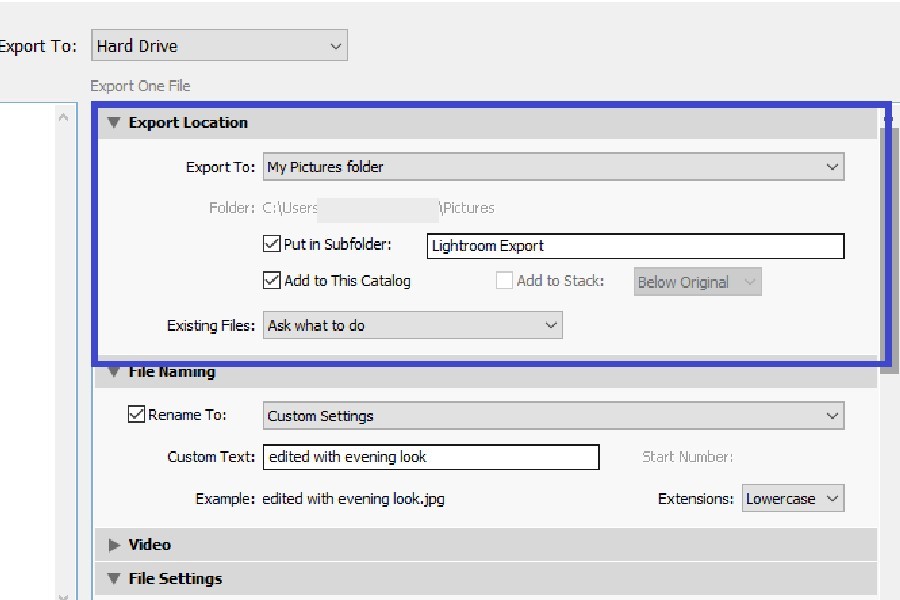
The file settings will determine what image format and quality you wish to set while saving the image.

  1. Ensure that the image format is set to JPEG if you want to send it to a client or use it on social media, blogs, or a website. 
  2. Set the image quality to a higher level (nothing below 85). 
  3. Here, you will also select the color spacing. Ideally, you should choose sRGB as it the standard color spacing for the web.
Determining image format and quality you wish to set while saving the image

Image Sizing

  1. In this section, you firstly need to check the box “Resize to Fit.” 
  2. From the drop-down, choose the option Long Edge and set the pixels to 1200 (it is up to you, but 1200 is the standard pixel size used for the web)
  3. Set the Resolution and choose Pixels Per Inch.

Output Sharpening

You can leave this box if you want. However, if sharpening is required, select Screen and then choose Low

Metadata

Adding metadata includes your copyright in the image file, which is a great way to save your photos from being plagiarized. Here in the Export dialog, you can choose to add your metadata so that no one can else take credit for your photos.

You can omit the Person Info and Location Info to maintain privacy if you are using your image for the web. 

Watermarking

Another remarkable feature of Lightroom is the ability to add a watermark to your images. Adding a watermark has many benefits, such as stamping your ownership on the image to avoid misuse and promoting your work. 

You can add a text or graphic watermark to your image here in the Export dialog. If you choose the Edit Watermark option from the dropdown, there are a variety of functions to set your watermark. 

Edit Watermark option in Lightroom

You can determine the size, position, and opacity of the watermark. 

Post Processing

This section allows you to set action after you export the photo, like Open in Explorer/Finder

Export Presets

You may require the same settings another time when you are saving photos. Lightroom gives you an option to save these settings as well.  

Once you have selected all the preferred export settings in the dialog, you can save it as a preset. It will make exporting convenient the next time you export images for a similar purpose. 

Option to save as a preset when saving image in Lightroom

Click on the Add button below the presets option. In the dialog box that opens up, select the name for the preset and the folder in which you intend to save it. Click on Create, and your new export preset will be added to the list on the left-hand side. 

Creating a new export preset in Lightroom

Clicking On Export

When you have selected the settings in the Export dialog, it is now time to click on the Export button below. Your photos are now saved on your hard drive in the selected export location. You can also select multiple images to export and apply the settings in the same way to all of them.

Conclusion

Saving photos from Lightroom is a different process than most editing software. It uses the Export method to save photos for external use. Although different, the export process in Lightroom Classic is highly intuitive, where you can do multiple settings before saving your images. 

Vendors

Rela Logo
CS6 PSE Logo
HD Photo Hub Logo
FullFrame Logo

Learning Topics

.
magnifiercrossmenucross-circle