PFRE-Logo-white-bg
Reading
blue-triangle-element

Articles

PFRE is the original online resource for real estate and interior photographers. Since 2006, it has been a community hub where like-minded professionals from around the world gather to share information with a common goal of improving their work and advancing their business. With thousands of articles, covering hundreds of topics, PFRE offers the most robust collection of educational material in our field. The history of real estate photography has been documented within these pages.
All Articles
blue-triangle-element

Latest

Image banner for the March 2024 PFRE Photographer of the Month Winner Alex Vincent, with a featured image of his winning photo titled "Kitchen."

Congratulations Alex Vincent, March 2024 PFRE Photographer of the Month! The theme this month was "Kitchen". Alex Vincent - #906 Yvonne Raaijmakers - #909 Peter Wingfield - #902 Here's what Alex has to say: Thank you for the award of Photographer of th ...

Contest
blue-triangle-element

OVERVIEW

For over a decade, photographers from around the world have participated in PFRE’s monthly photography contests, culminating in the year-end crowning of PFRE’s Photographer of the Year. With a new theme each month and commentary offered by some of the finest real estate & interior photographers anywhere, these contests offer a fun, competitive environment with rich learning opportunities. 

Contest Rules
blue-triangle-element

CURRENT CONTESTS

View / Submit
blue-triangle-element

PAST CONTESTS

View Archive
Resources
blue-triangle-element

Resources

PFRE prides itself on the depth and breadth of the information and professional development resources it makes available to our community. Our goal is to help real estate and interior photographers be successful while bringing the community together and elevating the industry as a whole.
blue-triangle-element

Conference News

No items found

How to Export RAW Files From Lightroom

Published: 10/06/2023

As an Amazon Associate we earn from qualifying purchases.

Instead of saving files conventionally, you must export RAW files using Lightroom. However, some editors find this process quite arduous at first. This guide demonstrates how to export RAW files from Lightroom to organize your real estate images for post-processing properly.

How to Export RAW Files From Lightroom

To export RAW files from Lightroom, you must first go to the Library Module, choose the necessary RAW file, and click the Export button at the bottom of the Library Module's left panel. From the Export window that pops up, pick the location where you need to save the exported RAW files.

Lightroom offers an extensive range of tools and features for all your image editing and processing needs. To save your files or publish them on any other platform, you would have to export them. Here are the steps to follow to export your RAW images from Lightroom.

Step 1: Choose the RAW Files You Need to Export

The first thing you need to do is to go to the Library Module to choose your RAW files for exporting.

  1. Select any number of images from your entire catalog. You can either select one photo, some random pictures, or a complete group of images.
  2. If you want to export only one RAW file, simply select that one file. Suppose you want to export randomly selected files from the collection. In that case, choose one of those files and then press the CTRL or Command key.
  3. If you want to export a whole list or group of RAW files, select the first file from the list and press the Shift key. Then, click on the last file on the list. This will select every file in that particular group.

Step 2: Initiate the Export Command

After selecting the file or files you want to export, the next step is to initiate the export command. You can do this using different ways.

Using the Export Dialog

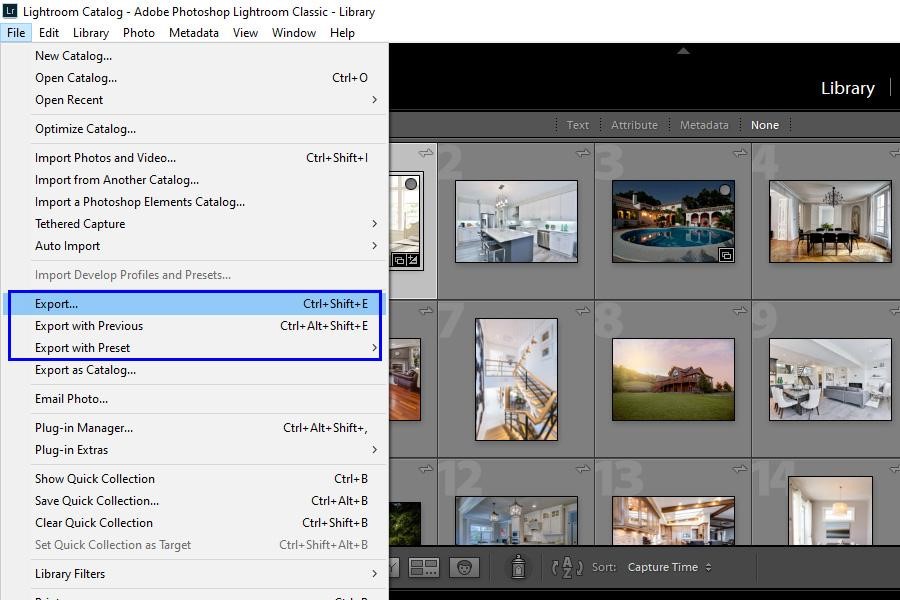
Navigate to the menu bar present on the top of your Lightroom interface, and click on File. This will open a drop-down menu for you. From this menu, select Export to open the Export Dialog.

Lightroom Export Dialog box

Right-Clicking Any of the Selected Photos

Another method is to right-click on any of your selected images. This will produce a popup menu for you. From this menu, navigate to Export, and click on Export.

Exporting RAW files from Lightroom

Clicking on the Export Button

The third method of initiating the export command is by clicking the Export button on the bottom left side of your Lightroom interface.

Export button in a Lightroom interface

Step 3: Choose the Export Dialog Settings

As you click on export, the Export dialog box will appear. Here, you can configure the export settings for your files. 

When exporting RAW files, you do not have to worry about all the tabs in the export dialog. You may only have to configure some of the tabs.

Selecting options in the Export Location tab
  1. First, I will open the tab for Export Location. Here, I have to select the location of the files where I want to export them.
  2. Then, go to the File Naming tab. Here, you must maintain the same file name with the same extensions. 
  3. The File Settings tab is another essential tab important while exporting RAW files. Go to this tab, and select Original for your image format. This will ensure that your images remain RAW.
  4. Apart from these three tabs, the other sections do not hold much importance when exporting RAW files.
  5. Now, click on Export.
Selecting "Original" as your image format

Export Dialog Settings

In case you want to include other settings, here are other options you can use.

  • Export Location: This tab allows you to set the final location for your exported file.
  • File Naming: This tab helps you ensure that the file of your name remains consistent from the source to the destination.
  • Video: The video panel section comes into play when you have selected videos for exporting from Lightroom.
  • File Settings: Here, you can determine the format of your image file, depending on your requirements.
  • Image Sizing: This panel allows you to change the size of your files. If you want your exported file to have a different size than the source file, you can do that through this tab.
  • Output Sharpening: This panel allows you to adjust the sharpening of your exporting file based on its destination. 
  • Metadata: The metadata panel allows you to have significant control over the amount of metadata included in your exported files.
  • Watermarking: You can add watermarks to your files through this panel.
Export dialog box in Lightroom

Why Do I Need to Export Images in Lightroom?

Multiple scenarios may exist where you want to export RAW files from Lightroom. Whatever it may be, you might be looking for ways to export your RAW files from Lightroom. Lightroom allows you to do that by following a simple exporting workflow. 

  • Saving for later use: You can display the RAW images on any platform and save them for later use. Saving a file ensures that you have it as a backup and can use or share it anytime. Likewise, the export functionality in Lightroom refers to the saving operation on any other program.
  • Lightroom works differently: Any work you do in the Lightroom workspace gets stored within the program. If you want to share or keep it, you must export it. That is why you must export your files when using Lightroom.

Frequently Asked Questions

What Is the RAW File Format?

RAW is the most common file format for images captured using cameras, scanners, or other devices that record visual images. The RAW file format makes sure that your image remains in its original form and maintains all its elements.

Will Exporting RAW Files From Lightroom Affect the Quality of My Images?

Exporting RAW files from Lightroom will not affect the quality of your images. Lightroom is a non-destructive image-processing program. Whether you edit an image or want to keep your RAW file intact, you can do it easily without affecting your image quality.

Do I Have to Configure the Export Dialog Each Time I Want to Export a File?

No, you do not have to configure the export dialog for every image you export. That is because Lightroom allows you to save your export configurations as presets. When you configure your export dialog for one picture, you can also save it as an export preset.

What Is the Best Resolution for Exporting Images in Lightroom?

The best resolution for exporting images in Lightroom is 300 pixels per inch (PPI). If you only need to view the pictures online, 72 PPI should be enough.

Conclusion

Now you know how to export RAW files from Lightroom. You will soon see that exporting RAW files from Lightroom will become a permanent part of your Lightroom workflow. Your editing and post-processing tasks will become easier and quicker.  

Vendors

Rela Logo
CS6 PSE Logo
HD Photo Hub Logo
FullFrame Logo

Learning Topics

.
magnifiercrossmenucross-circle