As an Amazon Associate we earn from qualifying purchases.
When printing your real estate images, you must add ICC profiles because these ensure color accuracy. If you don't, you may waste time and effort because of the different color grading in the prints. Learn how to add ICC profiles to Lightroom CC to make your print process easier and more accurate.
How to Add ICC Profiles to Lightroom CC
After downloading and extracting Lightroom profiles, you can install them in Lightroom using the Profile Folder (Mac) or by right-clicking directly on the ICC files (Windows). You may use the Develop Module's Soft Proofing panel or the Print Module to add the ICC profiles in Lightroom.
Thanks to technological advancements in photography, retaining the original color in a printed image is possible. It is vital to ensure proper color management to achieve a high-quality print when printing a photo. Color management for print involves collaboration between your camera, monitor, and printer.
Step 1: Download an ICC Profile
ICC profiles are available for download on the website of the particular print paper that you use.
- For instance, if I use Red River paper for printed real estate images, I visit their website and go to the Printer color profiles section.
- After that, I scroll down to select the profile for my printer model.
- Select the specific paper’s profile that you use.
- You can also download your printer model's profiles in one ZIP file.
Step 2: Install the ICC Profile
After downloading the ZIP file, it's now time to install it. The process of installing printer profiles differs on Windows and Mac.
Installing ICC Profiles on Windows
Simply follow these steps to install ICC profiles on Windows.
- Locate the zipped file that you have downloaded on your computer.
- Extract all files by right-clicking on the file and selecting Extract All to unzip the printer profiles.
- Once you have your duplicated folder, you can delete the zipped folder.
- Double-click on the duplicated folder.
- Among its contents, you will find a .ICC or .ICM profile extension. It will contain your paper and printer profiles.
- Right-click on the file and click on Install.
Installing ICC Profiles on Mac
These are the steps for installing ICC Profiles on MacOS.
- Locate the downloaded ZIP file.
- Double-click the folder, and an unzipped folder will appear next to it.
- Click on the folder to see its contents.
- Your printer profiles will be present in the folder. Copy these printer profiles.
- Click on the Go menu, and hold down the OPT key. Select Library.
- In the Library Finder, go to Color Sync and then Profiles.
- Paste your profile by right-clicking in the folder and choosing Paste.
If your profile is installed correctly, it will now be available on Lightroom. Restart Lightroom after installation.
Step 3: Add the Profiles in Lightroom
There are two places in Lightroom where you will be asked to add a profile. One is the Soft Proofing panel from the Develop module, while the other is from the Print module.
Adding Profiles via Soft Proofing
Let’s first discuss the Soft Proofing method in the Develop Module.
- In the Develop Module of Lightroom, you can select the soft proof feature by clicking on the Soft Proofing checkbox found on the toolbar in the Develop Module below.
- On the left-hand side, select the Soft Proofing panel.
- Expand the Soft Proofing panel from the Develop Module.
- Click on the Profile drop-down, and select Other.
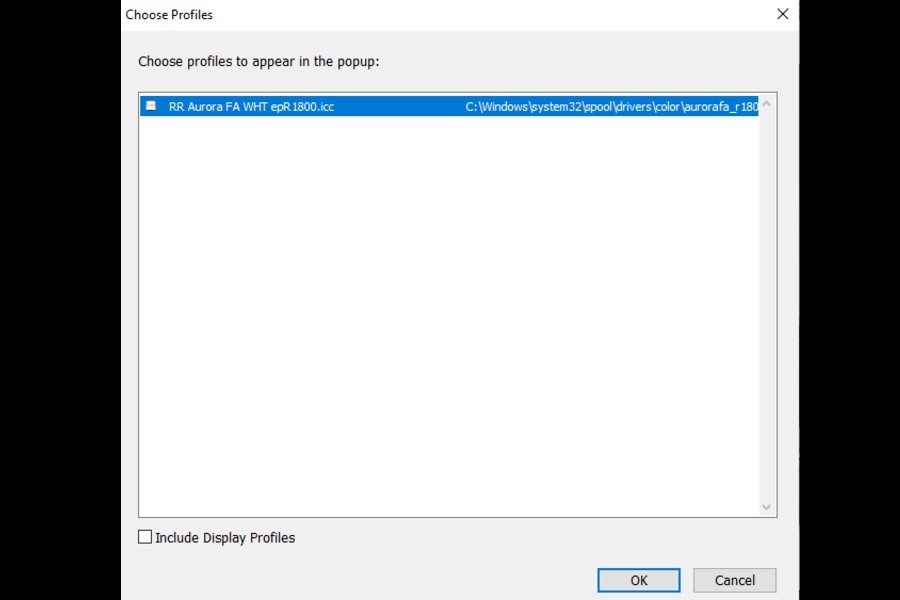
- A pop-up will show with your newly installed profile. Choose it and click on OK.
Adding Profiles via Print Module
In the Print module, there are a lot of settings upon which the appearance of your printed image is highly dependent. Among such settings is the profile which will ensure color accuracy.
- Go to the Print module in Lightroom.
- Firstly, decide on the image orientation and paper from the Page Setup option at the left.
- Choose the appropriate image size and resolution.
- From the right-hand panel, look for the Print Job panel.
- Expand the Print job panel and go down to the Profile.
- Click on the drop-down, and select your profile.
- If it isn’t showing in the list, go to Others.
- Your installed profile will be there in the pop-up. Click on it to select it, and hit OK.
- After that, you can also select Print Resolution and Print Sharpening according to your choice.
Related Questions
What Is the Importance of Color Profiles When Printing?
While exporting or printing an image in Lightroom, you can choose the color profile and space, which is a deciding factor in the final appearance of colors on the image. For online sharing, you can select the sRGB color space. For printing purposes, you need to choose a custom color profile.
Conclusion
Adding profiles in Lightroom is a straightforward process. It is a vital step if you are looking for color consistency in your printed images. A good profile will help you create prints with excellent color quality.