PFRE-Logo-white-bg
Reading
blue-triangle-element

Articles

PFRE is the original online resource for real estate and interior photographers. Since 2006, it has been a community hub where like-minded professionals from around the world gather to share information with a common goal of improving their work and advancing their business. With thousands of articles, covering hundreds of topics, PFRE offers the most robust collection of educational material in our field. The history of real estate photography has been documented within these pages.
All Articles
blue-triangle-element

Latest

Image banner for the March 2024 PFRE Photographer of the Month Winner Alex Vincent, with a featured image of his winning photo titled "Kitchen."

Congratulations Alex Vincent, March 2024 PFRE Photographer of the Month! The theme this month was "Kitchen". Alex Vincent - #906 Yvonne Raaijmakers - #909 Peter Wingfield - #902 Here's what Alex has to say: Thank you for the award of Photographer of th ...

Contest
blue-triangle-element

OVERVIEW

For over a decade, photographers from around the world have participated in PFRE’s monthly photography contests, culminating in the year-end crowning of PFRE’s Photographer of the Year. With a new theme each month and commentary offered by some of the finest real estate & interior photographers anywhere, these contests offer a fun, competitive environment with rich learning opportunities. 

Contest Rules
blue-triangle-element

CURRENT CONTESTS

View / Submit
blue-triangle-element

PAST CONTESTS

View Archive
Resources
blue-triangle-element

Resources

PFRE prides itself on the depth and breadth of the information and professional development resources it makes available to our community. Our goal is to help real estate and interior photographers be successful while bringing the community together and elevating the industry as a whole.
blue-triangle-element

Conference News

No items found

How to Remove Glare in Lightroom

Published: 02/06/2023

As an Amazon Associate we earn from qualifying purchases.

It is common to get unsightly glare in photos due to reflective surfaces like water, glass, metal, shiny wood, or ceramic. Either it is the sunlight, bright lighting, or even your camera’s flash that causes glare.  Learning how to remove glare in Lightroom Classic can significantly improve your photos.

How to Remove Glare in Lightroom

You can remove glare in Lightroom using the Adjustment Brush, Radial Filter, and Spot Removal tools. Here you can use layer masks to adjust Exposure, Clarity, Blacks, Whites, and Shadows until you eliminate glare in your real estate images.

Glare from glass, water, sunlight, or the reflecting surface glare is very easy to remove using various tools in Lightroom. The editing software has layer mask features that help you target specific areas with glare.

Remove Glare Using the Adjustment Brush

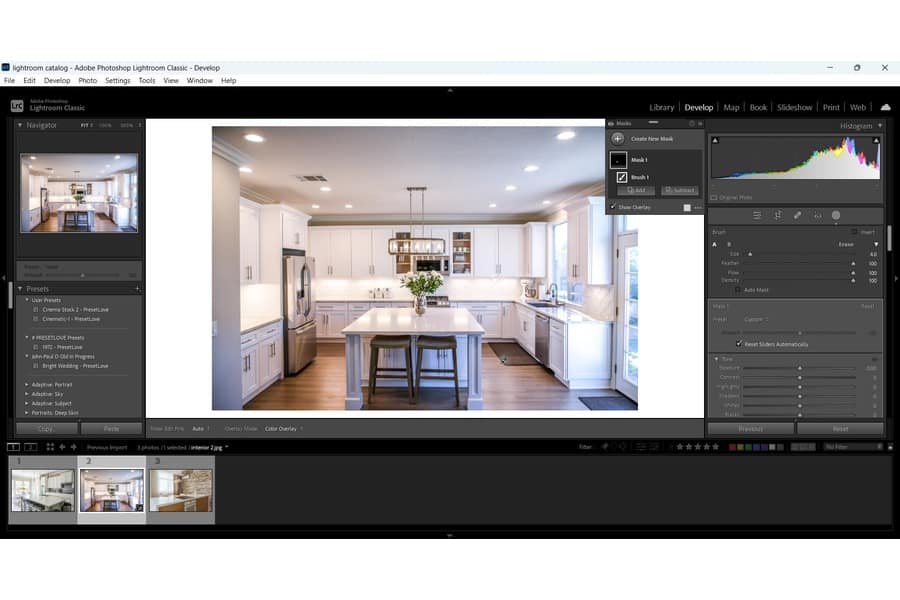
The Adjustment Brush is one of the pillars of editing images in Lightroom. The tool allows me to mask and work on a particular area without affecting the whole image. This functionality is exactly what I need when reducing the wooden surface glare from the image of this living room.

Remove glare using the Adjustment Brush in Lightroom

You can see that the shiny wood floor and the dining table surface are way too shiny. You can reduce this glare and bring noticeable improvement to the image.

  1. Select the image from the Library panel in Lightroom Classic CC.
  2. Go to the Develop Module.
  3. Click on the Adjustment Brush tool found below the Histogram on the extreme right.
  4. From the Effects drop-down, click on Dehaze.
  5. Choose the size of the brush. Keep the size of 4.4 for masking the floor, but you may need to reduce it while working on smaller areas.
  6. Increase the Feather and Flow to 100.
  7. Paint the glared area, including the floor and dining tabletop.
  8. Turn on the overlay by pressing O to see where the mask is being applied.
  9. Suppose you mistakenly mask a section that does not require editing. Turn on the Erase brush and remove the mask from those sections.
  10. Once you have masked the area with glare, turn off the overlay by pressing O and increase the Dehaze slider a bit.
  11. Bring up the Clarity and Whites.
  12. Adjust the Exposure to lessen the brightness.
  13. Bring down the Blacks and Shadows, and increase the Whites to bring out the details.

You can see how the glare is significantly reduced without compromising the image quality.

Remove glare using the Adjustment Brush

Remove Glare Using the Radial Filter

Perhaps your efforts to reduce glare in photos don't work due to sunlight in your exterior real estate images. You can use the Radial Filter to rectify it.

Remove glare using the Radial Filter in Lightroom
  1. Select the Radial Filter tool found beside the Adjustment Brush. This tool lets you create an elliptical around a specific area where you can apply edits.
  2. Create a filter around the area where sunlight is reflecting.
  1. From the Effects drop-down in the Radial Filter, select Dehaze.
  2. Make sure to turn on the Invert Mask.
  3. Bring up the Dehaze and Clarity values until there is a noticeable reduction in glare.
  1. Carry on to adjust other sliders per your editing requirements and the amount of glare in the photo.
Remove glare using the Radial Filter

Remove Glare Using the Spot Removal Tool

You can also use the Spot Removal tool to get rid of glare from glasses and shiny surfaces in properties. You'll find the Spot Removal tool underneath the Histogram.

Remove glare using the Spot Removal Tool in Lightroom
  1. Zoom in on the area with glare.
  2. Change the Brush size to around 75. Set the opacity to 90.
  3. Click on the area you want to edit. Observe as the color changes to match the adjoining area.
  4. Reposition the circle if necessary.
  5. Once blending looks natural, click on OK to finalize the effect.
Remove glare using the Spot Removal Tool

Frequently Asked Questions

Why Do I Get Glare in Real Estate Photos?

Getting a glare from a reflective surface is a common photography problem. Light sources like the sun and interior lighting can reflect from shiny surfaces like glass or metal, causing a bright glare that affects the image quality.

How Can You Prevent Glare When Shooting Properties?

You can use polarizing filters, lens shades, and creative camera positions to avoid glare in your images. Sometimes, using a faster shutter speed also works quite well. However, if you still face the issue after taking care of those things, it’s time to hand it over to Lightroom Classic.

Conclusion

You can use the Adjustment Brush, the Radial Filter, or the Spot Removal tool to fix glare in your real estate images. Once you master this technique, you won't have problems photographing properties with glass windows, water, or shining objects that can cause glare.

Vendors

Rela Logo
CS6 PSE Logo
HD Photo Hub Logo
FullFrame Logo

Learning Topics

.
magnifiercrossmenucross-circle