


In today’s competitive real estate market, static photos are no longer enough. Buyers expect dynamic, engaging content that brings properties to life. Enter Reptov, a powerful new platform that transforms ordinary listing photos into professional marke ...


As an Amazon Associate we earn from qualifying purchases.
Did you know Lightroom Classic has a useful feature of stacking photos in the Grid or Filmstrip view? This feature allows real estate photographers to group several similar images in a single thumbnail. Understanding how to stack images in Lightroom will allow you to organize your catalog in a clutter-free way.
Quick Navigation
As a real estate photographer, it is evident that you need to capture several images of the same view, often with varying exposure. When you import them into Lightroom, you may want to declutter the catalog by representing all the similar images with a single thumbnail. Here is where the image stacking feature comes in handy.
Stacking is simply gathering multiple images in one place on your Grid. You can stack photos in a folder and also in a collection.

You can easily select all the similar images and group them as a stack in Lightroom. It will help you spot the stack in an extensive catalog when you want to process those images later. It will also clean up your Grid, facilitating a seamless workflow.
When you open the Library module, you first need to select the photos you want to stack. You can make a selection by clicking on the first image, holding down the SHIFT key, and then clicking on the last image from the sequence.
Or, if your images aren’t adjoining, you can hold the CMD key on Mac, or CTRL key on Windows and click on the images one by one. After selecting the range of photos, you can stack your images using three ways:
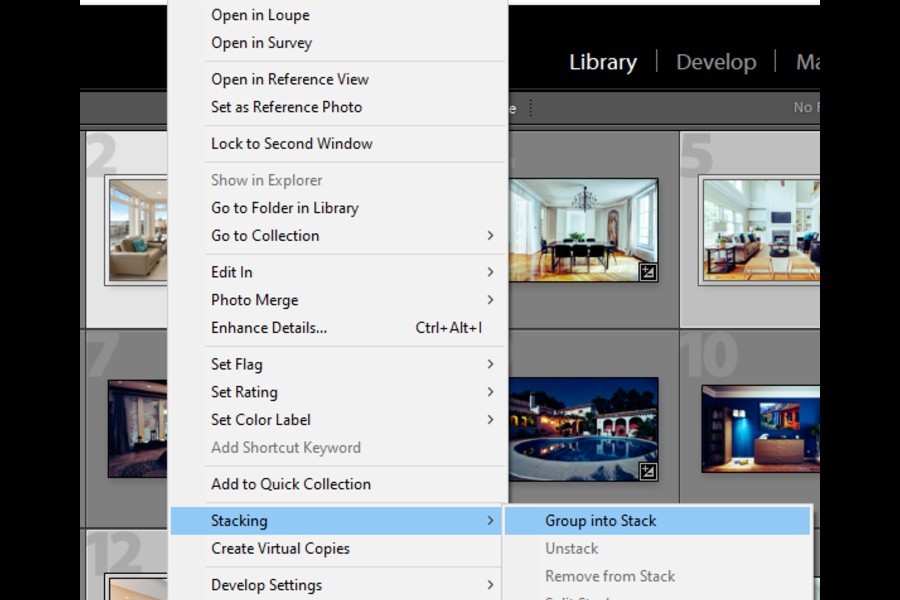

You will see that the images are now stacked on top of each other. The thumbnail that represents the stack is of the top image, and the number shown is the number of photos in the stack.
Creating a stack in the Develop module is the same as I do in the Library module. The only difference is that you can do it in the filmstrip view, which shows smaller-sized thumbnails than the Grid view.
One thing worth mentioning here is that you can not apply any effect to the whole stack unless you expand it.
Notice the side vertical bars that are added to the stack after you create it. Clicking on the bar on the Right side will expand your stack so that you can see all of the images within it.
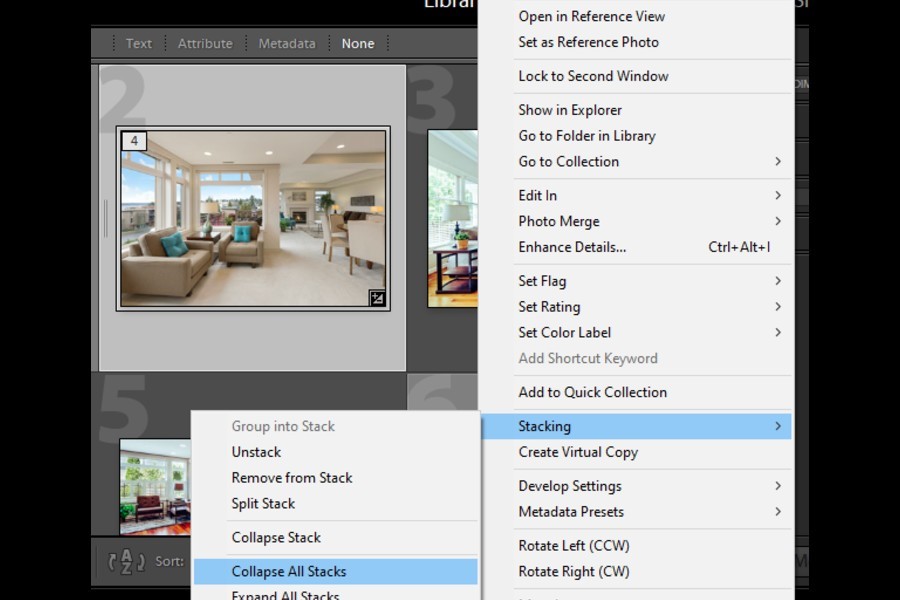
Alternatively, you can press the “S” key on your keyboard to expand or collapse the stack. Another way to expand the stack is to right click on it and select Stacking > Expand Stack.
In the same way, you can select “Expand All Stacks” to open all the stacks you have created in your catalog.
Collapsing a stack hides all the images within it. If you want to collapse an expanded stack, simply click on the vertical bar on the left hand side of the stack thumbnail. Or, right click on any image from the stack and choose Stacking > Collapse Stack.

Simply pressing S will also collapse the stack. If you have expanded multiple stacks, go to the Photo menu, and select Stacking > Collapse All Stacks.
It is possible to change the position of an image in the stack. Select the image and press SHIFT + [ or ] keys to move it up or down. If you want to change the top image, select the image you want to bring on top instead and press SHIFT + S.
When you no longer intend to keep a stack, you can simply right click on the stack, and select Stacking > Unstack. The keyboard shortcut for unstacking photos is CTRL+SHIT+G on Windows or CMD+SHIFT+G on Mac.
There may be occurrences where you want to split the stack into two different stacks.
Adding an image to a stack is as simple as dragging it from the grid and adding it to the stack. To remove a photo from the stack, you can select it and right click on it. Choose Stacking from the drop-down and select “Remove From Stack.”
While manual stacking gives you complete control over what images to stack and their order, Lightroom also has an Auto-Stack feature. This feature automatically stacks your photos according to their capture time. With auto stack, you can save time and get a clean, organized catalog with a click.

If you are creating stacks, you must know these tips:
Stacking is a helpful feature in Lightroom for those who want quick and efficient catalog organization. It will definitely improve your workflow while using the software. Moreover, it will save the time that you used to spend on looking for a particular image from the catalog.


