


In today’s competitive real estate market, static photos are no longer enough. Buyers expect dynamic, engaging content that brings properties to life. Enter Reptov, a powerful new platform that transforms ordinary listing photos into professional marke ...


As an Amazon Associate we earn from qualifying purchases.
Thanks to technological advancement and photo editors like Lightroom, image processing opens unlimited opportunities for me. I can edit my photos the way Ilike and transform them from an ordinary image to something worth watching. I will walk you through how to make photos pop in Lightroom to heighten their visual appeal.
Bringing that pop or punch in your photos may mean that you want to divert all attention towards the subject. Or, you may want to do so to enhance the overall colors of an image. Appealing shades help augment the details, plus they attract the viewer, which means these photos can be a useful marketing strategy.
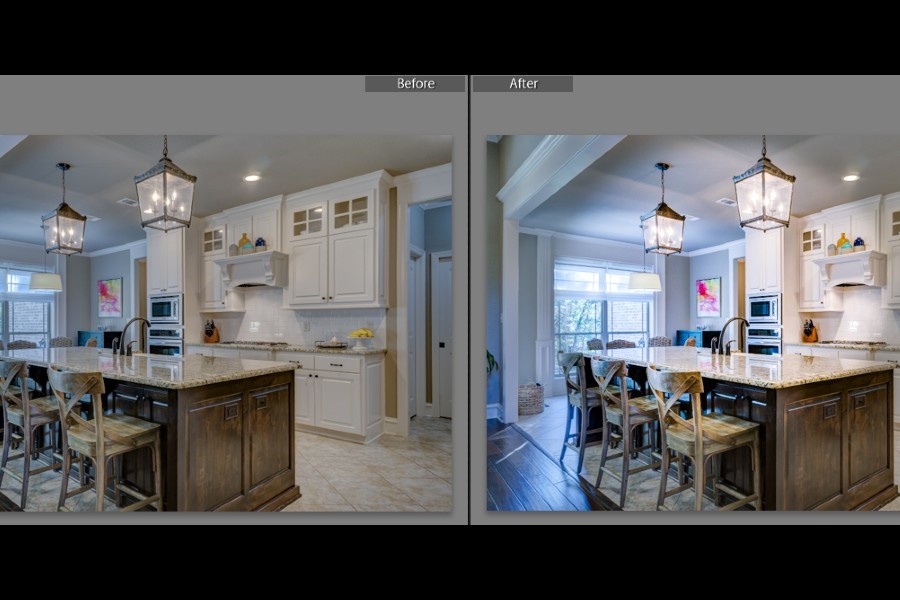
In real estate

You’ll need to add some punch to your photos before sharing them on social media platforms like Instagram, where visual appeal is highly important to make them share-worthy.
In Lightroom, there are a number of editing features that can completely transform lackluster photos. Below, I suggest Lightroom editing techniques that you can practice and learn to create beautifully vivid images.
The Radial Filter is a handy tool in the Develop module of Lightroom that lets you encircle a specific area of an image and make adjustments inside or outside it. The filter is very useful when you want to add pop to a dull-looking section of the image.
These are just a few basic editing tricks with a radial filter to add subtle but noticeable effects, as I did in the image below. You can experiment with more sliders if your image still lacks the impact that you want.
Shadows and highlights play a crucial role in enhancing the image. If your shadows are too black or highlights are too white, important details are masked. You can recover the details to a considerable extent by playing with these two sliders. Note here that if your image is in RAW format, this method will really help it pop.

Sometimes, poor lighting causes a disturbance in the white balance of the image. This results in an image with incorrect skin tones and white and grey areas that look unappealing. The white balance sliders for temperature and tint can bring a whole lot of difference even if you adjust them slightly.
A quick way to add that pop to your images is to increase the Contrast. You can find the slider under Exposure in the Basic Panel.
When you start adjusting the contrast, start by taking up the slider to the maximum and then gradually reduce it until your dull photo comes to life. Like other settings, contrast too depends on the image. Therefore a set amount cannot be recommended as a rule of thumb for all photos.
Lightroom has two sliders that let you add deep, rich hues to your photos. The Vibrance and Saturation sliders bring a tremendous amount of vividness to the image by adding intense colors. You can experiment with increased settings of vibrance and saturation of colors till you get the desired effect in your images.
You will be astonished how increasing the Clarity, Texture, and Dehaze sliders can immediately take your photos up a notch. These three sliders in the Basic panel equip you with the right toolset for image enhancement.

Look how much verve is added to this image when I brought up the Clarity and Texture to bring out the details and used the Dehaze tool for an added punch.

A feature that brought Lightroom into the front row among widely used image editors is its presets. Lightroom uses the term presets for its filters which you can apply to your photos and edit them in a single click. Like many other effects, there are amazing presets available for the color pop effect as well.
You can use the widely available paid or free presets to make your images pop in Lightroom. Make sure you use a preset specifically designed for the type of images that you edit. For instance, a color pop preset for landscape will not work well on a portrait.
Finally, you can try two or more of the techniques that I have mentioned together to improve the look of your photos. There is no hard and fast rule when it comes to photo processing, and you can experiment with a single slider and a combination, whichever works for your images.
You can apply a preset and then tweak the settings of clarity and dehaze for an added enhancement. Or, you can try playing with the contrast after recovering details from shadows and highlights in your images.
Editing the images in Lightroom so that they can pop is something that you may need to do with all your RAW images. However, you need to make sure that you don’t go overboard with the settings to make them look gaudy. Resist the urge for heavy editing and stay subtle with the effects to make the images eye-catching rather than unnatural and weird.


