


In today’s competitive real estate market, static photos are no longer enough. Buyers expect dynamic, engaging content that brings properties to life. Enter Reptov, a powerful new platform that transforms ordinary listing photos into professional marke ...


As an Amazon Associate we earn from qualifying purchases.
If you are shooting real estate interior photos in poor lighting, there are chances of shadows clipping and losing details in some areas. Since you can’t recover the details, learning how to raise blacks in Lightroom can help transform the shadows into artistic and aesthetically pleasing blacks.
Although light seems to be the critical ingredient in

Raising the blacks in such photos helps to increase the contrast and balance, making the photo look natural, realistic, and of higher quality. With the following Lightroom tips, you can raise the blacks or create a faded look that will give your photos a film effect.

The first step is to import the photo you want to edit in Lightroom. Launch Lightroom, go to File, choose Import and select Import Photos and Videos. Assuming you already have the photo on your computer’s hard drive, click on Add from the import dialog box that pops up.
Typically, this option tells Lightroom to import the photo into the workspace for editing without changing its location in the hard drive. Keeping in mind that Lightroom imports photos in the Library Module, switch to the Develop Module by pressing the D key on your keyboard.
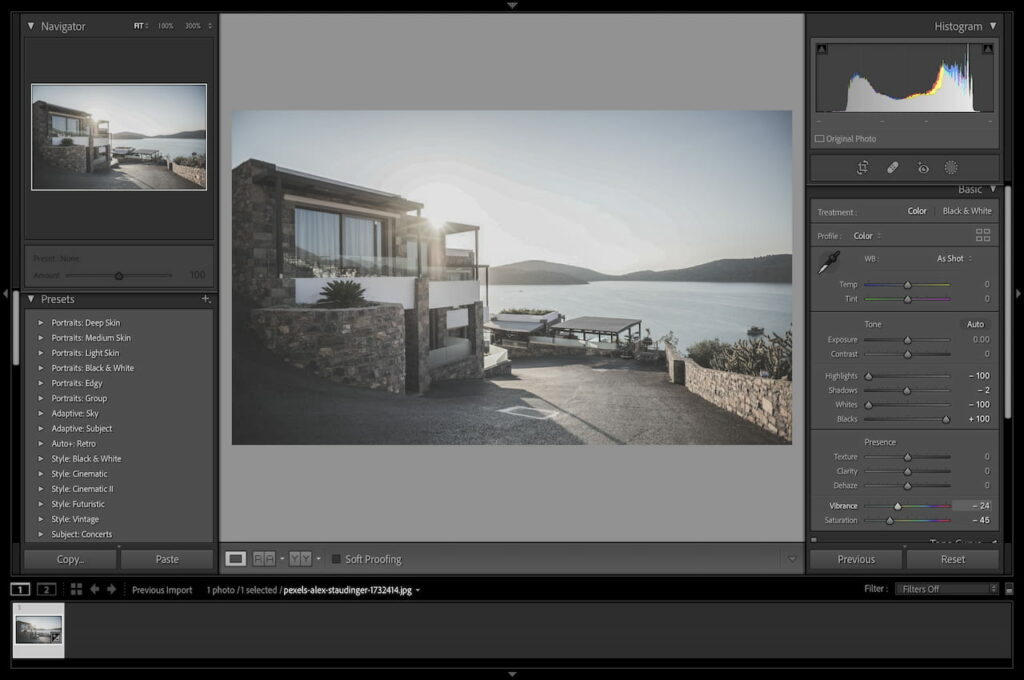
With the photo open in Lightroom, it’s advisable to first identify the blacks and shadows you want to edit. This will help you avoid tampering with areas with a good balance of shadows, blacks, highlights, and whites.
The most straightforward way to identify the shadows and blacks you might need to work on is using the Lightroom Histogram. Click on the three-dot menu icon at the top right of the Edit panel and then choose Show Histogram. The histogram is divided into five parts, ranging from blacks to whites, as follows:
Clipping means you have no data in the highlights or shadows and can’t recover the details. If the clipping indicator on your upper-right is illuminated and shows white, it means there are highlights clipping in your photo. Clicking on this indicator will show the clipped highlights on your photo as a red overlay mask.
On the other hand, if the clipping indicator on the upper-left is illuminated and shows white, it means there are shadows clipping in your photo. Clicking on this indicator will show the clipped shadows on your photo as a blue overlay mask.
Typically, you can turn the clipping feature on and off by clicking on the clipping indicators. Since you can’t recover the details in the clipped areas, you can consider using local adjustments to increase the blacks in clipped shadows or whites in clipped highlights for artistic purposes.

One way of raising the blacks is by reducing the highlights and whites in your photo. Drag the Highlights and Whites sliders to the left in the Basic panel. Usually, the extent of the adjustments varies from photo to photo depending on the initial exposure and how dark you want the photo to be.
Reducing the highlights and whites without adjusting the shadows and blacks means darkening the previously bright areas without darkening the already dark areas. In most cases, this will create an effect of reducing contrast, and you might lose some details.
To avoid this, increase the shadows and blacks by dragging the Shadows and Blacks sliders in the Basic panel to the right. Although the amount depends on the photo, avoid overdoing it as you might lose details.

Keeping in mind that the above are global adjustments that raise the overall blacks of the photo, there are high chances of shadows making you lose details in some areas. Typically, you will want to remove the shadows in these areas without affecting the entire photo.
Since a real estate photo might contain different subjects of different color tones, you might need to reduce the saturation to desaturate the image and make the blacks and shadows more dominant.
However, if you are editing portraits, it’s advisable to use the vibrance option instead of the saturation option, as saturation tends to affect the red and orange tones, making the resulting skin colors grayish.
In most cases, you will want to make the black matte if you have shadows clipping, and the photo looks less detailed. By making the blacks matte, you will be changing this unpleasing appearance to an aesthetically pleasing faded look like that of a film.
The most straightforward way to do this is by adjusting the Tone Curve below the Basic panel. Click on the Tone Curve to place a control point at around 20-40%, then drag the curve upwards. Again, the amount of fading will depend on the photo and your preferences.
You can make a subject dark in Lightroom by selecting it and then reducing the exposure. Pick the Radial Filter tool and then create a mask around the subject. Click on the Invert Mask option so adjustments can affect the inside of the filter. Drag the exposure slider to the left to darken the selected subject.
You can make a color stand out in Lightroom by reducing the saturation in the HSL mode. Reduce the saturation of every color to -100, except the color you want to stand out. Typically, this will turn the colors to grayscale, and you will remain with a black and white effect except for the color you didn’t desaturate.
If the details in the shadow areas of your real estate interior photos are grainy or unclear, knowing how to raise blacks in Lightroom can help you change the shadows to blacks, giving the photo an artistic look rather than a pixelated, grainy look.


