PFRE-Logo-white-bg
Reading
blue-triangle-element

Articles

PFRE is the original online resource for real estate and interior photographers. Since 2006, it has been a community hub where like-minded professionals from around the world gather to share information with a common goal of improving their work and advancing their business. With thousands of articles, covering hundreds of topics, PFRE offers the most robust collection of educational material in our field. The history of real estate photography has been documented within these pages.
All Articles
blue-triangle-element

Latest

Image banner for the March 2024 PFRE Photographer of the Month Winner Alex Vincent, with a featured image of his winning photo titled "Kitchen."

Congratulations Alex Vincent, March 2024 PFRE Photographer of the Month! The theme this month was "Kitchen". Alex Vincent - #906 Yvonne Raaijmakers - #909 Peter Wingfield - #902 Here's what Alex has to say: Thank you for the award of Photographer of th ...

Contest
blue-triangle-element

OVERVIEW

For over a decade, photographers from around the world have participated in PFRE’s monthly photography contests, culminating in the year-end crowning of PFRE’s Photographer of the Year. With a new theme each month and commentary offered by some of the finest real estate & interior photographers anywhere, these contests offer a fun, competitive environment with rich learning opportunities. 

Contest Rules
blue-triangle-element

CURRENT CONTESTS

View / Submit
blue-triangle-element

PAST CONTESTS

View Archive
Resources
blue-triangle-element

Resources

PFRE prides itself on the depth and breadth of the information and professional development resources it makes available to our community. Our goal is to help real estate and interior photographers be successful while bringing the community together and elevating the industry as a whole.
blue-triangle-element

Conference News

No items found

How to Convert Raw to JPEG in Lightroom

Published: 21/04/2021

As an Amazon Associate we earn from qualifying purchases.

It is a common practice to shoot and edit images in the RAW format. However, when you need to share these images with clients or post them on a blog, you need to convert them into JPEG. Learning how to convert RAW to JPEG in Lightroom will be helpful to use your images externally. 

How to Convert RAW to JPEG in Lightroom Via the Export Option

It is true that editing options in Lightroom are slightly more diverse for RAW images than they are for JPEGs, such as the White Balance. This facilitates processing to an extensive level which is always a good thing when you are editing. All is good until it is time to use your image outside Lightroom. Then it is important to convert them into JPEG format. 

Why Does The Need Arise To Convert Raw Images To JPEG?

  • To send the images to a client
  • To share them on social media/email
  • To publish them on a blog post

It is very easy to change your RAW photos to JPEG in Lightroom. It is a non-destructive process where the original RAW file remains in your Lightroom catalog while a new copy is stored on a folder in your hard drive in JPEG format. You can then use those images in the ways mentioned above. 

Let’s dive into the actual process of converting image format after editing. 

Enter the Library Module After Editing Your Image

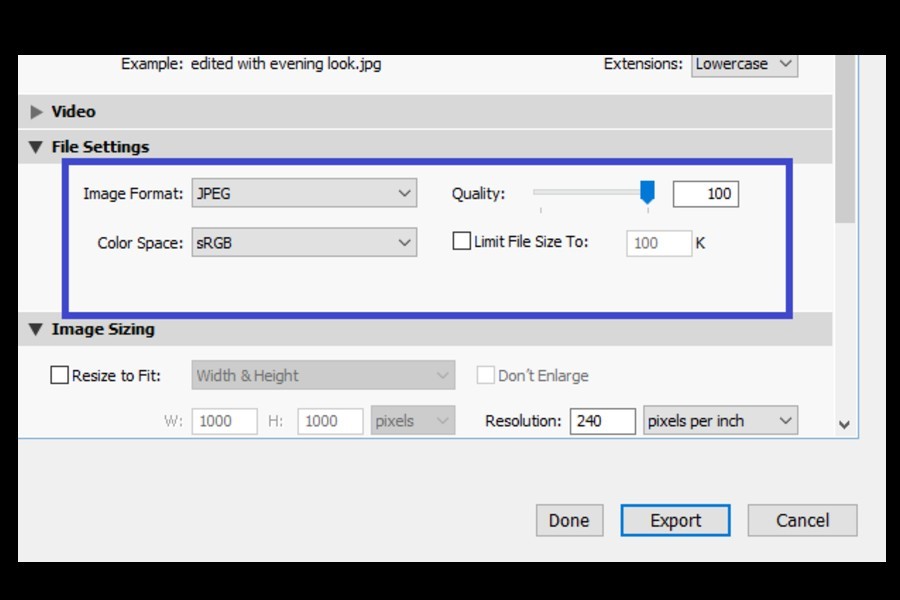
Typical photo processing involves three major steps. Importing a RAW image from your camera, Editing it in the multi-featured Develop module of Lightroom, and then Exporting it outside Lightroom. Assuming that you have already completed the first two steps, I will begin the conversion process from where it actually happens, the Library module.

  1. Once you are done with editing in the Develop module, choose the Library module.
  2. Select the image that you want to convert. You can use the multi-select option here in the Grid View to select as many photos as you wish.
  3. Now select the Export option on the left-hand side. Alternatively, you can go to the File menu and select Export from the drop-down.

Choose the Export Dialog Settings 

  1. When you have selected the images and clicked on Export, the Export dialog will open.
  2. The first option that you need to select from here is the Export To option. Set it to Hard Drive.
Choosing the Export Dialog Settings when converting Raw images to JPEG in Lightroom
  1. Next, open the Lightroom Presets option, and select Burn Full-sized JPEG Preset.
Selecting Burn Full-sized JPEG Preset option
  1. Choose the desired options for File Naming, File Settings, Image Sizing, and Output Sharpening panels as per your preferences. 
  2. Any Metadata changes or Watermarking you require is also selected here from the export dialog box. 

Export Your Image in JPEG Format

  1. Make sure the image format in the file settings option is set to JPEG.
Exporting image in JPEG Format in Lightroom
  1. If all options are checked according to your preference, click on the Export button at the bottom of the dialog box.

Your photo will now be exported to the destination folder after being converted into JPEG format. It is now much smaller in size and ready to use externally.

Frequently Asked Questions

Can I Convert RAW Image to JPEG in Lightroom’s Print Module?

Yes, you can. Open the Print module and go to the Print Job panel on the right-hand side. From the Print to option, select JPEG. Choose the other specifications, such as the file resolution and JPEG quality, and you are good to go. The image will be printed in JPEG format.

Is JPEG Image smaller in Size Than RAW format?

Yes, JPEG files are much smaller in size than RAW files. JPEG is a compressed format without much compromise on the image quality, which is why it is a universally accepted format for images, with many more advantages like compatibility and vibrancy. The RAW images are as much as three times larger in size than the JPEG images.

Can I Batch Convert Photos to JPEG in Lightroom?

Yes, converting multiple photos to JPEG is possible in the Grid View of Lightroom.

  1. If you want to select all images, press CMD+A on Mac or CTRL+A on Windows.
  2. If you want to select images in a sequence, hold down SHIFT and click on the first and last image in the row. 
  3. If you want to select images that are not placed side by side, hold down CMD on a MAC and CTRL on Windows, and click on the desired images until all are selected.

Go on to export using the same method mentioned above. 

Conclusion

To share your images outside Lightroom, you need to change their format from RAW to JPEG. Lightroom Classic will create a new copy in JPEG format rather than converting the master copy, which is in RAW format. I hope that the above tutorial will help you in the process of converting the image format for external use. 

Vendors

Rela Logo
CS6 PSE Logo
HD Photo Hub Logo
FullFrame Logo

Learning Topics

.
magnifiercrossmenucross-circle