


In today’s competitive real estate market, static photos are no longer enough. Buyers expect dynamic, engaging content that brings properties to life. Enter Reptov, a powerful new platform that transforms ordinary listing photos into professional marke ...


As an Amazon Associate we earn from qualifying purchases.
Lightroom Classic CC is undoubtedly an exceptional software for photo processing and organizing. However, it isn’t unusual to face some speed and performance issues while using it. Learning how to make Lightroom faster can help you make the most of your editing time and this amazing software.
Quick Navigation
A software as useful as Lightroom is understandably heavy. Multiple factors may be causing its slow speed, like a bloated catalog, less RAM on your computer, or even background processes that run simultaneously.
Facing speed issues can be quite annoying, especially when you don’t want to waste a lot of time editing photos. Any photographer would like to spend more time taking photos rather than processing them. Therefore, determining the cause of a lagging speed and solving those issues is vital for a productive workflow.

Below, I are describing a few steps that can help increase Lightroom’s running speed.
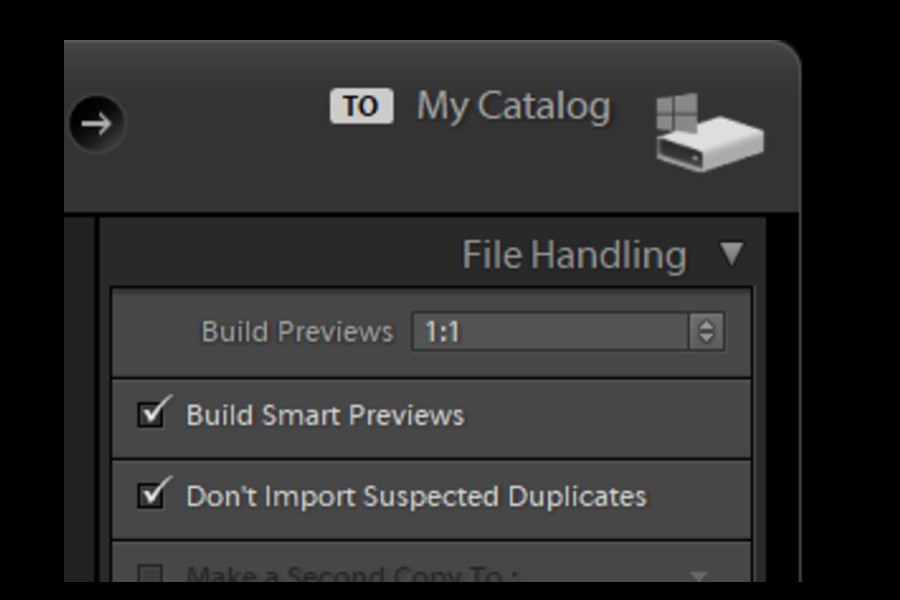
Rather than using full-sized RAW images for editing, Lightroom allows me to use smart previews in the Develop module. Smart previews are much smaller in size than the original images, which makes quick editing possible.
Just by using smart previews, you will notice a considerable improvement in Lightroom’s performance. To enable smart previews, you can go to the Library menu on the top left and go down to the Previews option.

Select Build Smart Previews and click on Build All from the dialog box.
Alternatively, you can tick the checkbox for Build Smart Previews from the File Handling panel when you import the photos.
Most Lightroom users complain of delay in rendering previews. To solve this problem, you need to understand how Lightroom previews work.
When you import a photo, you will see the Build Previews option on the right side under the File Handling panel. Setting it to 1:1 means that Lightroom will build full-sized previews. This, in turn, takes less time in rendering previews in Library and Develop modules.
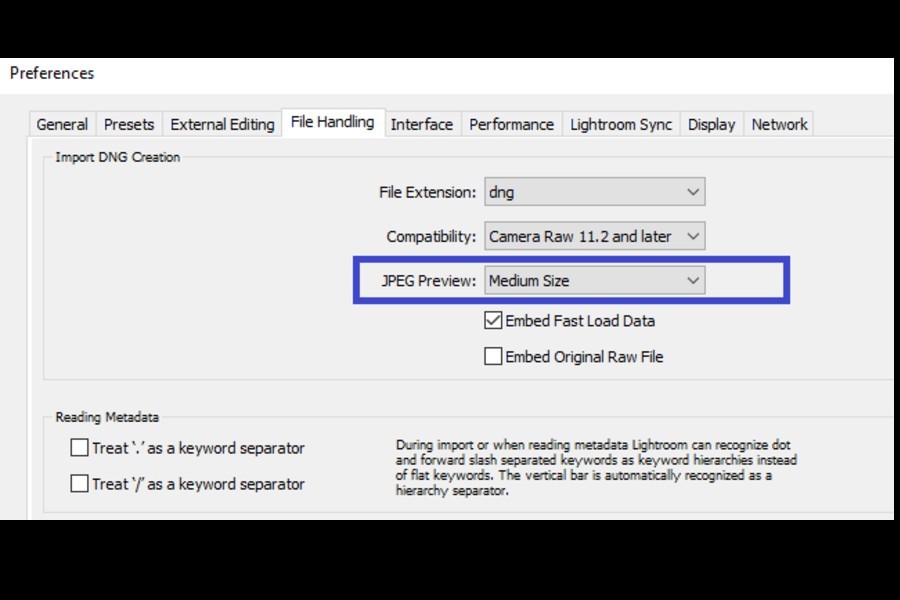
You can set the preview size to Medium so that it speeds up the preview building process. Go to the Edits menu (on Windows) or Lightroom menu (on Mac) and click on Preferences. Go to the File Handling tab and set the JPEG preview size to Medium.
If you are choosing the Standard previews option, it is highly recommended to set your preview size to Auto. Go to the Catalog settings from the Edit menu on Windows or Lightroom menu on Mac. Set the standard preview size to Auto.

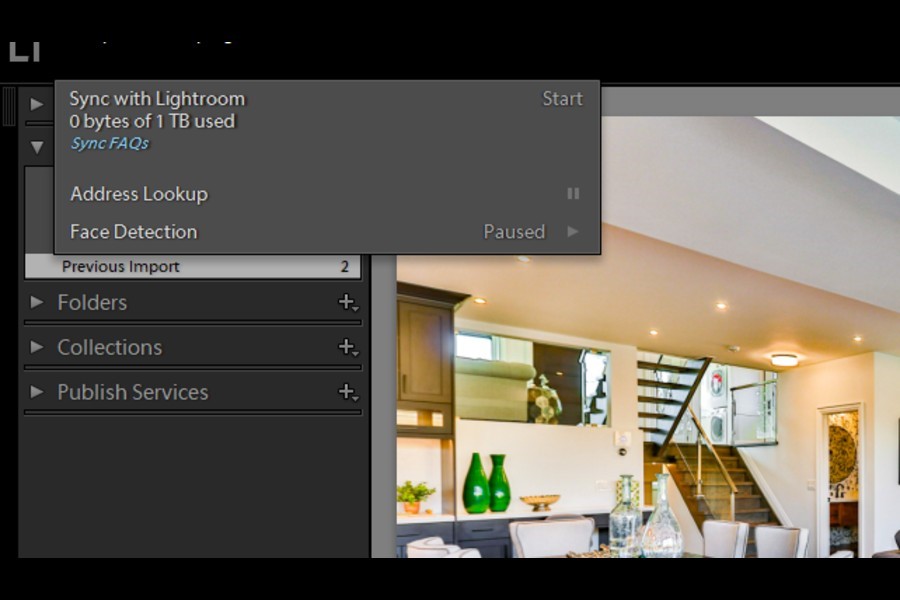
While you import and edit photos, your CPU and system are used to sync images with the Creative Cloud. Pausing “Sync with Lightroom” temporarily will reduce the load from your CPU, giving you more resources while you import and process photos. You can turn it on after completing your work and let the software remain open to continue the syncing process.

If Face Recognition and GPS tracking are turned on in Lightroom, the AI technology slows down the speed of the software. It consistently scans images to detect faces and look up addresses. You can pause both features by clicking on the arrow beside your user name and clicking on the Pause button beside Address lookup and Face detection.
The performance of Lightroom depends mostly on your hardware and memory. Therefore, if you find that Lightroom speed is sluggish, insufficient RAM may be the culprit behind it. This can happen when you run several programs along with Lightroom, like multiple browser tabs.
Adobe recommends using at least 4GB RAM to use Lightroom, stating that 12GB is your best bet. Increase your RAM to the suggested level and make sure your operating system is at least 64 bit. Doing so will bring significant improvement in Lightroom speed, especially while importing and exporting images.
Boosting the size of your Camera Raw Cache is a quick way to accelerate Lightroom’s performance. It results in faster preview generation.
Go up to the Edit menu on Windows or Lightroom menu on Mac, and select Preferences. Under the Performance tab, adjust the Camera Raw Cache Settings. Set your cache’s maximum size to at least 25 GB if your computer uses a solid-state drive (SSD) as the storage device or more if you have space on your hard drive.

Most photographers shoot their photos in RAW format, yet it is an undeniable fact that the format is considerably bigger in size and hence slows down processing in any photo editing software. DNG, on the other hand, is a smaller-sized image format. It is also compatible with Adobe, as the company itself designed the DNG format.
When you import your RAW images, instead of moving or copying them in the Lightroom catalog, select the option of Copy as DNG to save space and speed up the editing process. An additional step I recommend is to go to the Edits menu on Windows or Lightroom menu on Mac and choose Preferences. Go to the File Handling tab and set the Import DNG Creation options as shown below.

Using a good, portable SSD and saving your Lightroom Catalog and previews file on it is a sure-shot way to speed up Lightroom. Solid State Drives can make your computer up to 30 times faster, speeding up any process that you do on Lightroom.
For photographers whose catalogs get bulky quite quickly, this step is crucial to squeeze out optimum performance from Lightroom without compromising the catalog size.
Although it sounds complicated, optimizing the catalog is quite simple in Lightroom. Just go to the File menu, and you will find the option to Optimize Catalog. Click on it, and it will open up a dialog box showing you when your catalog was last optimized. Click on optimize, and it will automatically do the work for you.
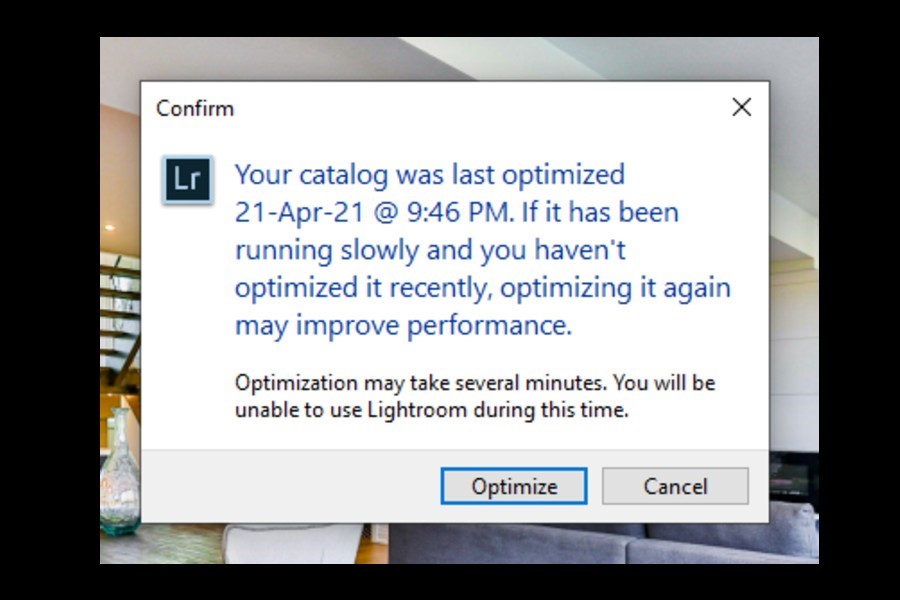
This may take some time if you have a large catalog that hasn’t been optimized for many days. This step alone is a solution to several speed-related issues in Lightroom.
It makes good sense to upgrade the software to the latest version. Adobe rolls out new versions with bug fixes and optimized performance, which will automatically solve your speed issues. In addition to it, you will get the added benefit of new and improved features.
You can get updates regarding new versions by going to the Help menu and selecting Updates.
As you go on to edit an image, Lightroom keeps track of the current and previous adjustments, resulting in a performance that gradually slows down. To tackle this issue, I recommend abiding by the suggested order of adjustments in the Develop module, which are as follows:
When you open multiple programs alongside Lightroom, the memory gets used up by each of them, slowing down Lightroom. Close unnecessary browser extensions, tabs, and programs while using Lightroom. Organize your workflow in such a way that it uses other programs once you are done with work on Lightroom.
Adobe also recommends pausing Security and Antivirus programs that run in the background and conduct real-time scanning.
Speed-related issues are a common occurrence in Lightroom if you have storage and memory issues on your system. However; there are multiple ways to optimize Lightroom’s performance targeted at using less space on your hard drive. It is always a wise option to keep your hardware and software versions up to date to enjoy a seamless workflow.


