


In today’s competitive real estate market, static photos are no longer enough. Buyers expect dynamic, engaging content that brings properties to life. Enter Reptov, a powerful new platform that transforms ordinary listing photos into professional marke ...


As an Amazon Associate we earn from qualifying purchases.
Twilight real estate
Quick Navigation
Twilight
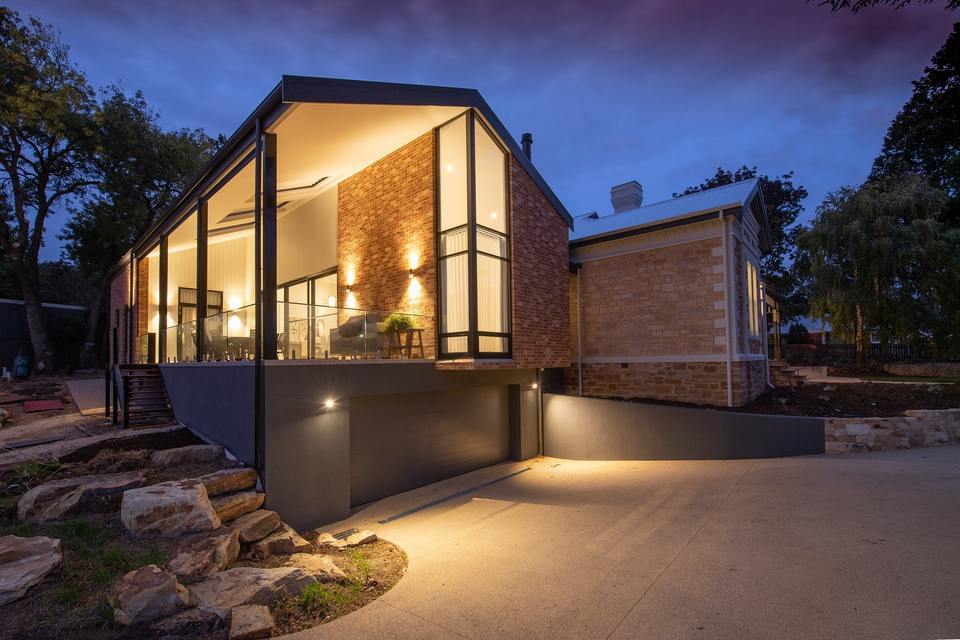
Photographers who want to work in the real estate industry must also know how to take twilight images that can further help sell a home. With these tips, you can successfully do a property shoot and let buyers see the beauty of their new home.

Make sure that the homeowners turn on the interior, landscaping, and exterior lights, if there are any. It's easy to underestimate the amount of time it takes to get all the lights on, especially if the homeowner is not there to show you where all the switches are.
I've found that the exterior spots can frequently be too much brighter even than the brightest interiors. You can selectively turn each bulb off by unscrewing the bulb slightly. A small step ladder is handy for this.
Use a tripod and cable release to eliminate vibration because exposure times will be 5 to 30 seconds, depending on the aperture you use for an image. If you don't have a cable release, use the interval timer to release the shutter.
Even if your DSLR can't support high ISO values, you can use a tripod for long exposures. I’d also suggest extending your tripod as high as it can go.
Use a graduated neutral density filter as the darker top-half of the filter can darken the sky, while the clear bottom-half will keep the natural exposure on the house.
Similar to a typical real estate photo, you still need the right settings to create an exposure that can capture the details of a home.
One way to take a twilight photo is to do the `straight-out-of-camera' (SOOC) method, in which you wait for that magical window, where the intensity of the natural light from the setting sun matches that of the house's interior light.
The other method is the “light-painting” approach, in which pops of flash augment the directionality of the light emanating from the house. It enhances various features of the surrounding landscaping. However, light-painting is more complicated than SOCC.
The best time of the day for twilight
You can use Naval Observatory, LightTrac, and SunSurveyor to search for sites with beautiful sunset times. By entering the city and state, these websites can show you what time sunset will happen on a day, as well as which direction the sun will be.
Be ready to capture the perfect light that will match the intensity of the interior lights. Some photographers like to hose down the driveway or cement areas, so they are wet for a twilight photo. You can also make an image look wet in Photoshop.
Similar to interior
One way is to use large continuous lights inside to boost the amount of light coming through the windows. I've also seen twilight shots where continuous lights work well in situations requiring focused light on the outside of the home.
This is a whole dimension beyond the basic twilight image. For details, see Mike Kelly's in-depth video series on how to do this.
Strobes can also work, although as opposed to continuous lights, you need to diffuse them to achieve good color.
Spend some time to scout out the best angle for a twilight image. Like photographing interiors, the goal is to use composition to highlight property features.
While the composition typically focuses on the house's front side, look at the back as this is also a good angle to highlight.
For the front side of a home, try to get an angle that allows you to show the front entry door closer to the camera than the garage doors. If the garage doors are closest to the camera, they will look disproportionately large relative to the rest of the house.
The main problem with twilight shoots is that you would typically need to edit exposure. These are the different ways of editing a twilight image.
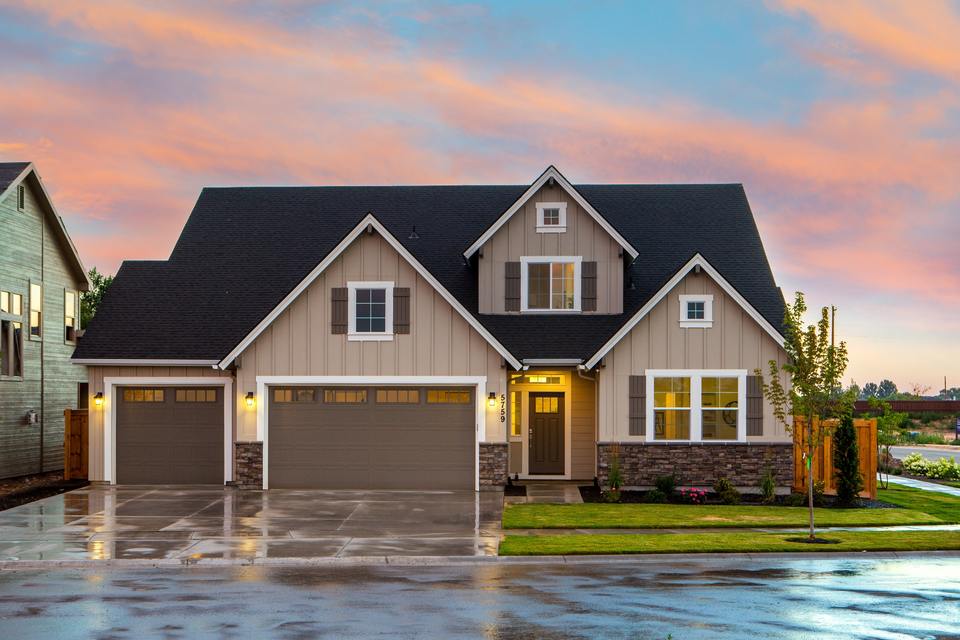
Unlike photographing in broad daylight, twilight shoots make a property look even more majestic by using the sky and its colors as the background. Taking photos of a property at dusk helps people do their home search, letting them see the night environment of a home.
Yes, since real estate
Twilight real estate
Everyone feel free to add to this list if you think I've missed anything!


Is your twilight photo best in the evening or the morning? If the sun is setting behind the house from your vantage point, by the time the sky looks great, the house will be really dark.
Start early. When the scene looks great to the eye, it's likely going to look too dark to the camera. Shooting brackets is a great idea. The magic time when everything is lit the best is pretty short so you don't have time to fiddle around with camera settings when it comes.
Make SooC your goal and separate components for home, windows and sky your backup. It's not always possible to get it bang on straight out of the camera, but it's whiz in post when you come back with an image that's 95% done.
Bring some worklights to light up the windows from the inside. I've gone to LED (warm white), but the older halogen ones work too. Don't forget extension cords. If the home just has a couple of table lamps, you may never get a good quantity of light out of the windows until it gets very dark outside and you can drag the shutter all you need. Speedlights and strobes will also work, but you will need to gel them to get a good color and you may have to modify the settings quickly to get all of the windows balanced well enough.
I like using the graduated neutral density filters to darken the sky. It buys some time and often lets me finish when there is still a little light left to pack up.
If you have a CamRanger or other remote software option, you will be much better off by not having to touch the camera to make exposure adjustments. By tethering, you also can get a much better screen to evaluate how well you are doing as you make images.
I forgot to add that if you are using halogen worklights, they get hot and they also suck up a bunch of power so you have to be careful about blowing a breaker if you are running 4 or more. I splurged on the LED type (not Home Depot or Lowes junk) as they draw far less power and don't get nearly as hot so I don't have to wait 45minutes before I can pack them away.
Francine, we had an amazing webinar last month on shooting and editing twilight photography using both single images and multiple image composites. A great learning experience for a newbie: https://learn.shootingspaces.net/twilight-photography-editing-webinar
The advice to get there earlier than you think you need to is spot on. The pre-sunset sun can drop behind a thick cloud bank at the horizon an hour before sunset and it can get a whole lot darker really fast! Also, as people probably already said, it takes time to find and turn on all the lights, position and set your own lights if you're using them, set up your own rig outside, troubleshoot whatever, etc etc etc. Good luck!
Great advise, what's challenging for myself is how to selectively tackle inconsistent lighting and colors visible in the windows sometimes with twighlight shoots.