PFRE is the original online resource for real estate and interior photographers. Since 2006, it has been a community hub where like-minded professionals from around the world gather to share information with a common goal of improving their work and advancing their business. With thousands of articles, covering hundreds of topics, PFRE offers the most robust collection of educational material in our field. The history of real estate photography has been documented within these pages.
In today’s competitive real estate market, static photos are no longer enough. Buyers expect dynamic, engaging content that brings properties to life. Enter Reptov, a powerful new platform that transforms ordinary listing photos into professional marke ...
For over a decade, photographers from around the world have participated in PFRE’s monthly photography contests, culminating in the year-end crowning of PFRE’s Photographer of the Year. With a new theme each month and commentary offered by some of the finest real estate & interior photographers anywhere, these contests offer a fun, competitive environment with rich learning opportunities.
PFRE prides itself on the depth and breadth of the information and professional development resources it makes available to our community. Our goal is to help real estate and interior photographers be successful while bringing the community together and elevating the industry as a whole.
As an Amazon Associate we earn from qualifying purchases.
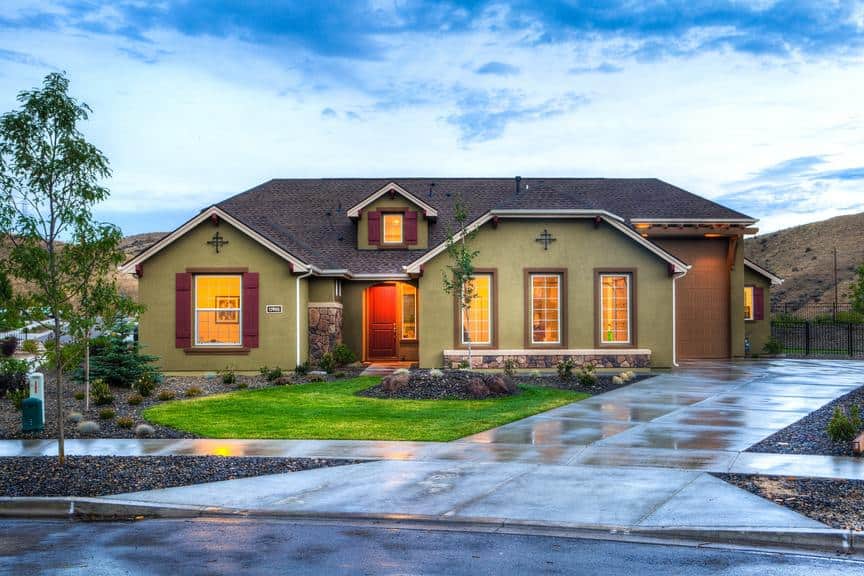
You may come across properties where agents want to dampen the driveway or walkways. Perhaps you're shooting on a hot, sunny day, and the water dries before you finish. With that, I'm going to teach you how to achieve a great 'wet look' in Photoshop to save water and time.
Adding a wet look or reflections can make a property look more dimensional compared to leaving it flat. You can make something look wet in Photoshop by duplicating layers, using the Curves tool, adjusting opacity, and even applying the Plastic Wrap effect.
Here's a step-by-step tutorial on how you can make pavements or pathways look wet using Photoshop.
Creating a Wet Look Using the Curves Tool
While actual water looks better, you'll find that editing reflection-like moist looks pretty great and convincing as long as you follow these steps.
Select the pavement area you want to look wet in the top layer.
Select the Curves Tool
Use Image > Adjustments > Curves to bring up the Curves dialog box.
Click on the lower-left section of the curved line and drag it to the right until the pavement area selected darkens, so it looks wet. Don't go too far, or the pavement will look more like asphalt.
In many situations, you may be satisfied by stopping here because this darker look is usually better than the dry light look.
The second characteristic of wet pavement is it has reflections. You can add reflections manually, but this can be tricky. Here is a video tutorial that shows adding reflections in a nighttime situation.
Adjust Opacity
Finally, you can set the Opacity of the wet cement layer to get just the look you want.
Creating a Realistic Wet Look Using the Plastic Wrap Filter
Compared to using Duplicate and Curves tools, applying the Plastic Wrap in Photoshop is quicker yet also a great technique of adding a wet look or some reflections.
Open the photo you need to edit.
To get the Artistic Filters to show up, you have to go to Preferences > Plugins and check the Show all Filter Gallery groups and names checkbox.
While the layer that you've darkened with the Curves adjustment is selected, choose Filter > Artistic > Plastic Wrap.
Next, play with the Highlight Strength, Detail, and Smoothness sliders until you get a look you like.
Set the Highlight strength between 8 to 20, Detail to 5, and Smoothness of 1 to 15to create a new effect.
Click the Layer Mask at the bottom of the Layers panel to put a black layer mask to the wet look layer.
Press V to choose the Move tool, so the duplicated layer would move down the lines.
Click the Eraser tool, then set the appropriate size to 91 pixels and set the hardness to around 40%. Use the Eraser to remove excess lines caused by flipping the duplicated layer.
Click the duplicated layer. Go to the Filter menu, choose Blur, then click on Motion Blur.
Set the distance to 10 pixels and angle to 90 degrees.
Adjust the duplicated layer's opacity slider to around 65%.
Frequently Asked Questions
Can You Use Photoshop to Make a Shiny Paint Effect?
You can enhance a property's dull paint in Photoshop by going to the Layer palette and right-clicking the Background layer. After that, select Duplicate Layer to add the shiny paint effect to the whole photo. Lastly, choose the Blurand Gaussian Blur from the Filter menu.
What's the Technique to Make Lights Glow in Photoshop?
When the lights of properties don't emit enough light, you can make them glow by clicking on Layer, then Layer Style. After selecting Outer Glow, the program will automatically give a light yellow for the outer glow. You can move the slider up and down to set the glow's color.
Conclusion
There you have it — a new technique to enhance your real estate photographs! Whether you use various editing tools or apply filter effects in Photoshop, these methods are much more effective and time-saving than hosing the driveway down, and you can stillgive people very realistic images.
6 comments on “How to Make Something Look Wet in Photoshop”
I think the wet pavement looks pretty tacky myself. I would probably do something like add a charge for this as a sort of staging. Like twenty-five for wet pavement on exteriors. The desired result wood not be to make extra money but to dissuade people from wanting it. If I had to do it though I would do it onsite and not in post, just make sure you get paid for the trouble.
My preparing your house for photography information list actually states - do not hose down decks paths or other surfaces, the reason being it looks wet, it starts to dry unevenly and nothing worse than getting to area to take photos and its all patchy and waiting for somebody to hose it down just to make it looked like it rained. I get them running around with mobs and brooms trying to even up the "wet look".
I'm also not a fan of wet pavement. The worst is when the yard and driveway are obviously drenched and somebody replaces the sky to look like it's ninety degrees out. But I've never heard of anyone spraying the driveway on purpose.
@Andrew - I checked out your website and saw your massive tripod for elevated photos -- impressive, to say the least! Where did you find that and what sort of system do you use to capture the photos from below?
There is an agent in my area that always waters the driveway before taking snapshots with his cell phone and it always looks tacky. I know what look he is going for, but it works only for certain properties and then usually only for twilight photos where the water will be reflecting the lights. Watered asphalt at twilight will give the best effect. Concrete looks the worst during the day from uneven drying, pools and coloration.
There is a PS filter (action?) from Flaming Pear called "Flood" that might do the job better than getting out the hose. It's more work in post production so there should be an extra charge for the editing.
See if you can talk the agent out of the look as a general thing and "clip" some images that you find where it comes out well to show examples of the type of situation where it could be worth the effort and charges.
I trigger it from up there with a camranger. I have gotten pretty good at judging the amount of down-tilt I will need, then I raise it up there watching on my ipad, and am able to turn it until I get what I want. This will usually take at least one lowering and raising back up. It really isn't much trouble at all though. It is right on b and h listed as a manfrotto super high aluminum stand. They went on sale last Christmas for three-hundred and I jumped on it. That was with shipping included, which is hard to believe the thing weighs a good twenty pounds. The main reason for buying it was the ability to do elevated twilights, but I never seem to get hired for those but I am hoping to get more soon. Great thing is I use it as my lightstand outdoors when I do group portraits and put a huge softbox and monolight up there, not high, and the thing is totally unshakable in the wind. That's been the added benefit.


I think the wet pavement looks pretty tacky myself. I would probably do something like add a charge for this as a sort of staging. Like twenty-five for wet pavement on exteriors. The desired result wood not be to make extra money but to dissuade people from wanting it. If I had to do it though I would do it onsite and not in post, just make sure you get paid for the trouble.
My preparing your house for photography information list actually states - do not hose down decks paths or other surfaces, the reason being it looks wet, it starts to dry unevenly and nothing worse than getting to area to take photos and its all patchy and waiting for somebody to hose it down just to make it looked like it rained. I get them running around with mobs and brooms trying to even up the "wet look".
I'm also not a fan of wet pavement. The worst is when the yard and driveway are obviously drenched and somebody replaces the sky to look like it's ninety degrees out. But I've never heard of anyone spraying the driveway on purpose.
@Andrew - I checked out your website and saw your massive tripod for elevated photos -- impressive, to say the least! Where did you find that and what sort of system do you use to capture the photos from below?
There is an agent in my area that always waters the driveway before taking snapshots with his cell phone and it always looks tacky. I know what look he is going for, but it works only for certain properties and then usually only for twilight photos where the water will be reflecting the lights. Watered asphalt at twilight will give the best effect. Concrete looks the worst during the day from uneven drying, pools and coloration.
There is a PS filter (action?) from Flaming Pear called "Flood" that might do the job better than getting out the hose. It's more work in post production so there should be an extra charge for the editing.
See if you can talk the agent out of the look as a general thing and "clip" some images that you find where it comes out well to show examples of the type of situation where it could be worth the effort and charges.
Thanks Jake.
I trigger it from up there with a camranger. I have gotten pretty good at judging the amount of down-tilt I will need, then I raise it up there watching on my ipad, and am able to turn it until I get what I want. This will usually take at least one lowering and raising back up. It really isn't much trouble at all though. It is right on b and h listed as a manfrotto super high aluminum stand. They went on sale last Christmas for three-hundred and I jumped on it. That was with shipping included, which is hard to believe the thing weighs a good twenty pounds. The main reason for buying it was the ability to do elevated twilights, but I never seem to get hired for those but I am hoping to get more soon. Great thing is I use it as my lightstand outdoors when I do group portraits and put a huge softbox and monolight up there, not high, and the thing is totally unshakable in the wind. That's been the added benefit.
Thanks for publishing!!! Well worth reading just to understand the techniques> I always enjoy these types of posts.