


In today’s competitive real estate market, static photos are no longer enough. Buyers expect dynamic, engaging content that brings properties to life. Enter Reptov, a powerful new platform that transforms ordinary listing photos into professional marke ...


As an Amazon Associate we earn from qualifying purchases.
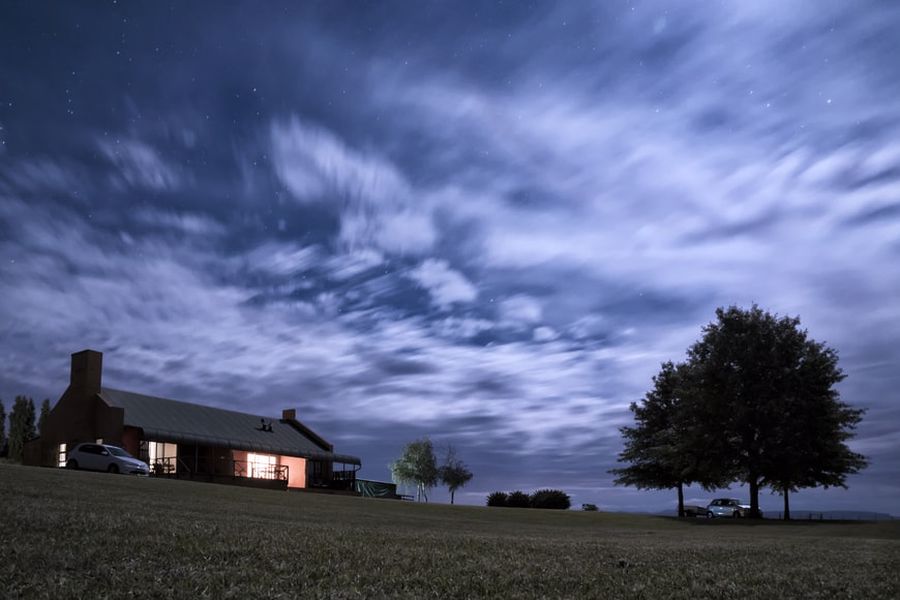
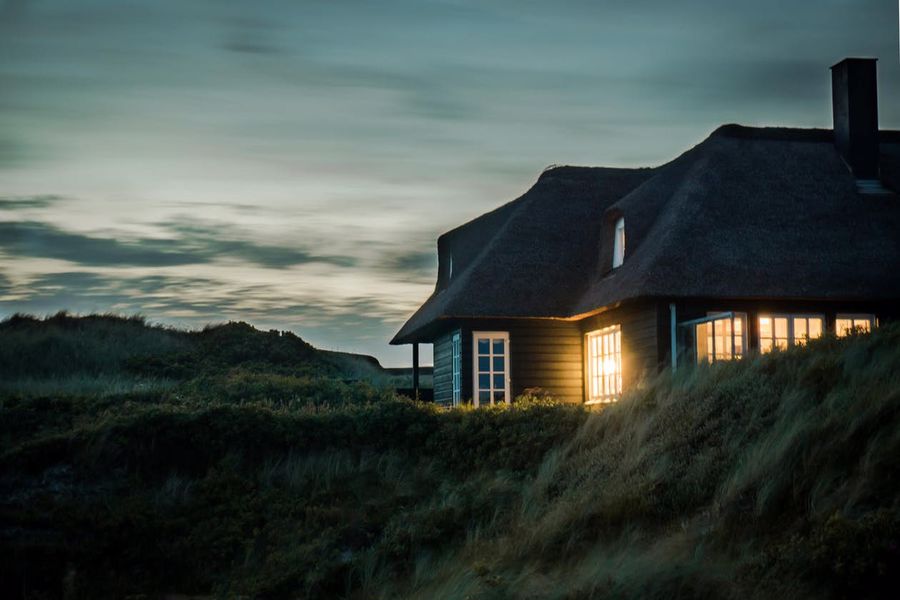
If you have seen photos of real estate properties with a beautiful silky background, you may have thought that they are heavily edited using an advanced photo editor. However, this is not always the case. This is the result of an easy and well-known camera technique.
The technique is called long exposure photography and it takes advantage of slow shutter speeds in order to create a unique and aesthetically-pleasing effect. It is a technique that is commonly used among real estate photographers so that their photos will stand apart.
Quick Navigation
In order to do long exposure properly, you need to set the lens’ aperture to the appropriate value depending on the subject you’re shooting. If you are going to do real estate

However, you will need to prepare a few things before you can start shooting. You first need to study the weather on the day that you are going to do your photo shoot, check the location of the real estate property, and set up the right gear for your photoshoot. We’ve listed the process below so you can know how to do long exposure effectively.
The success of long exposure photography depends heavily on the weather. If you check out long exposure shots from other real estate images, you will notice that many real estate photographers make use of clouds in order to create intense, eye-catching skies while taking pictures of the exterior of the property.
What works best for the long exposure technique is a cloudy sky. However, if the weather is not ideal, you can still do the technique with a mostly cloudy sky. White skies like clouds with no texture at all should be avoided. The long exposure effect will not stand out in those types of scenes and you will get a drab shot.
In an image with long exposure effects, the real estate property looks very different from how you see it in real life. You must be able to create a long-exposure scene with your mind. Imagine the overall look of moving clouds outside. This process often takes time, as you would want to analyze every possible angle before you start your photoshoot.
In order to address the issue, and to make sure that you finish your photoshoot with a strong shot, it is best to scout the real estate property hours or days ahead of time. You need to think about moving objects that you might encounter. Try to determine how they will move on the day of your photoshoot.
Also, you can download and install an app that will assist you in planning your photo shoot in advance. These types of apps can determine what the possible weather and sun and lighting condition on the day of the shoot and where the sun will be. Since the sun moves throughout the day, if you accidentally include it in your composition, it will add a bright streak of light to your images which does not look good.
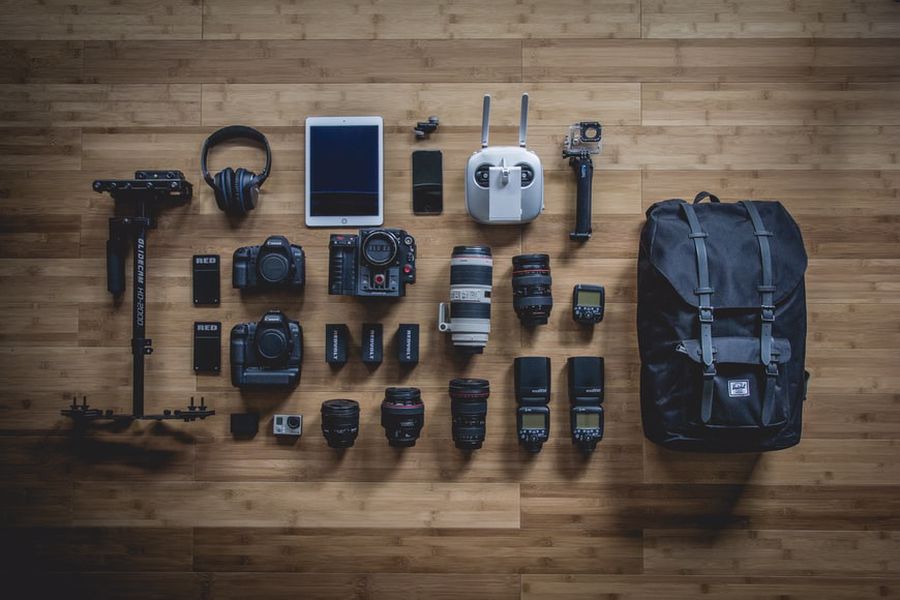
The long exposure technique is not gear demanding. You need your camera, either a DSLR or a mirrorless one. You will need a filter depending on how brightly lit or dimly lit the area of the photoshoot will take place. You will also need a tripod to support your camera and the lens.
The tripod can assist the camera over the course of the exposure, which often lasts from five seconds to ten minutes. Without a tripod, you will end up with a distorted shot even if your camera has a built-in stabilization system.
If you don't want to miss out, it is best to invest in a high-quality tripod. It is better to get one that can withstand strong winds especially if you want to shoot near the coast. In the process, you need to mount the camera on the tripod and set up the accessories that you will need for long exposure such as the filter holder and remote shutter release.
Before doing a long exposure, make sure that the composition is refined and your focus is set. You need to keep the whole shot sharp, from the subject to the background, all the way to the foreground. It is also important to take note of your distance from the scene, which is also called hyperfocal distance.
If you want to use manual focus, you can set the lens' focus ring in the area where you want it to. As for autofocus, you can position the camera's active autofocus point on your subject, and you just have to half-press the camera’s shutter button to effectively stabilize the focus.
Next, toggle the lens from Autofocus to Manual mode. In this way, the focus will still be locked even if you press the shutter button by accident.
Once you've got all of the gear prepared, you need to choose the camera settings. Select the mode that you want to use. You can go for manual or you can go for aperture priority. Your ISO should be at its lowest native value. You can go for either of the following:
As soon as you are done, you need to set the aperture to the right value for the genre of
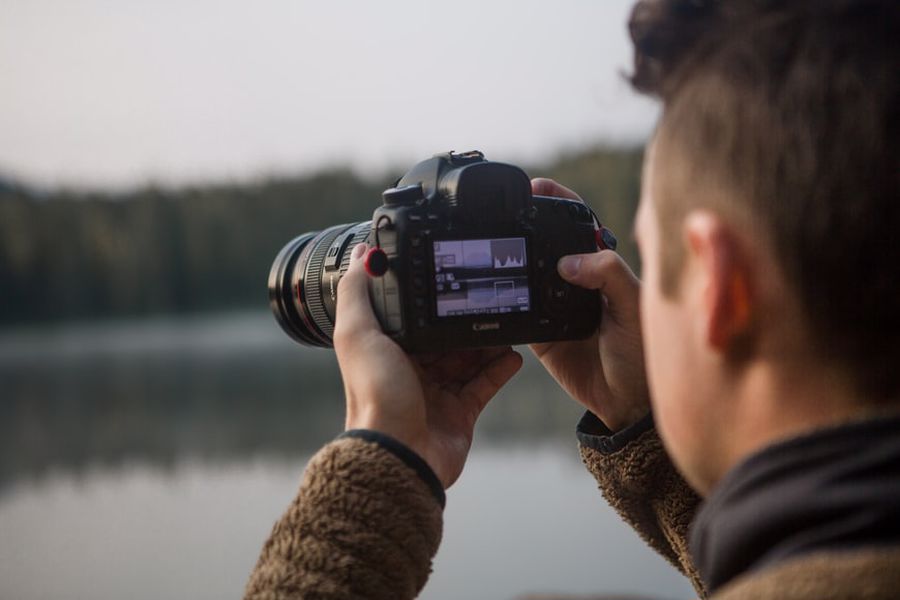
Next, check the histogram to know whether you have nailed the long exposure or if you still need to make some adjustments. The test is done once you get the correct exposure, so make sure to adjust the shutter speed or the exposure compensation and keep shooting until you get the result that you want. If the shot is successful, remember the shutter speed that you've used so you can use it again.
Next, you need to add your filter. If you are shooting in low-lit areas and you do not need an ultra-long exposure, you can get away with shooting images without any filter. However, for most long-exposure photos, a filter is a great idea.
Real estate
For real estate
The rate in ND filters is called "stops." Each stop doubles the exposure time of the previous number. For example, if an ND filter is at a five-stop rate, it will change the 1" exposure to 32", and a six-stop rate will require 64". By adjusting the rate, you will be able to effectively capture real estate images that are not overexposed and that have a soft background and beautiful aesthetic.
Do not overdo the rates and use the ones that match the background of the subject. If you end up using a strong filter, the camera’s viewfinder will be blurred out and it will be difficult to see through them.
You don't need to worry about this because if you follow this guide, you will remember that composition has already been made and the focus is already set. You may be taking shots blindly, yet all is set and the camera will be able to see the subject well.
Your camera’s bulb mode allows you to alter the thirty-second speed limit of your camera’s shutter. If the camera that you have has this feature, it is better to use it.
If your DSLR or mirrorless camera does not have this mode, or if the filter is not dark, or if you are shooting in strong light, you do not need to make this change.
In this next step, you need to know the right shutter speed, which requires a simple shutter speed calculation. Take note of the shutter speed that you used when you took that test shot. You need to tweak the shutter speed from time to time in order to cover for the several stops done by the filter.
Review the darkness of your neutral density or ND filter. Below are the shutter speeds commonly used by real estate photographers:
If you are using a 10-stop filter and the test shot was at 1 per 15 seconds, you will need to change the shutter speed by 10 stops to slow it down to 1 shot per minute. You can easily find conversion tables online if you do not want to do the math. You can also download apps for your phone that will do the conversion for you.
As soon as you've taken a picture, review the histogram once more to finalize everything. If the new histogram is already equal to the histogram of your test shot, you have successfully done the long shot exposure technique.
However, if the new histogram has a shift on either side, you need to shoot again and adjust the shutter speed.
Not all neutral density filters are the same. There are a few different systems that you will come across, yet they also come in different stages of darkness for filters.
The level of darkness of filers comes in three terms:
The optical density of the filter refers to how dark the filters are and how much is needed to extend the exposure time so you can get the same exposure that you would without any filter. So for example your neutral density filter is on a 10 stop rate, you will need to set your shutter speed to 10 stops as well.
Photographers who are new to the long exposure technique often make the same mistake, they only get the brightest filters with 1 to 2 stops. These tend to be a bit cheaper yet they also do not have much effect in some scenarios. However, they can be used during the blue hour when the atmosphere is darker.
The 6 stop and 10 stop filters are used to decrease the camera's shutter speed. If you need to use it during the golden hour, you can just extend the shutter speed to a couple of minutes. These dark filters are used in most photos where you see clouds that are stretched out and water that appear silky and smooth.
The 500 rule in
The result of this equation is the maximum number of seconds for which you can expose the image before you capture different motion blurs like the moving clouds in the sky, the running around of home pets, the rotation of garden hoses, and more. The rule also requires you to set the ISO of your camera to 3200 or to 6400 and the aperture to f/2.8 or wider. The calculation of this rule is straightforward when you use a full-frame camera, however, there is a decrease in exposure time.
Keep in mind that the 500 rule is not a perfect solution. There are still some adjustments that need to be done depending on the circumstances and the area where the real estate property is. Factors like atmospheric haze, light pollution, and the angle of the sun are something that you need to take note of.
A Canon camera's crop sensor is 1.6, which means you will have to account for that when you use the 500 rule. The equation will be 500 divided by the focal length of your lens multiplied by1.6.
For example, if the focal length of your lens is 50mm, that is 500 divided by 50 multiplied by 1.6. That is equal to 6 seconds. This is the shutter speed that you need to use in order to effectively use long exposure using your Canon camera.
The crop sensor of a Nikon camera is 1.5, which means you will need to divide 500 by the focal length of your lens and multiply it by 1.5.
For example, if the lens’ focal length is 50mm, you need to divide 50 by 500 and multiply the result by 1.5. That is equal to 7 seconds, which should be the shutter speed so you can do long exposure through your Nikon camera.
Make sure that you set up the composition correctly, apply the appropriate settings especially for shots without any filters, and take a test shot to make sure that both the focus and exposure are good. Next, switch to manual focus and mount the filter onto your camera's lens.
You also need to calculate the new shutter speed and apply it without adjusting the other settings. Take another shot and make adjustments if necessary. Following the guide is important, and you also need to make sure that you take time in getting everything done correctly as a single mistake can cost you time and effort.
Now that you know how to do long exposure


