


Congratulations Dave Koch, September 2025 PFRE Photographer of the Month! The theme this month was "Stairwell". Dave Koch - Entry 1099 Alyssa Huang - Entry 1095 Paul-Dan Dragoman - Entry 1098


As an Amazon Associate we earn from qualifying purchases.
White balance can be hard to get right when you're out shooting. Whether because of tight timing, bad shooting conditions, or tricky lighting, it isn't always possible to nail it in-camera. Sometimes, it's easier to just fix the white balance later on with editing programs. I've prepared a guide on how to fix the white balance in Lightroom.
Quick Navigation
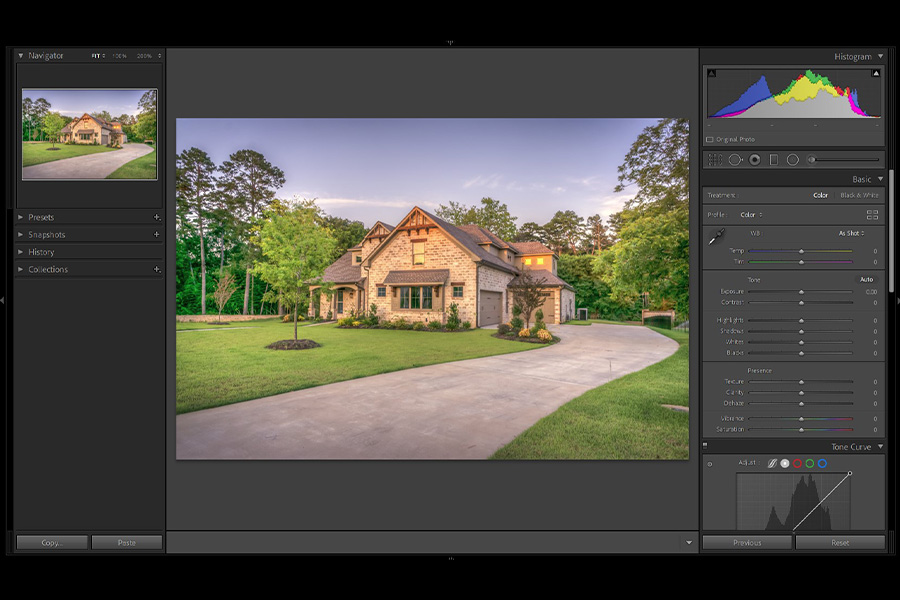
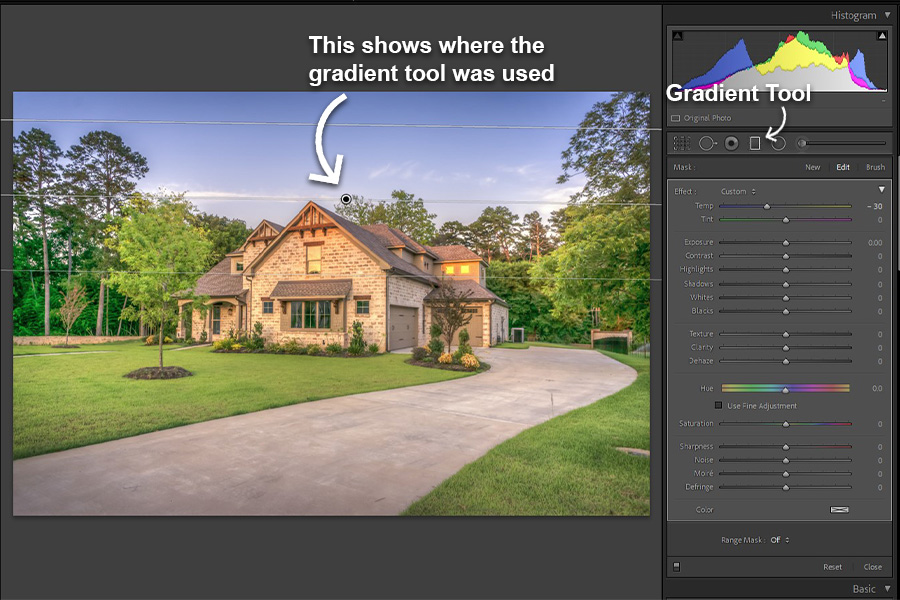
You can correct the white balance of a whole photo in Lightroom using preset options, as well as temperature and tint sliders. Meanwhile, for editing certain areas of an image, use the Brush, Radial or Graduated Filters, Eyedropper, or White Balance Selector tool.
Getting an accurate white balance in Lightroom should be one of the first steps of your photo editing workflow since it relates to a photo's color temperature. While there are times when the auto option in digital cameras won't reproduce your desired results, you can compensate and make white balance corrections through this editing program.

Easily fix the white balance when there's an orange color cast or during twilight with presets - Grab the entire collection of Lightroom Presets from Shooting Spaces here!
With Lightroom presets, slider, and dropdown menu, you can quickly fix the white balance of an entire image. See which one would work best for your photos.
Like camera white balance options, there's a drop-down menu of presets from the Develop module where you can pick a Lightroom white balance preset that either fits your style or is close to the colors of your image.
Keep in mind that the Lightroom presets above only work for RAW files. Shooting in JPEG only gives you three white balance presets: As Shot, Auto white balance, and Custom.
Most of the time, it's ideal to set your camera to RAW. RAW files give you the most flexibility for color correcting, including white balance adjustments and Lightroom white balance presets, in post-processing.
If an image ends up too warm or too cool when using Lightroom white balance preset options, you can make white balance improvements with the help of the Temperature and Tint sliders.
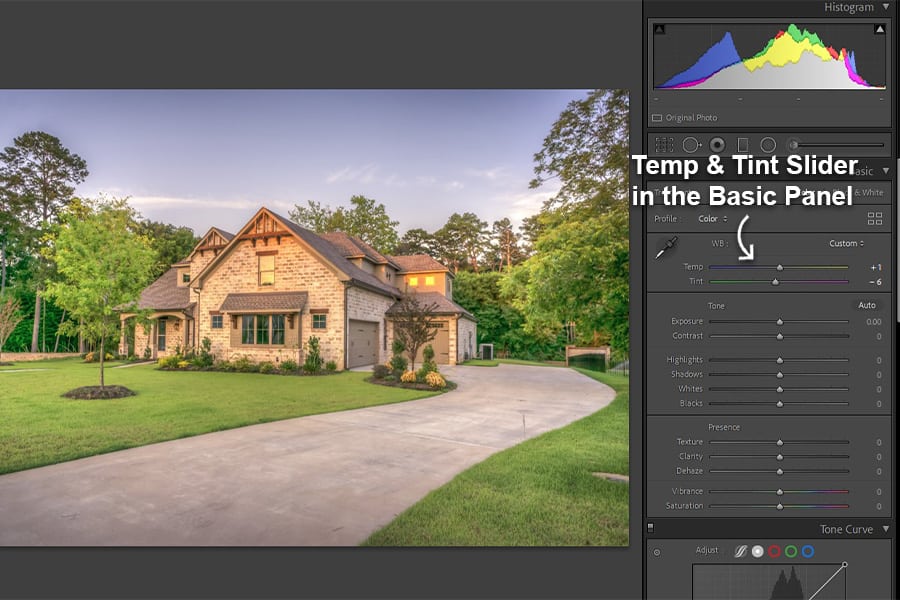
Temperature value ranges from 2000 to 50,000 for RAW, whereas JPEG only has -100 to +100. In general, moving the Temp slider to the right or moving the up and down arrows makes an image warmer or more yellow, whereas dragging the temperature slider to the left creates a bit of a cool or blue effect.
After setting the temperature, adjust the Tint slider to remove green or magenta colors. Move the tint slider to the right if you need to get more purple hues. Meanwhile, drag the Tint slider to the left if you prefer to make a photo have a bit of a greener tone.
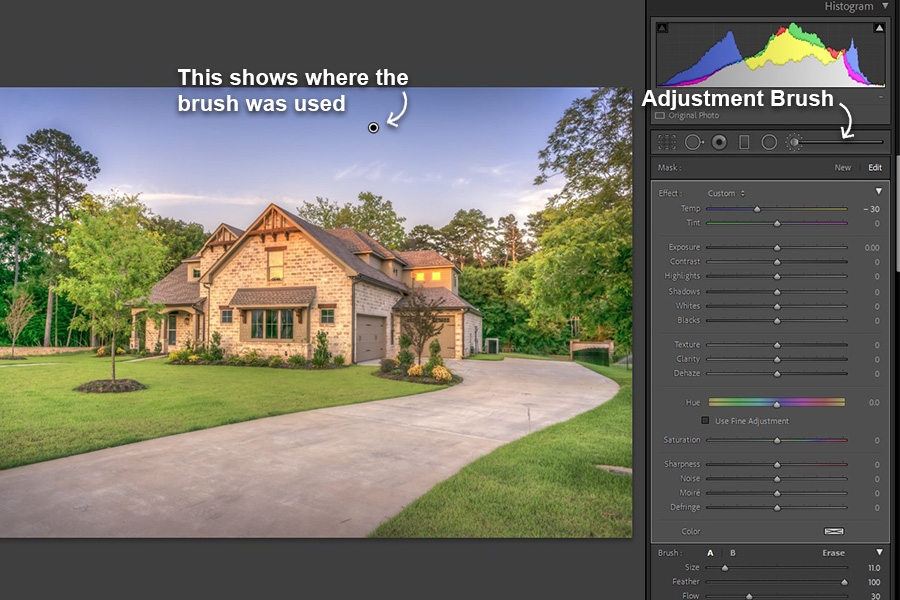
There are times when a real estate image has mixed lighting conditions, especially in interiors with various lighting fixtures. In effect, your photos get different colors. After applying a preset, you can use these Lightroom tools to get an accurate white balance of certain portions.
In Lightroom, using the Adjustment Brush involves 'painting the change' on specific areas of an image where you want it.

With the Radial or Graduated Filters of Lightroom, you can correct white balance in Lightroom by placing a filter and then applying a bit of adjustment only to a particular part of a photo.
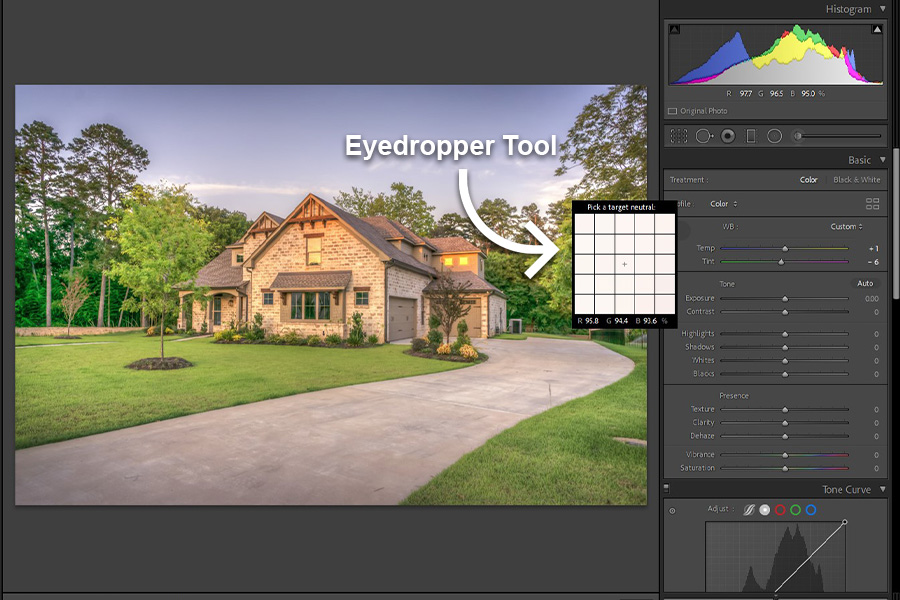
Learning how to adjust white balance using the White Balance Selector tool or Eyedropper is one of the most time-saving ways to set your white balance. The white balance selection tool calculates the average luminance of the neutral point and RGB colors to set new values for color temperature and tint sliders.
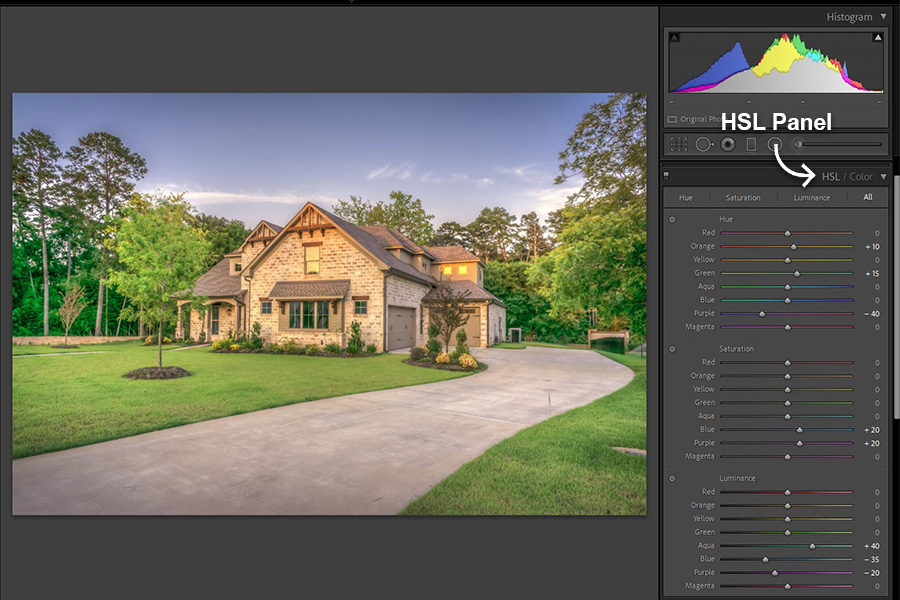
Using the HSL Panel is another easy way to adjust white balance, make white balance setting adjustments, and remove color casts, especially if you need to target an image's particular colors.
Lightroom's HSL allows you to tweak a color's Hue (shade), Saturation (intensity), and Luminance ( brightness).
Some default settings do a great job with auto white balance, and it's usually safe to pick auto white balance setting as a starting point, especially when you can do post-production and apply a white balance preset in Lightroom.
You can adjust the white balance a bit in Photoshop using the Curves panel. Click the white balance dropper and choose an area of the same photo that's meant to be white or something as close to 50% grey as possible. See this white balance trick from the Graphics Geeks.
For the details of adjusting white balance in Lightroom, John McBay has several videos in his Image Editing For Real Estate video series that deal with all the classic mixed white balance issues that I run into in interiors.
As we've mentioned earlier, even when using white balance presets in post-processing, adjusting an image's white balance in Lightroom should be easy once you learn the white balance techniques and tools. While choosing a perfect white balance may depend on your style, real estate
What workflow do readers use for white balance? I’d love to hear from readers as to how everyone handles white balance.


For starters, I shoot in raw—for the uninitiated, it allows you to set WB after the fact. I will typically leave my Canon in auto white balance, but Canon's (modern models) have a secondary auto white balance mode that prioritizes trying to get whites over ambiance (for example, it does a better job with making incandescent bulbs not be too yellow).
However, if I'm shooting primarily with natural light and flash, I will set it to daylight balance (if I remember). That way I can more easily batch correct things in post. I do the same for exteriors.
All that being said, I would say 90% of the time I'm using the eye dropper tool in Lightroom on something white to get WB to look where I think it should. I find that I can sample the same white ceiling, for example, at different parts and I get significantly differing results. In the end, I try and make each of my exposures (I do ambient/flash exposure blending) look about the same by eye and it usually works out.
Trying to get white balance correct when different lights are producing different colors can be tricky. So, while I generally prefer to shoot with the lights off (if there's enough natural light) and augment with flash, sometimes you just gotta leave the lights on to get the job done more quickly. I do have a technique I came up with that, at least for one recent shoot, worked extremely well for fixing color casts from different light sources in Photoshop, and it's relatively quick to implement. If anyone is interested I'll attempt to do a screencast on it... Let me know.
Shooting RE? There is no standard workflow for Wb. You can spend most of your time changing out the light bulbs if you want, but that won't solve the issue. Some shoot with all lights off, that will go along way, but then you lose the ambiance of the space. Shooting with flash could overcome the color of the different lights, but then you lose the ambiance again.
Bottom line, this is a RE product that has a life span of 30 to 90 days AND the agents will not spend the mula for what it takes to perfect a perfect image. Hone your skills and strive to do the best, but keep in mind that your here to make a living... a decent living, not feeding off the discarded bones left by agents
Ok, I normally refuse to pollute Larry's very informative posts with my swill, but this is just such a thorough and accurate overview of tackling WB I just could not resist 🙂
https://www.pecephoto.com
That link above was a mistake, here is the real one...
https://youtu.be/u8DFBz8Wans
RE photography presents a unique challenge with white balance. As Colin pointed out, you can eyedropper click on the ceiling and depending on where you click, get vastly different results. The same can be said for neutral gray cards. Depending on where in the scene they’re placed, results will differ. The reason this is true is simple. Consider all the different light sources most rooms have. Open the drapes/curtains, etc., and we have sunlight. Turn on the lamps and we can have everything from fluorescent to tungsten to halogen. Most times, we introduce flash to confuse the issue further. Then, we have the reflective qualities of the furniture and the paint on the walls. Sometimes, we have a second room in the picture with its own set of circumstances. All affecting WB.
The solution is neither simple nor foolproof, as there is no ‘scientifically’ accurate and repeatable method; despite all the YouTube videos out there proclaiming otherwise. Obviously, you have to shoot RAW, but I’d assume most pro’s are doing that. Typically, I start out with the eyedropper, sampling several areas I think might work. Once that decision is made, I then move the sliders to see if that improves the picture. With the picture now looking generally pretty good, I frequently will use the graduated filter and the circular filter to ‘spot’ correct problem areas. When the picture looks pleasing to the eye, colors are reasonably close to the original (assuming you accurately remember) and the overall look ‘sells’ the room, you’re done. Don’t forget, we’re not there to document the house. We’re there to sell it.
For exteriors, Daylight or Auto tends to get it right. Adjust manually as necessary.
For interiors, set flash frame to temp 5150 tint 0. (part of an LR preset on import)
If that doesn't look right, eye dropper on either the ceiling, baseboard or outlet cover.
If that doesn't work, try "Auto".
By now you've got a pretty good sense of what looks right. Go back through each and then adjust manually.
None of this is as precise as a gray card, but you can move through lots of shots in a hurry.
Andrew,
Was the youtube link you sent supposed to go into other videos before we hear what you have to say?
Like Colin I always shoot RAW. That way you can change the white balance in post if necessary.
I use Luxmeter+ to measure the temperature of the light when shooting interiors. The temperature can vary within each room so I take a few measurements and usually set my WB somewhere in the middle. If it needs a bit of adjustment I do it later in Lightroom.
Luxmeter+ is an app for iPhones. I paid $12 for it. I tested it by measuring the light in my locat camera shop (where he has all daylight balanced lights in the shop) and it was very accurate.
I shoot RAW and either use an x-rite mini or tape a gray card to a wall with gaffers tape. Really any white object will work. I also read that wrapping an object with plumbers tape works well.
I shoot RAW and either use an x-rite mini or tape a gray card to a wall with gaffers tape. Really any white object will work. I also read that wrapping an object with plumbers tape works well.
Only feel I need to use these when the lights are very yellow or orange or the rooms are in the yellow to red spectrum.
Agreed on shooting RAW, that should be a given. For those of you working with a Canon 5D Mark IV, in the auto white balance setting, you can activate a setting to prioritize whites, which is helpful. One trick I've found that seems to help is I'll manually adjust my white balance a bit cooler in post and then isolate the color blue and desaturate it slightly. There's a balance to be had there with adding some contrast back in, but I've done it so many times it's fairly second nature and I find it's a decent way to get colors where I want them, quickly.
I don't go too crazy with WB on RE images. A job for a designer or a company with distinctive colors it would make sense to employ a color checker to keep color correct for each image. For RE, I'm most interested in how the images feels rather than if the colors are absolutely accurate. When I'm sequencing the images I plan to deliver, they are all up on one page as thumbnails which lets me see if they all hang together on a warm/cool basis. I'll go back in and make adjustments if I see images that don't match the set. Would that be better described as "grading"?
RAW gives a lot of leeway, but you also need to be working on calibrated monitors. Your customers probably aren't, but as the professional, you should be working from a known reference.
Appreciate the feedback... For conventional real estate shoots (where cost is a factor) I've always photographed in RAW with Auto WB on my camera. The one additional step I think I'll add is (on import into Lightroom) set the import WB to AUTO as well. That seems to get to the closest WB for 90% of the less expensive real estate situations. For more expensive homes, I'll just need to revisit Scott Hargis, Andrew Pece and other solutions that use additional lighting sources. Thanks everyone!
As others have said, I shoot RAW in the field. When I get back to the computer, I batch convert the WB using the AUTO setting on lightroom, which gets about 60 percent of them right (to my eye). Then I go through each rather quickly, and correct as needed with the WB slider.
White balance is tricky on interiors. First you have to understand that while light coming through windows is "daylight" balanced, its influenced by the blue sky and any number of exterior surroundings like green grass and trees. So while it is primarily daylight, it can also create green color shifts on walls and blue contaminated highlights on floors and other reflective surfaces. The second issue is the interior tungsten lighting. This is always a mixed bag because bulbs can have different colors. So whats the answer? And is there one single workflow that addresses all these issues?
My approach is to first evaluate the interior tungsten light turning off any compact fluorescent or other odd color lighting. I also carry a few home made dimmers that I can plug table lamps into to control brightness. I gel my flashes with 1/4 CTO filters to push the daylight strobes a little closer towards tungsten. No two interiors are the same but I generally shoot trying to use flash power and shutter speed to bright the brightness level and color temperature of the tungsten down. When tungsten overpowers daylight, you get orange/yellow color shifts. The object for me is to do everything I can in the field to make post easier and faster. Sometimes you have no choice but to make exposures with and without tungsten and blend them together later in PS.
I use LR and PS to edit images. I do rough color edits in LR using color balance sliders and the HSL panel. Few people talk about this but when you do color editing in LR its like using a hammer. Color editing in PS is like using a jewelers screwdriver. I PS I do composting work first, and group those layers. Then I use a number of Hue Saturation adjustment layers to remove magenta, blue, cyan and green color cast. If its effecting something specific in the image, I just use the layer mask that's created and brush black to bring the color back locally. Finally I use a Color Balance adjustment layer and work my way up starting at highlights, mids and then shadows, rocking the color sliders back and forth just a few points so my eye can see any color shift. Using this approach can really get you dead on color. You can turn the layer on and off to see the difference and always go back in to refine your settings. I then group the color adjustment layers and adjust opacity of the group. I do this because these tools can be like bleach to grays and whites and this allows you to put back some color cast back that makes the image look more realistic. Finally, command shift option E to stamp visible, (create a single layer from composite and color adjustment layers), and do any cloning or sharping on this single layer. Save close and import back into LR.
I hope this helps. Hers a few final tips. I carry black plastic to block any problematic windows and white cloth diffusion material to neutralizes color shifts from window light. My workflow may seem like too much trouble and overly slow, but I have actions and key commands set up that speeds the process. Do it enough times to form muscle memory and you can do some very sophisticated editing in a short period of time. -Jeff
"Can You Adjust White Balance in Photoshop?
You can tweak white balance a bit in Photoshop using the Curves panel. Click the white balance dropper and choose an area of your image that's meant to be white or something that's as close to 50% grey as possible."
The above statement seems to imply that adjusting white balance in Photoshop is much more limited than it is in LR. Adobe Camera Raw (part of PS) is the nearly exact equivalent of LR's Develop module and has the same WB tools as described in the article.
Getting the "correct" WB is a fools errand. The WB of a given space changes constantly with season, time of day, weather, artificial lighting, the position of shades, blinds, curtains, and more.
Adjust the WB to make the image look pleasing.
I completely agree with the techniques shown. One more that I think has not been commented would be making use of a color cheker. I use it in cases where the white balance can really fail me. It consists of shooting a photograph with the palette, another without the palette. Subsequently, by applying the color profile of the image and correcting it in photoshop.
One of the first things you need to deal with is the exposure. You can play with temperature and tint all you want, but once you start editing for exposure, your white balance edits will look completely different than when you started - a waste of your time.
Set your parallels with Transform, then immediately balance your exposure across the entire image, then deal with your highs and lows on the tone curve. You now have an exposure balanced image to work on and your temps and tints will be much easier to work on.
Give this technique a try and it should help with your speed and quality.