


In today’s competitive real estate market, static photos are no longer enough. Buyers expect dynamic, engaging content that brings properties to life. Enter Reptov, a powerful new platform that transforms ordinary listing photos into professional marke ...


As an Amazon Associate we earn from qualifying purchases.
Although Canon cameras are one of the best, you might not capture stunning images if you don’t know the right camera settings to use for your long exposures. Knowing how to do long exposure on a Canon will help you capture sharp and bright photos even in poor lighting.
Quick Navigation
Long exposure
Most Canon cameras use two modes to shoot long exposures: Bulb setting and manual. Bulb setting is an exposure setting on your camera that allows you to use more than 30 seconds of shutter speeds, giving you control over the exposure time.

The manual, on the other hand, uses a specific shutter speed range. It allows you to manually control the camera’s main configurations, such as ISO and aperture. Depending on your lighting and lens, you can use the following long exposure
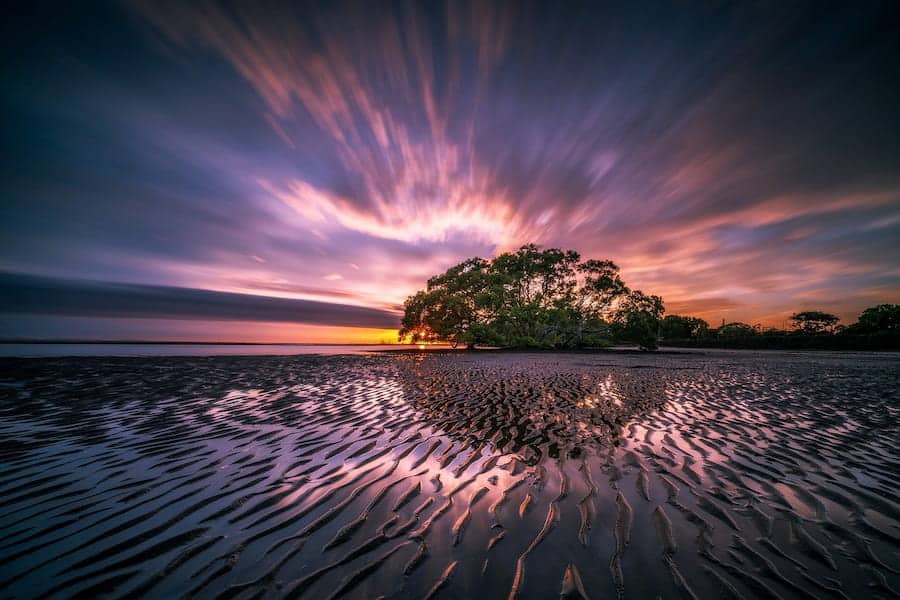
Like how important money is for business support, so is composition in
Keeping in mind that scenery plays a huge role in long exposures, knowing your surroundings will help you determine which is the best place and angle to shoot from. For instance, taking photos with some areas under bright sunlight and others under heavy shadows can make even post-processing challenging.
Scouting the location in advance also helps you to imagine the moving objects that might appear during your photo shoots, such as water, clouds, or birds. You may even try capturing some test shots to get the possible compositions for your photos.
Even if you have identified the subjects, the weather of the area you will be capturing, such as rain or the position of the sun, may make or break your long exposure.
Considering that the sun moves across the sky, you may try using a photo planning app to help determine the sun's position during your long exposures. This will help you take the necessary steps to avoid putting it in the frame.
In most cases, long exposure
Considering that long exposure is about minimizing camera shake and slowing down the shutter, it’s not gear intensive, and you only need to carry the following equipment:

Considering that the entire image should remain sharp from background to foreground, the focus should be at a hyperfocal distance. If you have difficulties determining the focus point, you can try using the depth of field calculator.
Set the lens focus ring into position if you're using a manual focus, or place the active autofocus point on the main subject and then press the shutter button halfway to engage the focus if you are using autofocus.
Considering this
With the shooting mode set to Aperture Priority (Av) or Manual (M) mode, set the camera ISO to the lowest native value, which is ISO 50 or 100 and then set your aperture appropriately, depending on the scene. For instance, the best aperture for landscapes is between f/8 and f/22.
Typically, this aperture ensures that the entire frame is in focus. Also, since the aperture regulates the light that reaches the image sensor, a narrower aperture such as f/22 is essential in long-exposure
Take a test shot and determine from the histogram whether you have got the exposure right. If the exposure is incorrect, adjust your exposure compensation or shutter speed and continue capturing until you get the most satisfying results. Note down the shutter speed you used when capturing that photo.
A neutral-density (ND) filter is a colorless photographic filter that decreases the intensity of the incoming light evenly in all wavelengths, meaning it does not affect the colors in the photo. This gives you precise control over the light entering the camera sensor.
Add the Neutral Density filter to your lens. Adjust the shutter speed you wrote down from the test shot to compensate for the f-stop number the filter introduced.
If you are using a camera like the Canon PowerShot G7 X series that comes with a built-in ND filter, you only need to switch it off in the menu when taking the test shot and then switch it on when shooting with a slower shutter speed.
You can also use the conversion tables and apps if calculating the long shutter speeds is challenging. However, if the long exposure
The two primary neutral density filters in long exposure
On the other hand, variable ND filters block a variable amount of light, offering more flexibility. As a result, you can use variable ND filters to create various effects, such as smooth water or motion blur. However, they can also introduce image quality issues, such as color shifts and vignetting.
Although ND filters are suitable for long-exposure
The following are classic situations where you can use ND filters in long-exposure
When shooting a crowd of people, there is often a lot of movement. Long exposure can capture motion blur, creating a sense of dynamism and conveying the crowd's energy. You can enhance the motion blur by using ND filters to extend the exposure time, resulting in more pronounced streaks or trails of people moving through the frame.
This can add an artistic or dramatic effect to the photograph. Also, in crowded situations, there might be unwanted elements or distractions in the frame, such as individuals walking in and out of the scene or obstructing the main subjects.
By using a longer exposure with an ND filter, the moving people in the crowd become blurred or partially invisible, reducing their impact on the overall composition. This helps to create a cleaner and more focused image, highlighting the main subjects or the overall atmosphere of the crowd.
Clouds in the sky can be bright, especially during the daytime, with ample sunlight. Long-exposure
Using an ND filter, you can reduce the light entering the camera, allowing for longer exposures while maintaining proper exposure and preserving cloud details. ND filters can also help enhance the colors and contrast in cloud
By reducing the overall brightness and exposure, the ND filter can deepen the saturation of colors and increase the tonal range in the sky. This can result in more vibrant and dramatic cloudscapes, richer blues, more defined cloud formations, and better overall image contrast.
Water bodies can be busy with activities like waves, ripples, or moving objects. By using a longer exposure with an ND filter, these dynamic elements become blurred, creating a cleaner, more serene image.
This draws attention to the main elements of the scene, such as rocks, reflections, or distant landscapes. Using longer exposures can also give water a misty or foggy appearance.
Since water bodies, such as rivers, lakes, or oceans, are often reflective and can result in overexposure and loss of detail in the highlights, an ND filter, can reduce the amount of light entering the camera, allowing for longer exposures without overexposing the image.
Keeping in mind that many Canon cameras come with a shutter limit of 30 seconds, you won’t be able to shoot ultra-long exposures unless you bypass this limit. Fortunately, you bypass this limit using simple long exposure
You can check whether your Canon camera has the dedicated Bulb mode feature by turning it to Manual mode and slowing down the speed below the 30 seconds limit. Usually, a B letter should appear as your shutter.
You will need to press the shutter release button throughout the exposure time for the mode to work. However, for advanced Canon cameras, you can use the Bulb timer feature, which allows you to set the exposure time in hours, minutes, and seconds, and the camera will automatically close the shutter when the time lapses.
You can edit long-exposure photos using photo editing software like Adobe Lightroom or Photoshop. Adjust basic settings like exposure, white balance, contrast, and saturation.
Pay attention to the highlights and shadows, ensuring a proper balance of colors and tones. Apply noise reduction techniques to minimize any visible noise that might have been introduced during the long exposure.
Consider making some sharpening and clarity adjustments to enhance details and textures. Fine-tune the tonal range using curve adjustments to achieve the desired mood. You can also apply a subtle vignette effect to draw attention to the central elements and crop the image if necessary to improve composition.
Leaving the shutter open for a prolonged time allows more light to get in, resulting in overexposed or completely white images. You can fix this issue by regulating the other settings of the exposure triangle, such as narrowing the aperture and using the base ISO.
You can use the free Camera Connect app to remotely fire and control the camera with a tablet or smartphone if your Canon camera is Wi-Fi compatible. Set your camera to Bulb settings, and then tap the shutter button on the app to start or stop the exposure. Generally, this is like a remote shutter release.
You can make your real estate exterior photos aesthetically appealing by capturing long exposures at night with some of the security lights on. Learning how to do long exposure on Canon will help you know which camera settings and equipment you need for long exposures.


