


In today’s competitive real estate market, static photos are no longer enough. Buyers expect dynamic, engaging content that brings properties to life. Enter Reptov, a powerful new platform that transforms ordinary listing photos into professional marke ...


As an Amazon Associate we earn from qualifying purchases.
Photoshop opens a world of possibilities to maneuver an image or a graphic for the portrayal of your ideas. Besides the exceptional editing techniques and tools, it allows me to use Smart Objects, a term for layers with nondestructive editing. Let me walk you through how to edit a Smart Object in Photoshop to show you all the possibilities.
Quick Navigation
Smart objects in Photoshop are such an advantageous feature for flexible, non-destructive editing. When you switch a layer into a smart object, any edits that you make to it are reversible. Also, the smart objects can be opened into their own separate window, paving the way for additional functionalities.
Using smart objects in Photoshop is a great way to preserve the original image. Plus, you can always revert and change the edits whenever you want. Another advantage of Smart objects is that they can be scaled without losing resolution.

If you are confused as a beginner about what smart objects actually are and what editing possibilities are there with them, read on to know the whats, hows, and whys of the Smart Object editing in this article.
Below are the three basic ways to create a smart object or to convert an image into a smart object:
Go up to the File menu on top and choose Open as Smart Object. Locate your image from the Explorer/Finder and click on Ok. The image will directly open as a Smart Object in Photoshop.

A cool feature that saves you time is to drag a photo into Photoshop directly.
In the layer panel, any of your layers can be converted into a smart object.
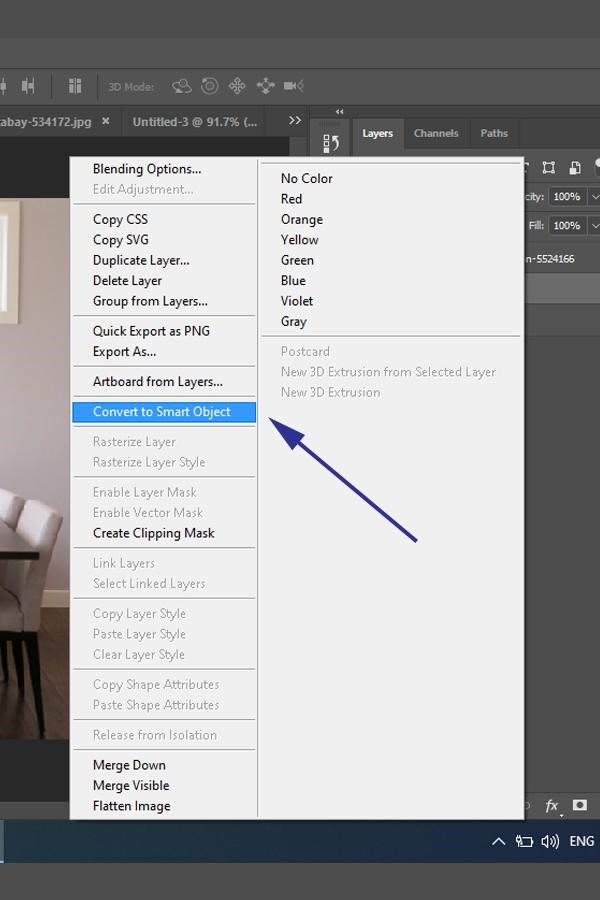
Alternatively, you can go to the Layer menu, hover on Smart Objects, and click on Convert to Smart Objects.
The three methods to open a smart object and enable editing on it in Photoshop are:
Using any of these actions will cause the smart object to open in a separate document. The Sky is the limit when it comes to editing a smart object. You can use any tool from the toolbar, filters, and adjustment layers to it. Let’s explore a few possibilities that are frequently used with smart objects.
First, remember that after making any of these edits on your smart object, you need to save it in order to make it appear in the main document. Go to the File menu, and select Save. Once again, go to the File menu, and click on Close to close the Smart Object document.
To resize a smart object, select the layer in the panel. Press CTRL/CMD + T. as the transform handles appear, press and hold the SHIFT key, and drag out or in the handles to resize the object. The SHIFT key would lock the aspect ratio of the image without stretching or compressing it unnaturally.


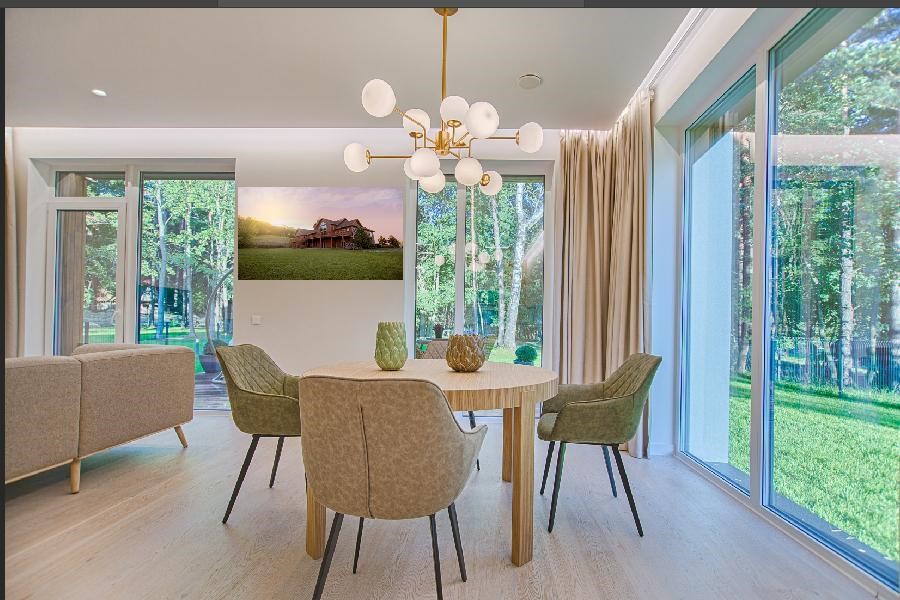
The image was inserted as a smart object in the background image. You can see that its resolution hasn’t been affected even after I resized it again and again.
There are several instances when I need to change the perspective of an object to blend it seamlessly with the perspective of the image. Whenever you wish to scale, rotate, distort, flip or warp your smart object, you can easily do it by selecting the transform and free transform command.
Go to the Edit menu on Windows or Photoshop menu on Mac. Go to Transform and select the desired command (Rotate, Distort, Warp, Flip, etc.) If you are dealing with a complex background with a small smart object, I highly recommend zooming in to get the perfect transformation and blending. Press Enter to confirm the transformation.
Using smart objects helps you avoid making any irreversible changes to your image. When you add an adjustment layer to a smart object layer, the editing is entirely non-destructive. In Photoshop, the adjustment layer options available for smart objects are:
If, for instance, I want to add a Black and White Adjustment Layer to the smart object, I will first click on the New Fill or Adjustment Layer icon present on the bottom of the Layers panel. I will then select Black and White. The adjustment layer will appear above the object layer, which you can edit as you like.
Remember to save the editing and close the smart object after you are satisfied with the effects.
Whenever I apply a smart filter to an image, it gets the effect permanently. However, the case with smart objects is different. Not only is the application of the filter non-destructive, but it is
also editable if you want to adjust it later on.
For instance, if you want to apply a Ripple filter to your smart object, just select the layer in the panel. Go to the Filter menu and hover to Distort. Click on Ripple and set the desired amount of Ripple effect.
After you save and close the smart object window, you can still go back and make changes by clicking on the smart filter layer present in the layer panel below the smart filter.
There are other things that you can do with the smart object layers which are worth mentioning here.
When you are using templates and layouts in Photoshop, using smart objects allows you to replace the contents of a smart object layer very easily.
For instance, changing the photo in a frame is a commonly used option in image editing. You don’t need to design background or frame again and again if you choose to convert the image inside it as a smart object.
If your workflow includes creating vector artworks in Adobe Illustrator and bring them into Photoshop later, you can easily do it with the help of smart objects. Import your vector or simply copy/paste them as smart objects on your Photoshop documents so that they are not rasterized.
In real estate
You can also create custom frames and templates and replace the smart objects in each of them for creative purposes. All of these functionalities won’t affect your image quality and resolution at all.
Creating and editing smart objects is one of the valuable Photoshop features that you must learn. The possibilities with the smart objects are endless, and they help take your image editing skills up a notch with flexible and non-destructive editing.


