


In today’s competitive real estate market, static photos are no longer enough. Buyers expect dynamic, engaging content that brings properties to life. Enter Reptov, a powerful new platform that transforms ordinary listing photos into professional marke ...


As an Amazon Associate we earn from qualifying purchases.
Image compression refers to the method of reducing the size of an image file without degrading image quality. As a result of compressing images, you get an efficient image size and format for transmitting or storing data.
You may want to compress your image size to save computer space when storing images or get the best resolution when you want to print photographs. Likewise, you may need to compress an image size to share files from your computer to your website to increase load speeds and boost SEO!
Quick Navigation
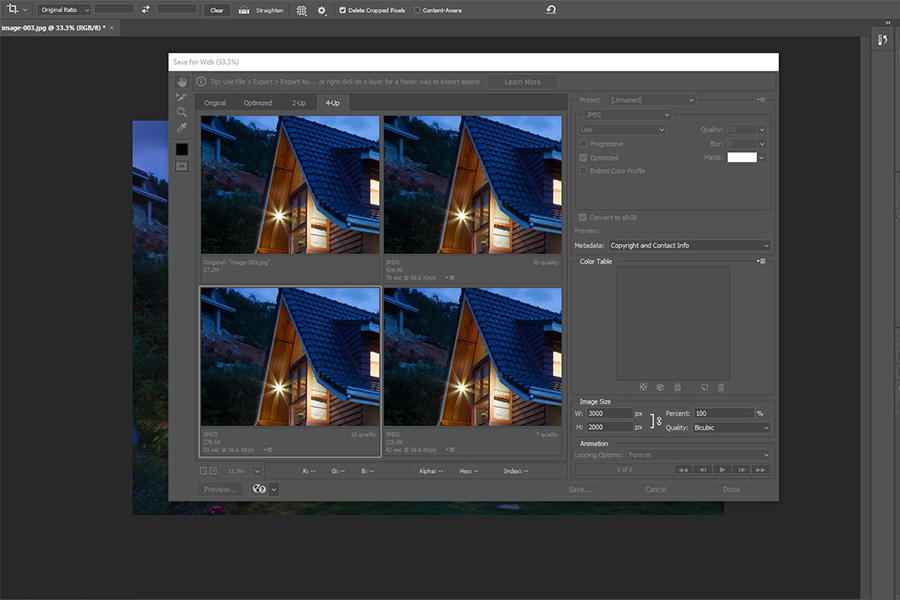
As opposed to third-party image compression tools, Adobe Photoshop gives you better control and customization for adjusting resolution and image file size as you're compressing images. Learn quick steps to reduce image size and compress an image file using Adobe Photoshop.

Here are the easy-to-follow steps you need to take to reduce image size and convert a single photo's format without impacting the resolution.

You can use Adobe Photoshop to compress images, change image size and optimize a batch of photos on your computer.

Lossy compression refers to the method of discarding some non-essential data to get a much smaller image file affecting image quality. On the other hand, lossless compression allows you to resize while preserving image quality. You can combine lossy and lossless compression to optimize the overall document compression while compressing images and change the image size without affecting image quality.
Similar to Adobe Photoshop, there are plugins and extensions enable you to compress images without opening a different application. For example, Optimus is a WordPress plugin for compressing images that lets you convert a file format upon uploading and retain image quality. Meanwhile, Easy Image Resizer is a compressing images web extension for reducing image file size by pixel dimensions.
Once you learn how to resize documents using Photoshop, you will save much editing time when compressing images and preserving image resolution and pixels. Although it looks overwhelming initially, this is the best method for compressing images, convert the image file, save storage space, improve your optimization process, maintain image quality and file size


I find it much easier to use Lightroom to change a group of photos to a new size, aspect ratio, etc
Say you want to compress and change aspect ratio on 25 pictures. Select them all and create new virtual copies of of the group. Then put each group into a new collection. Then for each collection, crop, compress, aspect change or whatever to the entire group at once. Then if the new aspect changes the composition too much of individual photos, just correct the shots that need it. Photoshop, on the other hand, would be a torture session, IMHO, for this repetitive task. Lightroom is very easy to do this, once you get the hang of it.
I have been using JPEG Mini for the last three years to compress all JPEG pictures that I deliver to my clients. The app comprrsses pictures 50-75 % in image file size without messing with the quality. https://www.jpegmini.com/
Can confirm Kalle. JPEG Mini does a great job.
Be aware that the saving for web feature in PS deletes nearly all exif informations.
I just do two exports in Lightroom. First, full size and the next reduced, to their own separate folders. If not changing the file name (original camera file name), label the folder by size. Ideally, if changing the name to job address or similar, add "dash file size" to end and the number sequence will be the same for each. For example, 123 Main-3 and 123 Main-1500px-3 are the same subject photo, third in the sequence delivered. I usually only deliver the 1500px but the full size are available for request when developing brochures and they can say #12 #17 and #22 rather than 'the kitchen' and have me going which one.. Plus, I need the 1500px for assembling tours.
When I edit my images in Lightroom, I upload them at 1800 x 1200, 300 dpi to PFRE tours. They in turn, re-size and create the tours, then send the links to download all photos in two sizes MLS and for printing.
if I am not doing a VT I just upload the 1800 x 1200 @300dpi up to the agencies FTP site for their marketing people. so far I haven't had any issues.
I know many people use and love tour buzz which offer many options. What size files do they require from the photographer?
If you are going to do this for the web, your first step should be to resize the images to that needed for the site. There is no reason to compress a 3000x2000 image when the site calls for an 1800x1200 image. This is likely to reduce the file size more than compression.
Also, skip the Optimized setting in favor of the progressive setting. (You can't select both). The Optimized setting will save you around 10k, a trivial amount on today internet. The progressive setting will allow your images to download in stages. That can be far more important on slow or poor internet connections than a 10k larger file.
Also, talk with your web designer, it's possible that compressing your images will do little to affect your site speed. Google PageSpeed module resizes, compresses and selects a format all based on information supplied by the browsers visiting your site. It then caches the results for future use. Now, you may still have to watch out for storage limits, storage charges, and uploading times.
Use Lightroom. This is what we did 10 years ago, but LR is better, and far easier.
Back in the days of dial up (if anyone can even remember that far back) we had to size our images to the exact size they were to appear on the website, then "optimize" them using Photoshop's now termed Legacy (File > Export > Save for Web (Legacy). This will take a 10 meg image and reduce it to 1 meg or less. You can set the quality level of the final image and see it much as described at the top of this post. It will also turn out GIFs with transparent back grounds and so while I seldom need to make those photo reductions anymore I still pass my headers and tail credits for video through the GIF system that will sit on top of any video clip and have a clear background through which you can continue to see the video. Call me old fashion. Or just old. But it works.
Otherwise I just batch select my high res images in Bridge, go to the Menu bar > Tools > Photoshop > Image Processor. There I can set the the file formats, sizes etc and where to put the subsequent files. Very fast. I use this to create full size JPEGs from my PSD files and 1800x1200 versions for use on the internet. Many ways to skin a cat but I am used to this, been using it for years, and I don't have to think about what I am doing.
My company uses an image optimization tool which allows to resize all the original images to the maximum size limit and then compress these accordingly. In this case, it is all automated and we do not need to resize all the images manually. The product we use is Cloudimage.com
Thanks a lot, nice article.
The issue I have with "Save for Web" in Photoshop is that it strips out a lot of the metadata. I want all of my metadata kept intact.
Aren't we talking about two things here? The first is resizing which the Photoshop "image processor" does. The second is compression which is what JPEG conversion and the "save for web" do. I've noted that resizing without compression can still result in very big files.
Thoughts?
Yes, very good point.
When you save for web there is an option for what metadata you want saved to the image. It's right above the color table and below preview.
There are so many different file sizes needed for the same image (MLS, website, portfolio, etc.) that it really is worth taking time to understand how to properly compress images. Good guide.
Wyatt Kern
flybycreatives.com