


Congratulations Dave Koch, September 2025 PFRE Photographer of the Month! The theme this month was "Stairwell". Dave Koch - Entry 1099 Alyssa Huang - Entry 1095 Paul-Dan Dragoman - Entry 1098


As an Amazon Associate we earn from qualifying purchases.
Even with a wide-angle lens, you might be unable to capture a large field of view like what the human eye can see. Learning how to merge photos in Lightroom can help you stitch together different photos of the same scene to create a high-resolution wide-angle photo.
Quick Navigation
Merging photos involves shooting a series of images of the same scene at varying exposures and then combining them to form an HDR image, or shooting a series of overlapping photos at the same exposure and combining them to form a single wide-angle image with horizontally elongated fields of view.
That means you can shoot multiple landscape or real estate exterior photos with a normal 50mm lens and then merge them using photo-editing software such as Lightroom to create a panorama photo that covers the entire real estate exteriors.

Keeping in mind that you will be combining several photos, the resulting image tends to be of higher resolution and free from distortions than one shot with an ultra-wide angle lens. Depending on the Lightroom version, you can use the following steps to merge photos using the Lightroom built-in features.

After capturing a series of images, you want to merge, connect the camera to the computer or insert the memory card into the card reader and connect it to the computer. Launch Lightroom, go to File, and then choose Import Photos and Video to open the import dialog box.
If you have shot the images in RAW format, choose the Copy as DNG option, so Lightroom can copy the images to your preferred destination on the hard drive and convert them to the digital negative format. You can choose the images from the big box at the center of the interface.
To avoid confusion and keep your workflow clean, it’s advisable to only import the best photos that you want to merge. Click on the first image, press and hold the Ctrl key on a Windows computer or Command on a mac, select the other images you want to import, choose the destination folder and then click Import.
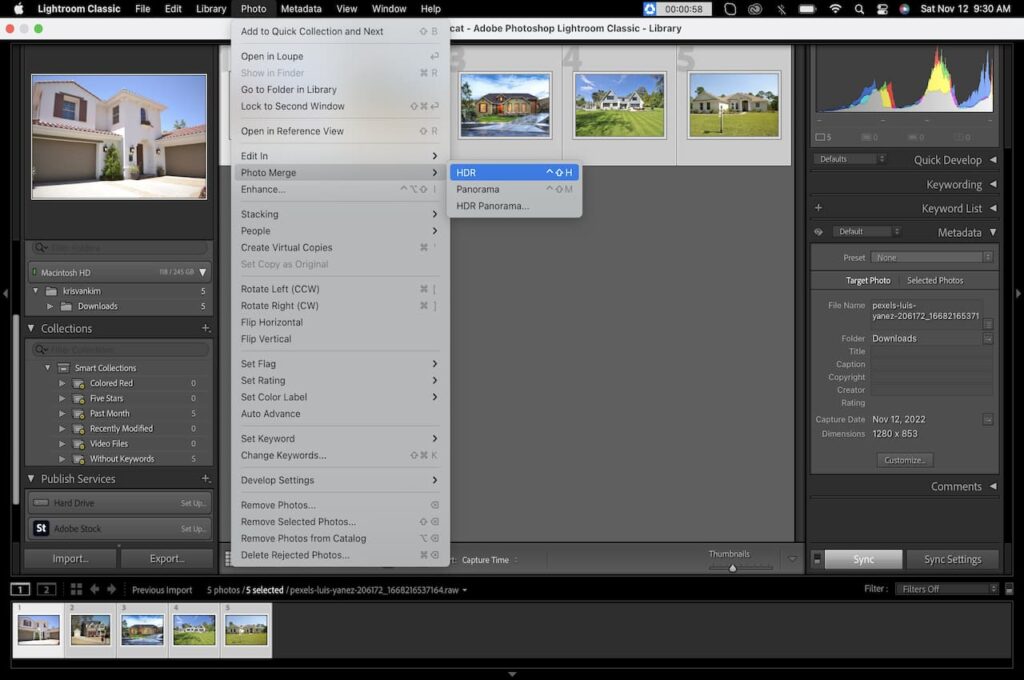
Since you will have imported only the images you want to merge, select all of them by hitting Ctrl + A keyboard keys if you are using a Windows computer or Command + A if you are using a mac. Navigate to Photo at the top menu bar, choose Photo Merge, and select HDR.
Usually, a window will appear showing a preview of your HDR merge. Note that the time it takes for Lightroom to generate the preview will depend on the number of images you have selected and your computer specifications. Depending on your images, you can tweak the following settings for a more seamless and natural-looking blending.
It is common for the camera to shake when shooting handheld, causing some movements in between the frames. Usually, this creates some artifacts and white patches when stacking the photos. The Deghosting tool helps to adjust these objects in the image to prevent patches of transparency in the overlay.
Depending on the extent of movements, you can set the Deghosting Amount to High, Medium, Low, or None. However, keeping in mind that the ghosting might not be easily visible as you can’t zoom the preview to 1:1 magnification, you will need to switch to the Develop Module and zoom in on the image to check for ghosting.
As the name suggests, the auto align option helps to align the images in case of composition misalignments when shooting. Typically, this is more common when using a tripod setup, and the camera slightly tilts or pans as you press the shutter button.
The Create Stack feature is more of an organizational feature than an image manipulation tool. When you check this checkbox, Lightroom will automatically stack the original photos with the HDR you created. Usually, this removes clatter from your Library Module and makes your overall workflow look cleaner.

Keeping in mind that you will be merging photos of different exposures, there are chances that the different colors and tones won't blend seamlessly. The auto tone option tells Lightroom to adjust the vibrance, saturation, blacks, whites, shadows, highlights, contrast, and exposure to ensure everything blends seamlessly.
Typically, the auto tone option in the HDR creation feature works the same as the auto tone in the basic panels. If you are a beginner, it's advisable to check the auto tone and auto-align boxes only and leave the rest.

If you want to merge the images in an overlapping pattern to create a panorama, import the photos and select them using the above steps. However, instead of choosing HDR, navigate to Photo, choose Photo Merge, and then select Panorama.
Alternatively, you can launch the panorama merging tool using the keyboard keys Command + M if you are using a mac or Ctrl + M if you are using a Windows computer. Usually, this will open a preview window with the following projection options:
Keeping in mind that all the projection types involve stretching of photos, empty spaces tend to form around the edge of the frame. The best way to eliminate these empty spaces is to enable the Auto Crop feature.
This will help remove the white borders and make the resulting photo more aesthetically appealing. However, you might lose a significant part of your image if the panorama is wide.
The boundary warp feature works as an alternative to the auto crop by stretching the entire image to fill the empty spaces instead of cropping. However, this feature is relatively new, and you will be limited to the auto crop feature if you are using the older version of Lightroom.
After stacking the images, click the Merge button to create and save the actual HDR or panorama image. After merging and saving the image, Lightroom will switch back to where you started, whether in the Library Module or Develop Module.

Lightroom might be unable to merge photos to a panorama if the photos are not the same size or the shots were not taken at the same focal length. Usually, this is because the sizes can’t seamlessly overlap, or the fields of view can’t blend.
The best way to shoot photos for panorama stitching is to use a tripod to minimize camera shakes. Set your camera to panoramic mode and then switch to manual mode so you can have better control of the shutter speed, ISO, and aperture.
Knowing how to merge photos in Lightroom can help you stitch a wide-angle photo of your real estate exteriors using the Lightroom panorama merge or even create a high-resolution and well-exposed HDR image from a combination of several overexposed and under-exposed photos.


