


Congratulations Dave Koch, September 2025 PFRE Photographer of the Month! The theme this month was "Stairwell". Dave Koch - Entry 1099 Alyssa Huang - Entry 1095 Paul-Dan Dragoman - Entry 1098


As an Amazon Associate we earn from qualifying purchases.
Photographing highly reflective objects is one of the most challenging jobs for both beginners and experienced real estate photographers. Knowing how to photograph shiny objects without reflection will help you avoid problems with image exposure, clarity, and image quality when shooting interior photos.
Quick Navigation
Although you can use third-party photo-editing software to correct reflections after photographing, the applications are not 100% effective. In most cases, the resulting image quality will be lower than that of a photo initially shot without reflections.

It is therefore advisable to minimize the reflections before capturing the photo. Before understanding the different ways to prevent reflections, let’s first understand what reflection is and its impact on real estate

Reflection is an unwanted effect that occurs when direct light is reflected into the lens, obscuring detail and causing a decrease in contrast in the image. In most cases, this happens when shooting smooth, shiny surfaces, such as glass, polished metal, or water, which can reflect light directly into the lens, causing glare.
This results in bright spots that mask details or overexposed areas that appear washed out. The lack of contrast and loss of details can affect real estate photos in the following ways:
Fortunately, the following specialized tools, light adjustments, and camera settings will help you avoid reflections when photographing shiny objects.
A beam of artificial light or sunlight is the main cause of reflections. When light hits the shiny object, it bounces off its surface, creating a reflection. The most effective way to capture highly reflective objects without reflection is to diffuse the light source.
Typically, spreading the light source helps minimize the amount of light hitting the shiny surface directly, minimizing reflections. You can use many methods to diffuse the light, such as placing the subject in a shady area away from the sun or using a fabric reflector or studio lighting equipment.
In the case of artificial lighting, you can also use other techniques such as adding another source of light to diffuse the angles of incidence, putting a light modifier between the source of the light and the object, or bouncing the source of light off another object.
It might not be possible to capture real estate exterior photos on studio lighting equipment or a makeshift tabletop. On the other hand, capturing them on a bright sunny day can result in reflections and glare, especially from the windows.
In such cases, the best way to reduce reflections is to improve the natural lighting. Consider capturing your images during the first few hours of daylight, or wait until the sun goes down a bit for optimal lighting without direct sun rays.
You can also shoot when the sky is cloudy, as the clouds can help to diffuse the light and minimize reflections. Keep in mind that you can use the early morning sun rays to create unique effects on your shiny objects without creating reflections.
A polarizing filter is a unique glass that you can mount in front of your camera lens to help separate the polarized light from the rest. Typically, it allows the passage of certain light wavelengths through the filter to the camera lens.
Mounting a polarizing filter on your lens will help minimize glare, especially if you are capturing glass or water. However, polarizing filters still affect the amount of light reaching your camera lens, which can be a problem if you capture interior photos in poor lighting.
If you are still experiencing glare even after adjusting the angle of incidence, consider adjusting other variables according to the laws of reflection, such as changing the camera angle. In most cases, this is the easiest way to avoid reflection, especially when shooting portraits with eyeglasses.
Light reflects off a flat surface at a similar angle that it strikes the surface, so you can adjust the angle of reflection by adjusting the angle from which you are shooting. As you change the angle, be careful to observe what is happening to the light as you may want to retain some effects of glare.
You can also try to position yourself in a way the sun is behind you instead of capturing directly. In the case of eyeglasses, try having the person tilt the head slightly away from the source of light to minimize reflections on the lenses.
If you are shooting small objects such as a watch or jewelry, you can create a tabletop studio to help spread out the light. A tabletop studio enables you to move the light source farther away from the subject or closer.
You can improvise your own tabletop studio by constructing a white cardboard box to surround the object. The white surface helps spread out the light from the outer side of the box and scatter the angle of incidence, minimizing reflections.
When photographing jewelry, place it on the tabletop and side-light from an angle of 45 degrees. For transparent and reflective objects such as glassware, you can try to use backlighting. With metallic objects, positioning the light source from above can help reduce the glare.
You can either incorporate the lens hood into your camera or place it over the front part of your lens. Lens hoods come in a wide range of shapes and sizes, and the right one depends on the kind of
When capturing through glass, you can attach a lens hood directly against the glass to reduce the unwanted reflections that can appear on the surface of the window. They also prevent stray light from getting into the lens, causing reflections.
If you don't have a lens hood, you can use a black cloth to shade the front part of the lens or cautiously place the lens near the glass and block the light using your left hand.

You can apply a dulling spray on a reflective surface to create a matte finish which helps to stop the incident light from hitting the shiny element or surface. Usually, you can remove the dulling spray after photographing by wiping it off with a damp cloth.
Apart from the specialized equipment, you can tweak the following lighting and exposure settings in your camera to reduce the reflections and glare when shooting shiny subjects.
The ISO controls how much you amplify the light reaching the camera sensor. A low ISO value such as ISO 100 or 200 means the camera sensor is less sensitive to light. On the other hand, a high ISO value such as ISO 3200 or 6400 means the camera sensor is highly sensitive to light.
That means you can use high ISO to boost the image brightness when shooting in poor lighting. However, since you will be amplifying the light signal uniformly across the camera sensor, it means you will also amplify the areas with glare and reflections, making it more pronounced.
It’s, therefore advisable to use the base ISO to make glare less pronounced and intense in your images. You can then control your exposure using other members of the exposure triangle such as aperture and shutter speed.
The shutter is a physical thing that opens and closes to allow light to reach the camera sensor for a given duration. The shutter speed is the duration the shutter opens to allow light to enter the camera. Shutter speed is typically measured in fractions of a second such as 1/500, meaning the shutter is open for one five-hundredth of a second.
If a shiny object is causing glare due to a strong light source, using a faster shutter speed will reduce the time the sensor is exposed to that glare, reducing the glares the sensor will reproduce on the final image. However, the shutter speed will still affect the other exposure settings such as ISO.
If you face a situation where there are reflections even when the lighting is not overly bright, it’s better to reduce the shutter speed instead of increasing the ISO. This will yield a clearer, noise-free image, even if the glare might still be there.
The aperture refers to the opening that allows light to enter the camera. A small aperture means less light entering, increasing the chances of the glares and reflections being locked out. Note that narrowing the aperture means you will be getting a deeper depth of field.
That means everything in your frame will be in focus, including the bright reflective spots. Narrowing the aperture works well when you are shooting real estate exterior photos and there are windows causing glares, yet you want to cover everything in a single frame.
However, it can be counterproductive when you are focusing on a specific part of the frame, such as shooting portraits with the person standing in front of reflective windows. In such cases, use the next technique, which involves widening the aperture to get a shallow depth of field.
Shallow depth of field is when only a portion of an image is in sharp focus, while the rest of the image appears blurred and out of focus. This effect helps to isolate the subject from its background and foreground, making it stand out.
If you use a shallower depth of field, you bring the glare out of focus, blurring the reflections. However, this might require you to use a widest aperture settings, especially if you are not using a full-frame camera
If the reflections result from the lighting conditions, consider switching to manual mode so you can regulate how the camera responds to light. Keep in mind that the aperture priority is easier than the manual mode as it allows you to regulate the light reaching the camera sensor.
If you are capturing a portrait with eyeglasses or real estate photos that include glass windows, there are higher chances that your camera flash will cause glare. It is advisable to turn off the camera flash and use other lighting methods.
Sometimes it’s not possible to avoid glare entirely when taking the photos, especially when you don’t have the right camera gear. However, it’s possible to remove the glare during the post-production phase.
For the best results, it’s advisable to capture the photos in RAW format so you can have lots of data to manipulate. You can then use the following steps to remove the reflection using photo editing programs such as Lightroom and Photoshop.
As the name suggests, the Dehaze tool seeks to counteract the loss of contrast and washed-out appearance. The Dehaze tool doesn't just increase overall contrast. Instead, it adjusts the contrast primarily in areas impacted by haze.

It does this by analyzing the image and targeting the specific tonal values that are affected. Since glare causes loss of contrast and clarity just like in photos shot in haze, the tool can analyze the photo and reduce the glares.
However, this tool works best when the reflections result from sun reaching the camera from behind the main subject. Use the following steps to reduce glare with the Dehaze tool in Lightroom.
The Clone tool allows you to copy pixels from one area of an image and paint them onto another area. Usually, this tool allows you to select a source point in the image, which Photoshop uses as a reference for cloning.

As you paint, Photoshop continuously samples from the source point and replicates it to the destination area.
The Patch Tool is designed to repair larger areas of an image by taking a selected region and replacing it with pixels from another area. Unlike the clone tool, you first select the area you wish to fix.

Then, you drag that selection to a clean area that you want to use as the source for the patch. Photoshop will then blend the source pixels into the selected area, attempting to match the texture, lighting, and shading of the surrounding pixels.
The highlights and shadows slider specifically targets the brighter and darker portions of your image. Since the reflection might have resulted in a washed out image, you can consider adjusting the highlights slider to reduce the brightness and bring out the details.
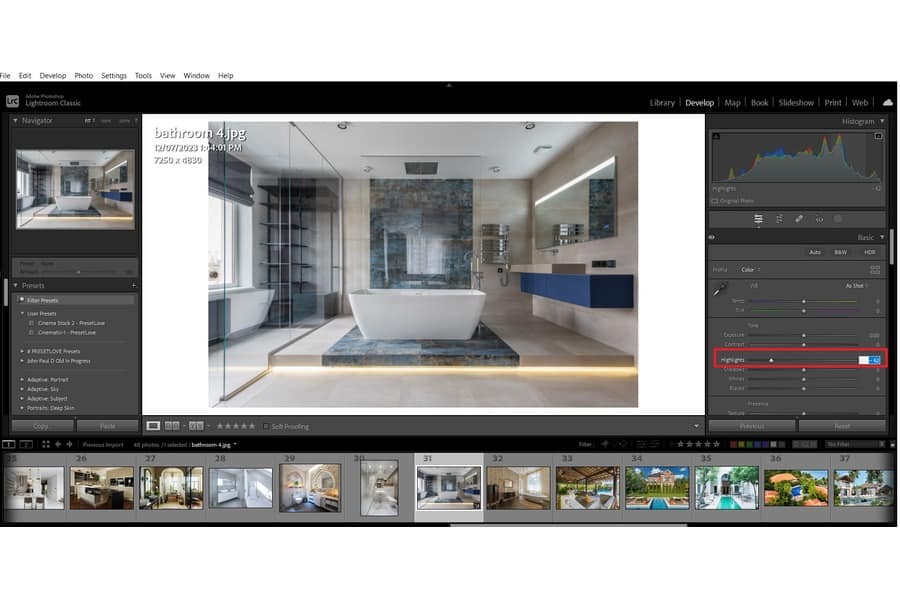
Simply open the photo in Lightroom's Develop module or Adobe Camera Raw, navigate to the Basic panel and move the Highlights slider to the left. This will darken the brightest parts of the image, which can help reduce the visual impact of the glare.
The main difference between an umbrella and softbox is design. Umbrellas resemble standard rain umbrellas. They can be reflective, where the light is bounced off the umbrella's interior before hitting the subject, or shoot-through, where the light source shoots through the translucent umbrella towards the subject.
On the other hand, a softbox is a box-like structure with reflective interior walls and a translucent front. The light source is placed inside, and the light is diffused through the front panel. Softboxes generally produce more directional and even light, although they are bulkier and take longer to set up.
Reflections can be a good thing when you want to showcase notable features in a property such as city skyline, ocean, forest, or garden. Instead of capturing these features in a different photo, you capture the view in the reflection of windows and glass doors, emphasizing the property's prime location and appeal.
You can photograph objects without shadows by controlling the light to minimize hard shadows and ensure even illumination, which you can achieve using softboxes, diffusers, or shooting through umbrellas. You can also illuminate the object from multiple directions to fill in shadows.
Learning how to photograph shiny objects without reflection will help you capture high-quality interior and exterior photos of shiny subjects regardless of the lighting conditions. Before using a lens hood or polarizing filters, it’s advisable to avoid reflections by adjusting your camera angle and settings.


