


In today’s competitive real estate market, static photos are no longer enough. Buyers expect dynamic, engaging content that brings properties to life. Enter Reptov, a powerful new platform that transforms ordinary listing photos into professional marke ...


As an Amazon Associate we earn from qualifying purchases.
Taking a shot is only halfway through the photo-making process in today's digital
Quick Navigation
Editing your photographs also makes them appear more professional and provides them with a distinct style, which helps to visually connect your website and social media. Let’s go over several tips to make your photos look professional in Photoshop.
Removing the background is a common photo editing task. As a result, it is best to take photographs with a white backdrop to prevent the time-consuming process of eliminating things from the background or decolorizing them.

There are various advantages to eliminating backgrounds from photos. If you do this, people would be able to focus on the subject in the photo with minimal distractions. There are numerous tools available for removing the backdrop.
One of Photoshop's most commonly used tools is the pen tool. This application also features a Select and Mask function for quick choosing. However, because Photoshop cannot provide total control, the selection may be inaccurate.

It is critical to remove any defects, including abrasions, fingerprints, and dust. In Photoshop, use tools such as the Clone Stamp as well as the Healing Brush to remove any flaws from product images.
You can use the Healing Brush to repair several sections of your photo. After this procedure, Photoshop should fill in this region with pixels that are the same color as their surroundings.
This Clone Stamp Tool makes it easy to copy and paste a number of pixels from one area to another, giving you more manual control. While using this function, utilize lower hardness settings to make colors look more natural.
To use the Clone Stamp, follow these steps:

Color retouching is an important part of photo editing. The most important fact to notice is that the colors in a picture should correspond to the actual colors of the shot. To correct a photograph's color scheme, white balance, exposure, colors, and contrast must all be modified.
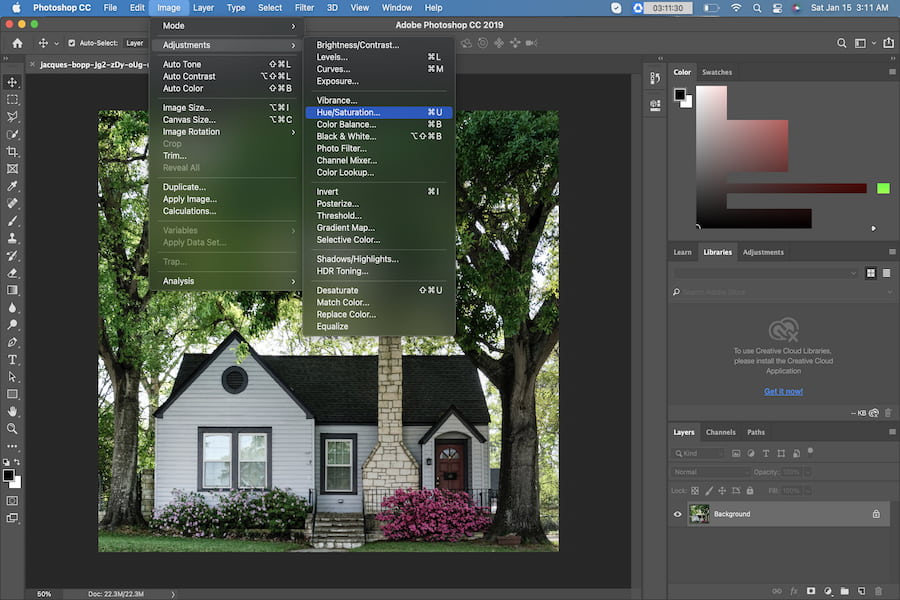
To create all colors in a photo to appear as they would be seen by an observer, in reality, use Photoshop's quick and easy color correction feature. This feature can be used to change the color and brightness. Upload a picture of your liking, then select Image, Adjustments, and Hue/Saturation. Move the triangle slider across both sides to get the desired color.
Graphic uniformity is essential, yet it is difficult to achieve. If you want to edit photos with Photoshop, you may do so with a variety of tools. Using the toolset supplied by this software, you may adjust the white balance, color scheme, temperature, contrast, and other properties of a picture.
Once you've obtained a well-balanced color as well as other adjustments, you won't want to repeat this process for each image because it's time-consuming. Furthermore, if you perform this task individually, you risk making errors.

As a result, it's preferable to use Photoshop actions to get all of these methods so that they can be replayed automatically in the future. By using batch processing features, you may edit many images at once.
If you've set your camera's white balance correctly, you shouldn't need to make any color adjustments to the subsequent photographs. Incorrect white balance will result in a color cast, which will have a significant impact on the vibrance, saturation, and contrast of your images.
Always remember to add a Photo Filter adjustment layer to your image so that you may alter or modify the color while keeping the original. First, open the image you want to work with within Photoshop. After that, under the Layers panel, click the Adjustment Layer icon and choose your preferred Photo Filter.
You may also use a picture filter as a direct adjustment (Image > Adjustments > Photo Filter) since it includes a layer mask that allows you to tweak only a portion of your photo while preserving the original from any irreversible modifications.
To use Photoshop's color balance, follow these steps:

To use photoshop's selective color, follow these steps:
Color adjustment can also be done via Vibrance, Hue/Saturation, or Channel Mixer. If that isn't enough, you may also use the Color Wheel Color Picker to see how you want the colors in your image to look.
Photoshop allows you to examine and choose certain colors, ranging from harmonic groupings to complementary and analogous hues. Select the Color Wheel option from the Color panel fly-out menu to do so. The Dodge and Burn tools, on the other hand, let you highlight or darken certain sections of your image to create texture or character.

Even if your image is well focused, it may benefit from some sharpening to emphasize features or to reduce softness. Sharpening improves the definition of the edges of your subject in most pictures.
The necessity for picture sharpening may vary depending on whether you will be seeing the photo on a computer screen or in print. In any case, the rule of thumb in picture editing is to always make little adjustments in small increments. If you wish to sharpen your image, start with tiny modifications and analyze as you go to prevent overdoing it and introducing noise into the image.
Unsharp Mask is indeed a Photoshop tool that assists you in edge detection in the photo that you intend to edit. It has the capacity to shade one side while brightening the other. You can sharpen your image by adjusting the contrast around the edges.
You can select the Unsharp Mask from the Sharpen tab after clicking the Filters button. Move the slider to choose the optimum settings for your photo. You have the following options:
To sharpen a photo in Photoshop, use the following steps:
A shadow is intended to make a product shot appear more professional, and this applies to both drop and reflection shadows. The Drop Shadow effect makes shadowy objects appear more vibrant and lifelike. It distinguishes them from the background by making them appear to be floating above rather than in front of it.
The effect replicates the shape of the item, and the shadow gives the impression that light is falling on the object from a certain angle, depending on where the shadow is dropped. Reflection shadows are shadows that are cast in the backdrop and then flipped around to cast a reflection on an object.
There are two rules to follow if you want to create shadows in your photo. First and foremost, you must apply this feature in a way that appears normal and compatible. Second, objects in the same category should cast the same kind of shadow. When dealing with this effect, you may use drop shadows and reflection shadows.
It is often necessary to photograph a subject that has metal pieces or mirrors that are prone to reflect light. When dealing with reflections, one must decide which ones to keep and which to discard.
When editing photos in Photoshop, one may remove reflections by selecting one of many options. Selecting a color from an impartial backdrop as well as applying it to the area you want to correct using the Brush in Color blending option is among the easiest and most effective ways to eliminate an unwanted reflection. Another approach is to use the Sponge tool, however, this will only work if the metal outside is flat.
Despite your best efforts, you will occasionally be unable to achieve the necessary exposure for your real estate image. Thankfully, if you know how to use Photoshop, this is a simple fix. When a photograph is overexposed, the image's color and details are washed out. To bring out more clarity in the photo, use Photoshop's collection of adjustment tools to modify the exposure.
These tools may be found by selecting Adjustments from the drop-down menu after clicking on Image (on the Menu Bar):
If you've never used them before, Exposure, Brightness/Contrast, and Shadows/Highlights are all rather straightforward to use; all you have to do is move the sliders to the left or right to make changes. If you want to conduct more advanced Photoshop work, you'll need to learn how to read a histogram, which is a graph that shows the tonal range of the image you're working with.

Make sure all of your images are the same length and width to provide consistency and uniformity by using the Crop Tool. ToolYou may definitely apply this aspect while shooting a shot by using your camera's or phone's grid feature.
A little crop may sometimes make all the difference. Basic cropping is the simplest photo editing tip that can do wonders for your shot's composition. It allows you to remove unneeded parts, focus more on the details and create more suspense for the best effect in real estate
Smart Guides, on the other hand, can help you improve your shooting. This function is available in Photoshop. To make your images consistent and uniform, create a template based on the criteria.

Photoshop is a fantastic software that will enhance your editing experience and make you a better real estate photographer. There is no one approach to editing images that is correct. Professionals employ any and all techniques available to them to make their photographs unique and memorable, as well as to correct image flaws such as non-straight lines and undesirable spots.


