PFRE is the original online resource for real estate and interior photographers. Since 2006, it has been a community hub where like-minded professionals from around the world gather to share information with a common goal of improving their work and advancing their business. With thousands of articles, covering hundreds of topics, PFRE offers the most robust collection of educational material in our field. The history of real estate photography has been documented within these pages.
In today’s competitive real estate market, static photos are no longer enough. Buyers expect dynamic, engaging content that brings properties to life. Enter Reptov, a powerful new platform that transforms ordinary listing photos into professional marke ...
For over a decade, photographers from around the world have participated in PFRE’s monthly photography contests, culminating in the year-end crowning of PFRE’s Photographer of the Year. With a new theme each month and commentary offered by some of the finest real estate & interior photographers anywhere, these contests offer a fun, competitive environment with rich learning opportunities.
PFRE prides itself on the depth and breadth of the information and professional development resources it makes available to our community. Our goal is to help real estate and interior photographers be successful while bringing the community together and elevating the industry as a whole.
As an Amazon Associate we earn from qualifying purchases.
When it comes to combining different images together, Photoshop is undoubtedly one of the most used software. It offers several powerful tools for blending and compositing images. However, I first need to know how to move images in Photoshop before starting to blend them together.
How To Move Images in Photoshop Using Different Methods
Whether you are editing images, creating a composite image, or making a graphic, moving images is something that you’ll do often in Photoshop. That is because whenever you open images in Photoshop, each image loads up in a different document. To combine the images together, they have to be within the same document.
Here, I will show you different methods of moving images in Photoshop. I will explain the usage of the move tool, the copy and paste method, the drag and drop method, and the duplication method. All these methods allow you to move images from one document to the other so that they can be blended together easily.
Moving Images Using the Move Tool
Using the move tool is the simplest method of moving images in Photoshop. It not only helps you move images, but it also helps you with the alignment and selection of images.
Using the Move Tool Between Tabbed Documents
Follow the steps below to move images between different tabbed documents using the move tool:
Open all the images in Photoshop. Here, I will be working with only two images to give you a clear concept of moving images. You can load any number of images according to your requirement.
Go to the document that contains the image you want to move. You can do this by clicking on the tab of the respective image. You will find the tab below the menu bar and at the top of your Photoshop canvas.
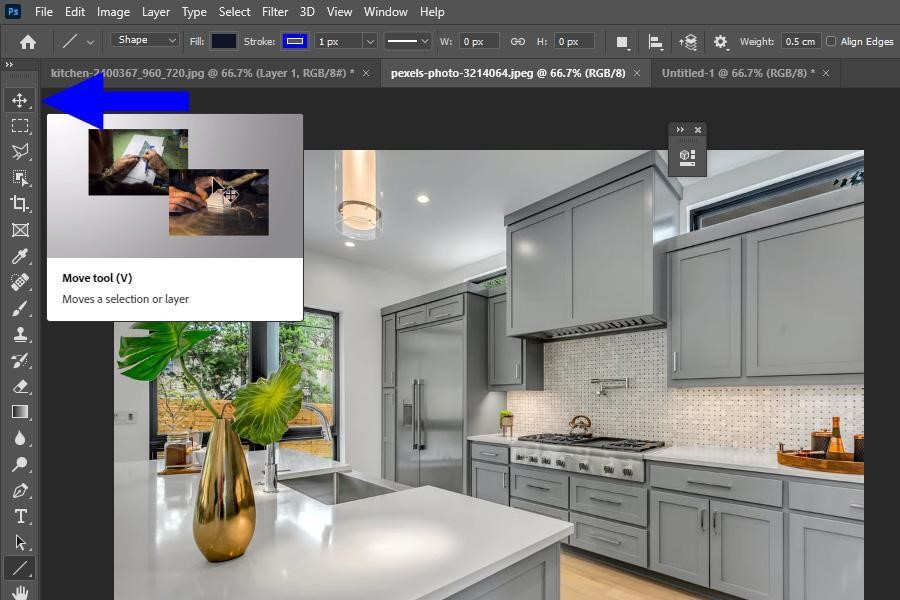
Now, select the ‘Move Tool.’ To do this, go to the toolbar present on the left side of your Photoshop interface. The Move Tool is usually the first item on your toolbar. It looks like the sign of addition with arrowheads on all corners. Alternatively, you can also press the key V to select the move tool.
Click on the image, and while pressing down the mouse button, drag it up till you reach the destination tab. This will switch the document, and your other image will now become visible.
Keep your mouse button held down, bring it to the other image, and then release it. This will bring both your images within the same document.
You will now see that each of the images has its own layer in the layers panel.
You can repeat the procedure for any number of images in Photoshop.
Using the Move Tool on a Multi-Document Layout
Now, let’s understand how to move images with Photoshop's multi-document layout feature. Here I will also use the move tool and the drag and drop technique to move the image.
Open both images in Photoshop.
Go to the menu bar present at the top of your Photoshop interface.
Select ‘Window’ from the menu bar. This will open up a drop-down menu.
Go to Arrange > 2-up Vertical. As you click on this option, both of your images will open side by side.
Even though both the images are visible, they are still present in different documents. In order to bring them together, you will have to use the move tool.
Go to the toolbar present on the left side of your Photoshop interface. Select the move tool or simply press the key V. Now, click on the image you need to move, and drag it to the other image. Release the mouse button to drop the image.
Both of your images will now be within the same document, where each of them will have its own layer.
You may want to switch the view from the 2-up Vertical to the basic one. To do that, go to Windows > Arrange >> Consolidate All to Tabs. This will take you back to the default view.
You can repeat this procedure for any number of images you want.
Moving Images Using the Copy-and-Paste Method
Let’s look at the steps of moving images by using the copy and paste method in Photoshop. To use this method for moving images, follow the steps below:
Open up your images in Photoshop.
Now, open the tab of the image that you want to copy.
To copy the image, you have to first select it. To do that, you can use any of the ways below:
Go to ‘Select’ in the menu bar and then choose ‘All.’
Or,
Pick the ‘Object Selection Tool’ from the toolbar, go to your image, and press ‘CTRL + A.’
Once you have selected the image through any of the above ways, it is time to copy. To do that, go to Edit in the menu bar and then click on ‘Copy.’ Another way to do this is by using the keyboard shortcut, CTRL + C.
Now, switch to the tab of the second image and paste the picture you copied. To do this, go to Edit > Paste. Alternatively, use the keyboard shortcut CTRL + V.
Moving Images Using the Drag-and-Drop Method Between Floating Windows
Another method of moving images in Photoshop is by dragging them between two floating windows. To do this, follow the steps below:
Open both the images in Photoshop.
First, you have to switch your view to the floating windows layout. To do this, go to the menu bar on the top of your Photoshop interface and click on ‘Windows.’ This will open up a drop-down menu for you.
Now, navigate to ‘Arrange’ and then select ‘Float All in Windows’ from the cascading menu.
As you click on it, each of your images will be shown inside a floating document window.
Now, pick the ‘Move Tool’ from the toolbar on the left of your screen.
With the move tool in your hand, click on any one of the pictures and drag and drop it onto the other image.
This will bring both your images into the same document, and each image will have its own layer.
You can do this procedure for any number of images you want.
Moving Images Using the Duplication Method
The last method of moving images that I will explain here is the duplication method. Here is the procedure for it:
Open up the images in Photoshop.
Now, go to the tab of the image that you want to move.
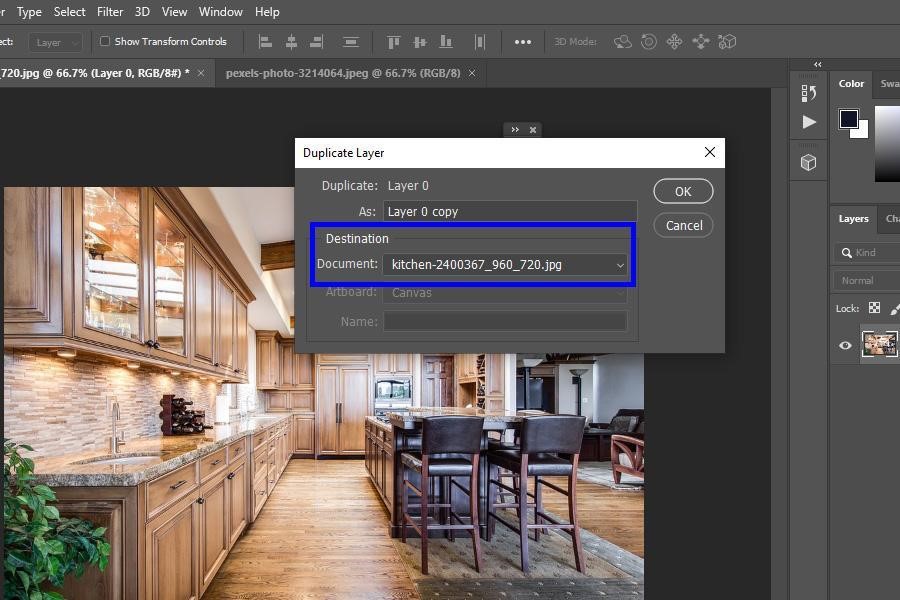
Choose the layer of the image and then duplicate it. You can do this by:
Now you will see a dialog box. Here, in the Destination section, choose the other image where you want your picture to go.
Click OK. This will move your picture to the other document.
Conclusion
Now you know everything about moving images in Photoshop. I have explained five different methods of how to move images that are all accessible and easy to implement. Either you like to copy and paste, drag and drop, duplicate, or use the move tool, there is a suitable method for everybody.