PFRE is the original online resource for real estate and interior photographers. Since 2006, it has been a community hub where like-minded professionals from around the world gather to share information with a common goal of improving their work and advancing their business. With thousands of articles, covering hundreds of topics, PFRE offers the most robust collection of educational material in our field. The history of real estate photography has been documented within these pages.
In today’s competitive real estate market, static photos are no longer enough. Buyers expect dynamic, engaging content that brings properties to life. Enter Reptov, a powerful new platform that transforms ordinary listing photos into professional marke ...
For over a decade, photographers from around the world have participated in PFRE’s monthly photography contests, culminating in the year-end crowning of PFRE’s Photographer of the Year. With a new theme each month and commentary offered by some of the finest real estate & interior photographers anywhere, these contests offer a fun, competitive environment with rich learning opportunities.
PFRE prides itself on the depth and breadth of the information and professional development resources it makes available to our community. Our goal is to help real estate and interior photographers be successful while bringing the community together and elevating the industry as a whole.
As an Amazon Associate we earn from qualifying purchases.
While adding various effects to my photos, I might want to add fog for a dreamy feel. A foggy effect also shows a frigid climate or just adds a dimension to an otherwise plain view. Learning various methods for how to make fog in Photoshop will add to your editing skills, helping you to create interesting images.
How to Make Fog in Photoshop Using Multiple Quick Methods
As a real estate photographer, your work mostly revolves around creating intriguing photos to increase the buyer’s interest. Using the efficient filters and tools in Photoshop, various weather effects like rain, snow, and fog can be virtually added to the images. This creates a feel to them which makes a property look way more appealing.
When I created a foggy effect, it adds opacity to the image, which helps me hide unwanted details. As a result, the viewer focuses on the bigger picture rather than getting distracted by trivial details.
Below, I had compiled various techniques that expert photographers recommend to add fog to your images using Photoshop. You will definitely find them quick, easy, and practical.
Method 1: Adding Fog Using the Dehaze Slider in Camera Raw
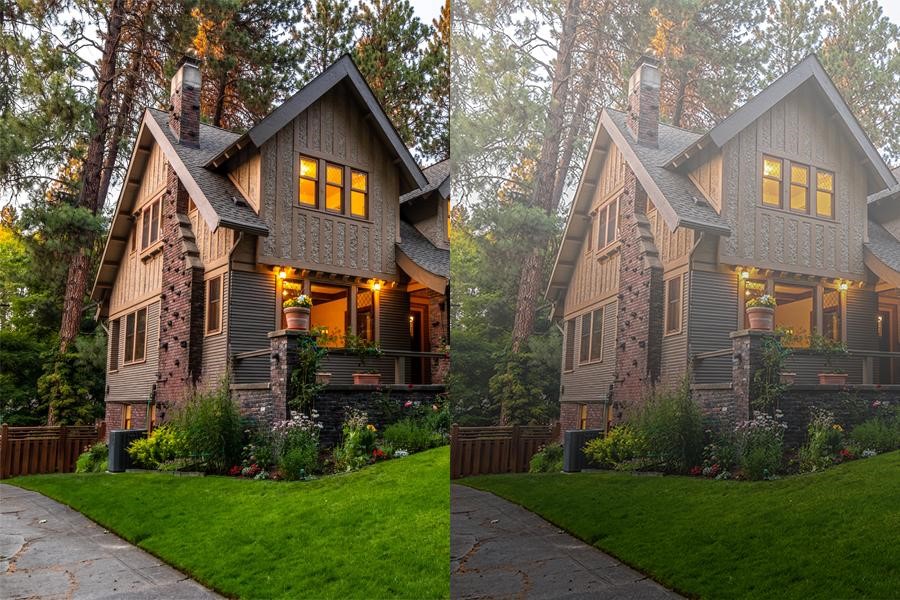
The first technique to add fog is so easy that you will love it. It just involves adjusting two sliders, and a realistic foggy effect can be achieved. However, the method works better on photos with a slight fog already present, like the one I had used below.
Make a duplicate layer of the image so that any edits that you add are non-destructive. Drag the layer and drop it on the Create a New Layer icon.
As you will be applying a Camera Raw adjustment to the image, convert it into a smart object by selecting the duplicate layer. After that, go to the Filter menu and click on Convert for Smart Filters.
Go to the Filter menu once again. This time, select Camera Raw Filter. Alternatively, you can press CTRL + SHIFT + A (Windows) or CMD + SHIFT + A(Mac) to launch the Camera Raw filter.
In the basic adjustments on the left, scroll down to the Dehaze slider.
Bring down the Dehaze slider to the extreme left.
Adjust the contrast slider and take away a little bit of contrast to make the foggy effect dense.
You can see that the slight fog in the Before view is converted into a realistic, dense fog in the After view.
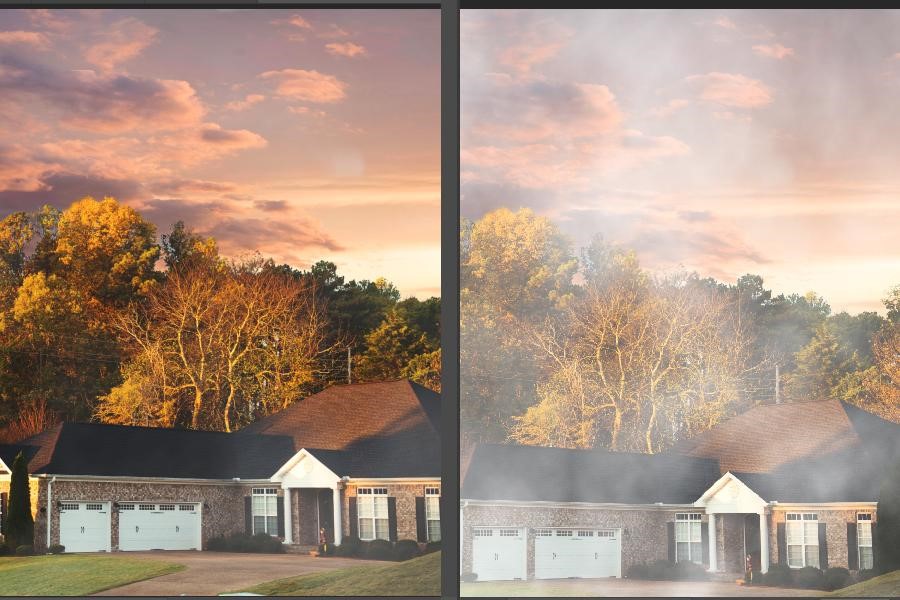
Method 2: Adding Fog Using Fog Overlays
Photoshop has features like opacity sliders and blending modes, which allow me to add the weather effects as if they were real. This is where overlays come into play. Overlays are templates designed to add effects to images by using blend modes and adjusted opacity.
You can easily find and download free fog overlays to help you achieve the foggy effect on photos. Save them on a specified destination so that you can easily find them later while using Photoshop.
Open the image in Photoshop by uploading it via File > Open.
Go to the File menu. Click on Place Embedded.
Locate your downloaded overlay and click on Place.
After loading the overlay on your background duplicate layer, resize it to fit the image and hit enter to commit the transformation. You can also flip the overlay vertically using the Transform feature if you want.
Go to the Layers panel, and select the Screen blend mode from the blend mode dropdown menu.
Set the opacity of the overlay between 80-90%.
Your work is mostly done here unless you desire to make further enhancements using Curves, Brightness, and Contrast adjustment layers.
Create a new adjustment layer by going to the Layer menu and selecting Curves from the New Adjustment Layer submenu.
Set the black, white, and mid-tones to add some intensity to the original image.
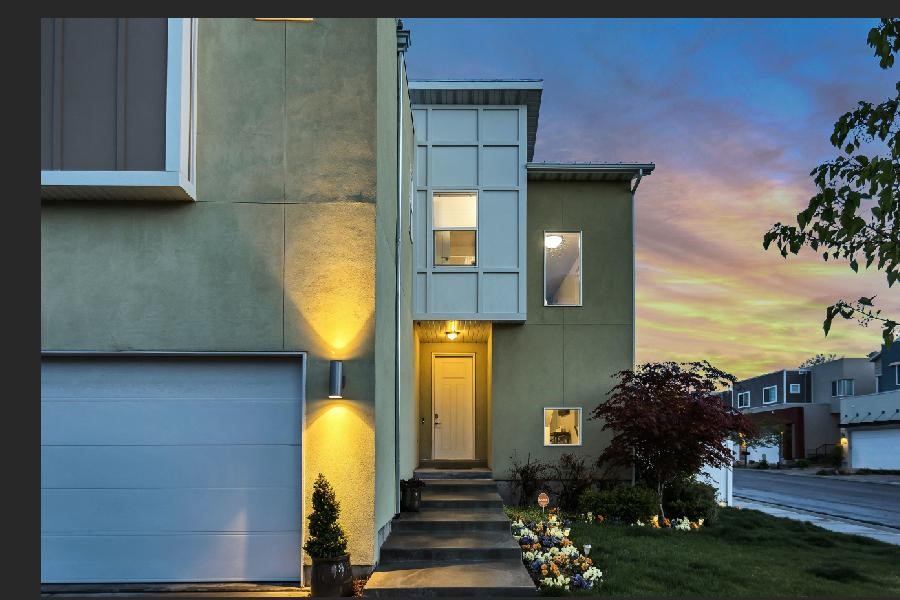
Method 3: Adding Fog Using Gradient Tool
The Gradient tool proves to be quite powerful in adding several kinds of effects. For instance, you can easily add an icy weather effect by adding a gradient in blue shades or a foggy effect by adding black to white or foreground to transparent gradient to your exterior views.
Load the image to which you intend to add fog in Photoshop.
Make a copy of your image by creating a duplicate layer. Press CTRL + J (Windows) or CMD + J (Mac).
Pick the Gradient tool from the toolbar. It is present in the flyout menu of the Paint Bucket tool.
In the options bar of the Gradient tool, pick the Black to White gradient.
Set the opacity to 25% in the beginning.
Set the blend mode to Lighten.
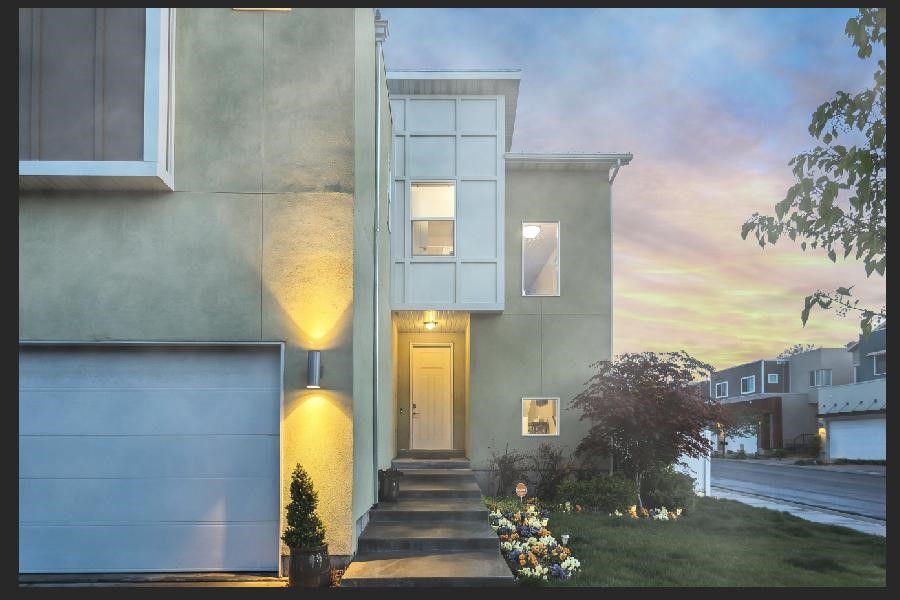
Drag a vertical line from the top of the image to the middle. It will add a foggy effect to the image.
You can increase or decrease the fog by adjusting opacity and trying other blend modes.
Method 4: Adding Fog Using the Brush Tool and Gaussian Blur
Let’s try another method to add fog to an image. For this technique, I will be using the Brush tool and then the Gaussian Blur filter.
Bring in your image into Adobe Photoshop CC. Open a new document of the required file size, drag, and drop your image from the destination folder on the new document window. This will convert your image directly into a smart object while it is loaded.
Select the Brush Tool from the toolbar.
In the options bar of the brush tool, choose the brush specifications.
Set the brush hardness to 0 to create the fog effect in a natural way. Also, select a 30% flow and set the opacity to a maximum of 20%.
The color of your brush should be a lighter shade of gray. Pick a swatch after selecting the Foreground color box.
Paint the image using soft pressure horizontal lines across the image. The brush will add a foggy effect.
You can add varying effects by changing the shade and opacity of the brush to add a realistic feel.
Go to the Filter menu and hover to the Blur option. Select the Gaussian blur filter.
In the Gaussian blur filter dialog, adjust the radius between 10 to 20 px(more if required). This will blend the brush strokes into the image giving a full foggy effect.
Method 5: Adding Fog Using the Difference Cloud Filter
The last method of adding fog uses the Difference Cloud filter and blend modes.
Load the image onto a new window in Photoshop.
Follow the usual steps for non-destructive editing, that is, duplicating the background layer and converting it into a Smart Object.
Next, click on the Create a New Layer icon from the bottom section of the layer panel. Go to Edit > Fill and fill the layer with 50% gray color.
Go to the Filter menu, hover to the Render option, and select Difference Clouds.
You will see that a black and white layer has filled your image.
Change the blend mode from the layer panel and choose it to Screen. It will get rid of the dark areas in the image, leaving the white cloudy effect.
With Photoshop filters and effects, the possibilities of adding various effects to your images are boundless. You can see that there are multiple ways to add fog with perfection such that no one can believe that the effect is unreal. Adding fog will add depth and attraction to your images and make the atmosphere around the properties look dreamy.