As an Amazon Associate we earn from qualifying purchases.
Changing colors in your composites and collages is one of the most frequently used functions while editing. There may be some colors in an image layer that you don’t like, or you may want to add a contrasting color for creative purposes. Learn how to change the color of a layer in Photoshop to upgrade your editing skills.
How to Change the Color of a Layer in Photoshop
Layers are the building blocks in any Photoshop workflow, which allows me to create images with multiple elements. Each element that you place forms its own layer. This functionality gives me the power to make changes to any element without affecting other layers.
Besides changing the color of layer contents with a solid color, Photoshop has gradient fill options and various patterns that equip you further in the creative design process. Moreover, you have the ability to change color in specific areas of a layer using masking and other tools.
Rather than working with the whole image at once, layers give you the advantage to work independently with objects besides making reversible changes. You can also move and resize the layers around to create exciting visuals and composites. Besides the very common Edit > Fill command, let’s explore the other ways of changing the colors in your layers.
Change a Layer’s Color Via Adjustment / Fill Layer
One of the frequently used features for layer editing is the Adjustment Layers. You can create an adjustment layer above a layer, clip it to the layer, and make the desired adjustments without affecting other elements. Using the same workflow, you can make color alterations to give various effects to your images.
In any Adjustment Layer processes, you need to create a duplicate layer before working on it to ensure a non-destructive color change and clip the adjustment layer to the layer.
- To create a clipping mask, press and hold the ALT/OPTION key on your keyboard while clicking on the adjustment layer. This action will clip the adjustment layer to the layer below (you can notice that via the addition of the clipping icon), resulting in the effects to be added to that layer only.
- Another way to create a clipping mask is to click on the clipping mask icon present on the adjustment layer panel.
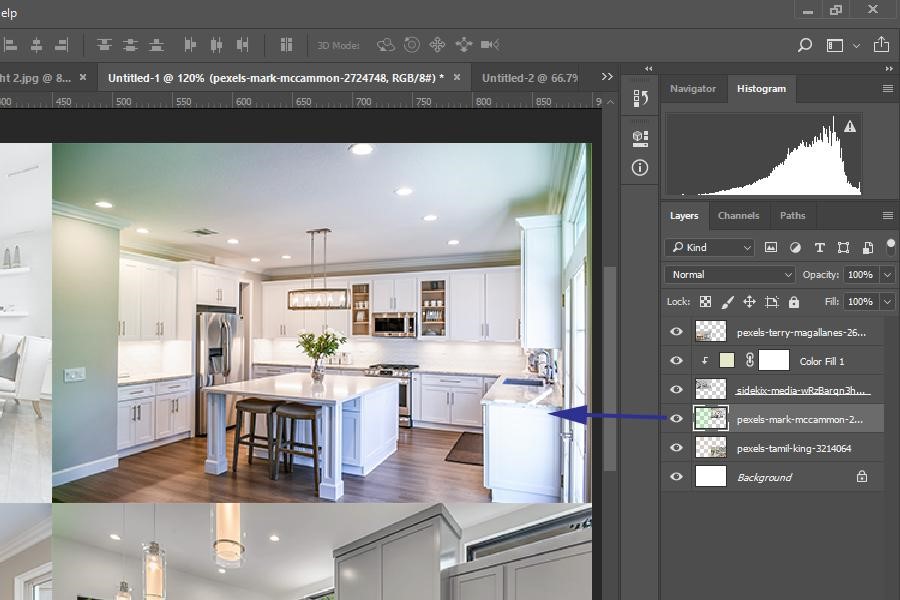
Here, I have used a photo collage with four layers and applied each color-changing effect to a specific layer. You can look at how the adjustment layer addition has changed the colors in the images.
Hue/Saturation Adjustment Layer
First, let’s experiment with the Hue/Saturation Adjustment layer to change the color of one of the layers to give it a brightened look with an orangish tone.
- Click on Create New Fill or Adjustment Layer. Once the drop-down menu appears, select Hue/Saturation.
- Clip the adjustment layer to the desired layer by right-clicking on it and select Create Clipping Mask.
- You can manually adjust the hue, saturation, and lightness by adjusting the sliders, but the kind of effect added here is accomplished by checking the Colorize option. Click on it, and adjust the sliders later until you get the desired change in color.
Gradient Adjustment Layer
I will use one of my image layers to add a gradient by using the Gradient Adjustment layer. The image doesn’t need a complete color change, but a transparent gradient in green color will add some color to the boring walls, bringing some life into the interior shot.
- Make a new adjustment layer by pressing the adjustment layer icon on the bottom of the Layer panel.
- Clip it to the specified Layer by using the Alt/Option key while clicking on the adjustment layer.
- From the dialog of the Gradient Fill adjustment layer, select the gradient from the collection.
- You can customize the gradient by choosing its type (linear, angular, radial, etc.) and the opacity of each color.
- The gradient will be applied to the layer. You can change it by double-clicking on the gradient layer later. Plus, you can change its opacity through the Opacity slider on top of the Layer panel.
Solid Color Adjustment Layer
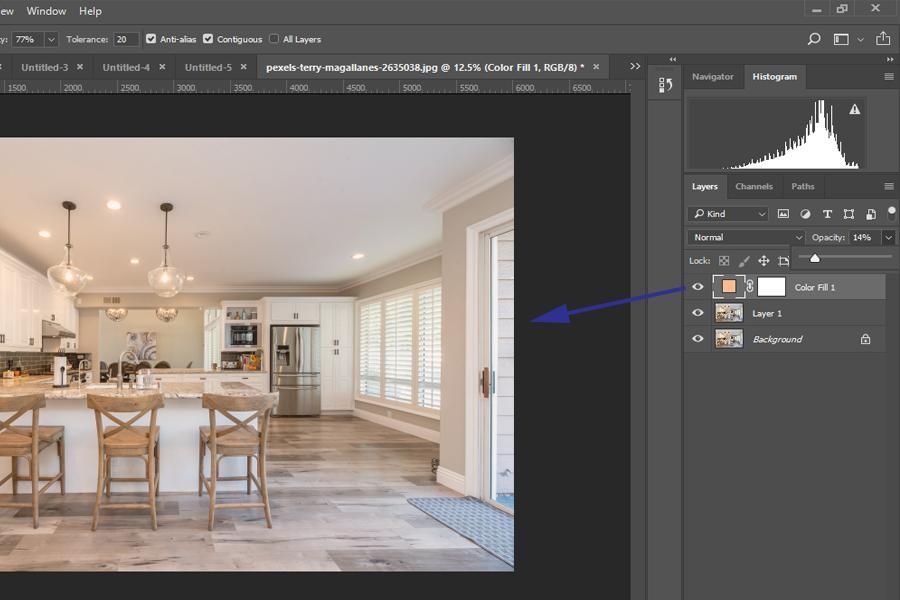
While the Solid color adjustment layer is mainly used to fill blank layers or backgrounds, you can use it on an image as well by reducing its opacity or using it with a blend mode. Adding such an effect is a popular way to enhance real estate images. They can help change the ambiance of a room virtually.
- The layer which I chose to fill with a solid color is converted into a smart object. Therefore, I have a completely different window to edit it and add the solid fill layer.
- Select a Solid Fill adjustment layer by clicking on the half-filled circle icon at the bottom of the Layer panel.
- Choose a color from the color picker dialog.
- At first, the solid color will conceal the layer. Set the opacity level to less to make the image viewable.
- Select a blend mode to blend the color in the way that you desire. I recommend trying the screen, multiply, or the overlay blend mode.
Change Layer Color Via Paint Bucket Tool
- Open the photo you want to edit on one layer.
- Duplicate the Layer by pressing CTRL + J (Windows) or CMD + J (Mac).
- Select the Paint Bucket tool from the toolbar.
- From the options bar of the Paint bucket tool, choose the foreground color or a pattern to change the color inside your layer.
- Choose the opacity and Tolerance (Color matching level).
- Click on the areas where you want to change the colors.
- Here, I choose a mauve pattern to make my plain white chairs and rug look upholstered. You can change the color of the walls or any element in your real estate images by choosing the Paint Bucket tool.
Change Layer Color Using the Replace Color Command
A color manipulation feature in Photoshop which is quite popular among photographers and graphic designers is the Replace Color command. It is a highly efficient way for color swapping in layers.
- Choose the layer in which you want the colors to be changed.
- Go up to the Image menu on top. From the Adjustments submenu, choose the Replace Color option.
- Click on your image to choose the color that you want to replace. Make sure you click on
- Set the fuzziness slider to low as a high amount determines a higher level of tolerance.
- Select the shade which you want to apply from below.
- You will also get the extra sliders for adjusting the Hue, Saturation, and Lightness.
- Select the eyedropper with the plus sign to add an area to the selection or the one with a minus to subtract from the selection. You can undo any mistaken selection by pressing CTRL/CMD + Z.
- After selecting the color that needs to be changed, click on Ok.
Change a Layer’s Color with a Layer Mask
The last method for layer color change is by using the layer mask. It allows you to mask certain areas when you don’t intend to apply changes to the whole layer.
- Import an image into Photoshop and make a duplicate layer of the background layer by dragging the background layer to drop it on the make a new layer icon.
- Use the Magic wand tool (automatically selects according to colors) to choose the desired area. Or, you can go with the Polygonal Lasso tool as well.
- From the layers panel, select the layer mask tool.
- Make a new layer for your selection by pressing the new layer icon.
- By using the Paint bucket tool or the Edit > Fill command, choose the desired color, pattern, or content aware to fill the masked selection.
Conclusion
It’s a lot of fun to kick off your creativity and change the colors of layers in real estate photos. As I have laid down so many ways to change the colors, you can try and master them to help with your Photoshop workflow.