PFRE-Logo-white-bg
Reading
blue-triangle-element

Articles

PFRE is the original online resource for real estate and interior photographers. Since 2006, it has been a community hub where like-minded professionals from around the world gather to share information with a common goal of improving their work and advancing their business. With thousands of articles, covering hundreds of topics, PFRE offers the most robust collection of educational material in our field. The history of real estate photography has been documented within these pages.
All Articles
blue-triangle-element

Latest

Image banner for the February 2024 PFRE Photographer of the Month Winner Art Ibewuike, with a featured image of his winning photo titled "Living Room or Family Room""

Congratulations to Art Ibewuike, February 2024 PFRE Photographer of the Month! The theme this month was "Living Room or Family Room". Art Ibewuike - #895 Paul-Dan Dragoman - #898 Peter Wingfield - #900 Here's what Art has to say: Thank you so much for ...

Contest
blue-triangle-element

OVERVIEW

For over a decade, photographers from around the world have participated in PFRE’s monthly photography contests, culminating in the year-end crowning of PFRE’s Photographer of the Year. With a new theme each month and commentary offered by some of the finest real estate & interior photographers anywhere, these contests offer a fun, competitive environment with rich learning opportunities. 

Contest Rules
blue-triangle-element

CURRENT CONTESTS

View / Submit
blue-triangle-element

PAST CONTESTS

View Archive
Resources
blue-triangle-element

Resources

PFRE prides itself on the depth and breadth of the information and professional development resources it makes available to our community. Our goal is to help real estate and interior photographers be successful while bringing the community together and elevating the industry as a whole.
blue-triangle-element

Conference News

No items found

How to Feather in Photoshop

Published: 08/06/2021

As an Amazon Associate we earn from qualifying purchases.

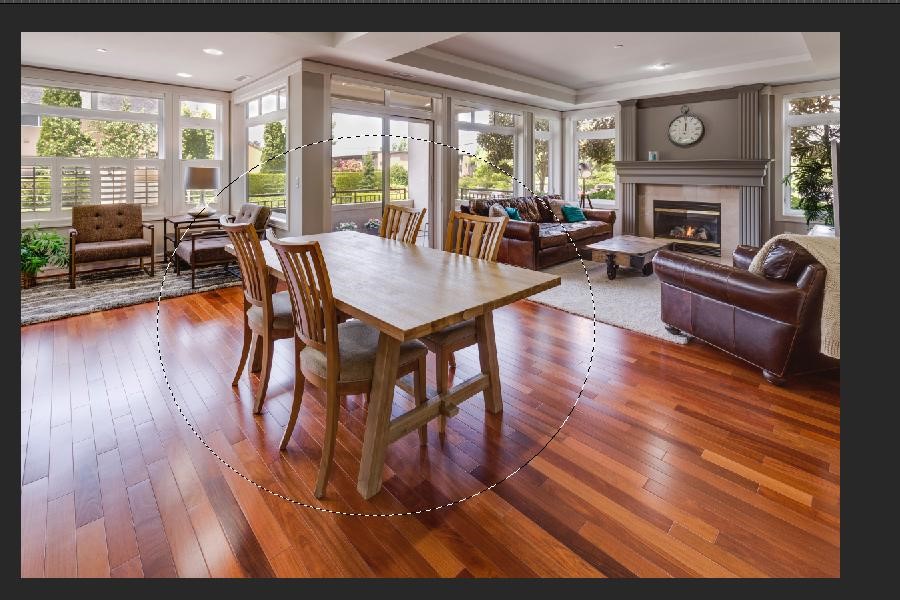
If I want to get rid of hard edges around an image or any object, you’ll need to do some feathering. The feathering technique is frequently used in image editing to make the edges gradually fade out until they are transparent. Hence, understanding how to feather in Photoshop using multiple methods will take your editing skills up a notch. 

How to Feather in Photoshop Through Different Methods

Whenever I need to blend multiple images or create a blurred edge around a single image, I need to soften the edges so that the blending with the background or other images looks smooth. This effect is achieved via feathering, which is crucial to learn if you want to do editing in a professional manner.

Feathering is frequently used in real estate photography, especially for residential interior views where you need to portray a soft and cozy ambiance. Getting rid of hard edges around objects and the image itself will instantly bring up the appeal of the view. The photos look more polished and professional due to the use of feathering.

Before starting, remember to make duplicate images of all the images that you use for the feathering effect if you want non-destructive editing in Photoshop. 

How to Feather Using the Quick Mask and Gaussian Blur Method

The usual method to feather edges of an image or a selection in Photoshop is by using the Modify > Feather command. However, it has an inconvenience that it doesn't allow you to see the preview, making the whole process a blind shot.

The method described below is very simple to use and lets you see the effect you are applying via a live preview.

Create a New Document

  1. Launch Adobe Photoshop CC and create a new document with a white background.
  2. Now open your image by using File > Open. 
  3. Unlock the background layer, and drag it to the blank document by using the Move Tool. 

Draw a Selection

  1. Click and select the image layer from the Layer panel.
  2. Pick the Elliptical Marquee Tool from the toolbar.
  3. Drag a selection around the area where you want to feather the edges.

Use Quick Mask Mode

  1. Now pick the Quick Mask tool from the toolbar. You can also toggle it on by pressing Q on your keyboard.
Use Quick Mask Mode to feather in Photoshop
  1. Turning on the quick masks adds an overlay to the area outside the selection. The area which you have selected using the Elliptical will be visible.

Use the Gaussian Blur Filter

  1. Go up to the Filter menu, and hover to the Blur option.
  2. Choose Gaussian Blur filter. A new popup will appear.
  3. Increase the radius slider in that popup. You will begin to see the blurring effect on the overlay. In other words, the edges around the selection are softer as you increase the Gaussian blur.
  4. When you get the desired feather effect, switch off the Quick Mask by pressing Q again or click on the Quick Mask icon.

Invert Selection to Delete Background

  1. For now, the document doesn't show any indication that I worked upon feathering around a selection. To view that, i need to invert the selection.
  2. Go to the Select menu on top, and choose Inverse. This action swaps the selection onto the rest of the area from the previously selected area.
  3. Press the Backspace key (Windows) or the Delete key (Mac) to delete the rest of the pixels from the image. 
  4. To deselect the selection, go to the Select menu and click on Deselect. 
Inverting selection to delete background in Photoshop

The feathered edges of your selection can now be viewed. They will be smoothly blending into the surrounding white background. 

How to Feather Using the Refine Edge Method

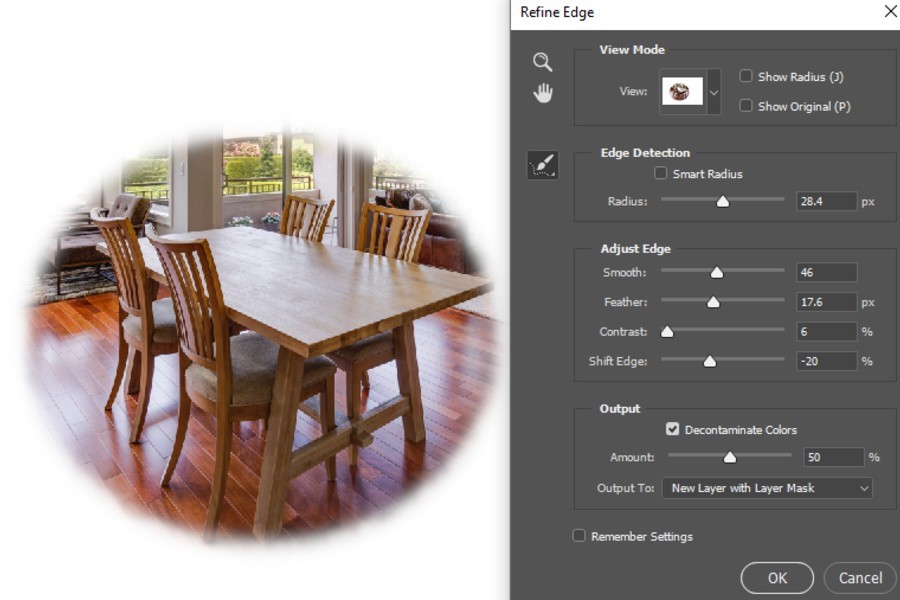
The second way to use the feathering effect in Photoshop is through the Refine Edge command. If you have been using Photoshop for many years, you will know the fact that the refine edge command used to be accessible via the Select menu. In the newer versions (2015 and up), it is not available there anymore.

However, the truth is that you can still use the Refine Edge method in the new versions. Read on to know how to access the Refine Edge feature in new and older versions of Photoshop. 

Refine Edges in New Versions of Photoshop

  1. Import an image into Adobe Photoshop CC using File > Open.
  2. Depending upon the edges of the object that you want to feather, choose a Selection tool from the toolbar and make a selection. You can use the Marquee tool for well-defined edges or the Quick Selection or Lasso tool for complicated objects.
Refine edges in new versions of Photoshop
  1. After making a selection, it’s time to access the Refine Edge feature.
  2. Press and hold the Shift key, go up to the Select Menu, and click on Select and Mask. This will open the Refine Edge dialog box.
  3. Adjust the Radius slider first. Bring it up until the edges look softer.
  4. Lower the Smooth and Feather slider. If you want to shrink or expand your selection, use the Shift slider for that.
  5. If you want to remove the color fringe around the selection, click on Decontaminate Colors checkbox.
Removing the color fringe around the selection
  1. From the output options, choose New Layer and New mask. Click on Ok.

You will now be able to view the selection with feathered edges, and the rest of the pixels from the surroundings will be removed. 

Refine Edges in Old Versions of Photoshop

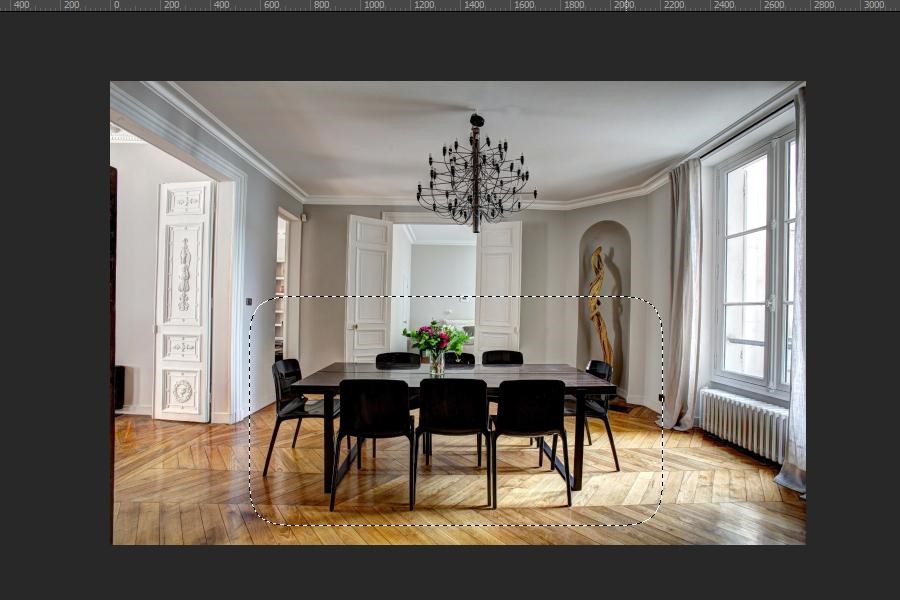
Accessing the Refine Edge command is not that hard as in the new versions. You first need to import the image, make a selection, and open the Refine Edge option just by going 

to the Select menu on top. 

The same Refine Edge dialog that we have explained to use above will open, and you can carry on to make the adjustments as required. 

Using the Feather Method

Although this method for feathering is commonly used by graphic designers and photographers, I give it a mention in the end. The reason to do this is that it doesn’t allow me to preview the changes while editing. This hindrance makes it impossible to get complete control over the feathering effect. 

However, it can’t be denied that the technique is the quickest of all. Therefore those looking for accelerated workflow on multiple images prefer it over other methods.

Open Image and Draw a Selection

  1. Open the image in Adobe Photoshop CC.
  2. Unlock the Background layer by clicking on the padlock icon beside it.
  3. Select the Marquee tool and drag out a selection surrounding the object on which you intend to create feathering.
Feathering in Photoshop by opening the image and drawing a selection

Launch the Feather Adjustment Dialog

  1. Now go up to the Select menu and come down to Modify from the drop-down. Choose Feather from the submenu. Alternatively, press Shift + F6 to launch the Feather dialog.
  2. Adjust the feather radius. Try setting it between 30 to 50 in the beginning. You can later launch the command again and increase the radius if you want a higher feathering. For now, click on OK.

Copy and Paste the Feathered Selection on a New Document

  1. Copy your selection by pressing CTRL + C ( Windows) or COMMAND + C (Mac).
  2. Create a new blank document. Paste your selection on it. 
Copying and pasting the feathered selection on a new document

You can now see the selection with softened edges blending beautifully in the white background. You can add a color or gradient to your background layer

Besides the three methods mentioned above, you can soften edges around images and objects using the layer mask method as well. 

Conclusion

The feathering feature softens the hard edges of an image or an object to make a smooth transition with the pixels surrounding them. In Photoshop, there is more than one way to do that. To master the feathering effect, you can practice these methods on various images and learn how to adjust the different sliders.

Vendors

Rela Logo
CS6 PSE Logo
HD Photo Hub Logo
FullFrame Logo

Learning Topics

.
magnifiercrossmenucross-circle