


Congratulations Dave Koch, September 2025 PFRE Photographer of the Month! The theme this month was "Stairwell". Dave Koch - Entry 1099 Alyssa Huang - Entry 1095 Paul-Dan Dragoman - Entry 1098


As an Amazon Associate we earn from qualifying purchases.
Photoshop is a complex photo manipulation software with tools that allow you to fix gaps in your teeth or whiten the yellowing color. Knowing how to whiten teeth in Photoshop can help make your teeth in a portrait more charming and make smiles brighter before sharing the photos with friends.
It's common to capture real estate interior photos such as seating rooms with several people seated or dining rooms with people around the table to make the room realistic and create a homely feeling. However, the photo might not be aesthetically pleasing if the person featured in the photo has yellowish teeth.
Fortunately, Photoshop allows you to make edits and adjust the colors in specific areas of the image without affecting the entire image. The following tips can help you make a selection of the teeth and whiten them without brightening or whitening other parts of the photo.


Open Photoshop, navigate to File and choose Open to open Finder if you are using your Mac or File Explorer if using your Windows PC. Go to the folder holding your photos, and then double-click on the image you want to work on. The photo will open in the normal Photoshop workspace, ready for editing if it's a JPEG.
If your image has one person, you only need to carry out the whitening procedure once. However, keeping in mind that every person's teeth are different and require varying amounts of whitening, it is advisable to perform the procedure separately for every person if the photo involves a group of people.
Press the Command key on your keyboard if using Mac or the Control key on your Windows PC, and then press the + sign to zoom in on the first person's teeth to have a clear view of the teeth.

To avoid affecting other parts of the image, you need to make a selection of the teeth you want to edit. You can make the selection using a flexible selection tool such as the Lasso tool.
Choose the Lasso Tool or the selection tool of your choice from the panel on the left-hand side of your screen, or use the keyboard shortcut by pressing the L key. With the photo zoomed in, make a selection around the subject’s teeth.
A dashed line will appear around the teeth, indicating a successful selection. Even if the selection might not be accurate, you can make precise adjustments later.

The adjustment layer allows you to make non-destructive edits to your image. This allows you to keep making adjustments without affecting the actual image pixels.
Click on the Adjustment Layer on the bottom right side of the window. This opens a dropdown menu with varying options for adding different types of adjustments. Select the Hue/Saturation option from the menu.
A new Saturation adjustment layer will appear above the background layer. It is advisable to rename the layer if you are whitening multiple sets of teeth or leave it alone if you are editing one set of teeth.
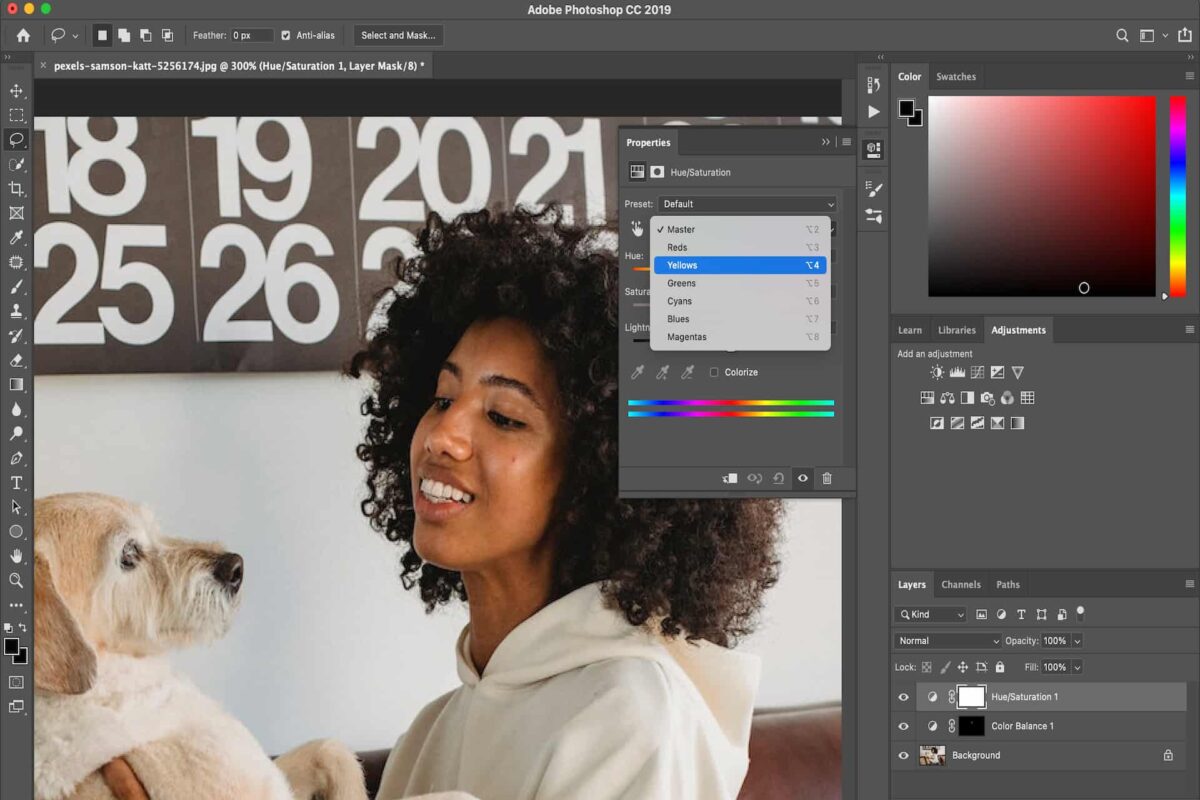
You can find the Saturation adjustment layer controls and options in the Properties panel. By default, the Edit option is set to Master, which means any saturation affects all the colors in the selection.

Typically, this is not what you want, as you only need to whiten the teeth without changing the color of the gum. Click on the Master option and then choose Yellows from the menu so that any adjustments you make on this layer affect only the yellows in your selection.
Reduce the yellow saturation by dragging the slider to the left. However, considering that teeth have a natural yellow tint in them, dragging the slider further to the left makes them completely white, which can make them look unrealistic.
It is, therefore, advisable to keep a close eye on your photo as you move the slider to ensure you leave the teeth looking as natural as possible.

Zoom out the image, navigate to the layers panel, and select the Eye icon near the Saturation adjustment layer once to turn the yellow adjustment effects off and view the original photo.
Click the eye icon again to compare the whitened image with the original version. If the teeth look so white and unnatural, go back and slightly increase the yellow saturation.
Once you are happy with the results, click the Yellow option in the Properties panel and choose Master so your adjustments can affect all the colors in the selection. Keeping an eye on the image, brighten the teeth by moving the Lightness slider to the right.
Again, click on the Eye icon to turn the adjustments layer on and off, and compare the two images to ensure the edits look natural.
If you accidentally highlighted the gums or lips or you didn't select the teeth accurately, it's important to clean up the selection to make it more accurate.
In the layers panel, you will see a thumbnail on the saturation adjustment layer that is mostly filled with black and a small area that is white in color.
White represents the area being affected by the adjustment layer, while black stands for the areas that are not affected. In order to clean the areas surrounding the teeth, you will need to use a brush to paint on the layer mask.

You can adjust the brightness of a specific tooth in the Adobe Photoshop by painting over it with black color using a lower brush opacity. Typically, the low opacity means the flow of the brush is minimal, which makes the final results look realistic. With the brush set to black, paint over the tooth to restore the original brightness.
Yes, you can hide the braces in your teeth using the Healing Brush located on the toolbar on the left side of the screen. Typically, the Healing brush is designed to help remove spots or blemishes.
Learning how to whiten teeth in Photoshop can help you gain skills you can use to enhance the colors of specific parts of a real estate photo. Simply select the teeth using a Lasso tool and then whiten the teeth by reducing the yellow saturation.


