


In today’s competitive real estate market, static photos are no longer enough. Buyers expect dynamic, engaging content that brings properties to life. Enter Reptov, a powerful new platform that transforms ordinary listing photos into professional marke ...


As an Amazon Associate we earn from qualifying purchases.
Whether you want to do selective edits or create social media grids, you'll need to split a real estate photo or file into equal sections. Here is a step-by-step guide on using Photoshop to split images in different ways.
Quick Navigation
You can split an image into as many parts as you want using the Guide Layout, as well as the Slice, Ruler, Marquee, and Polygonal Lasso tools. These Photoshop tools let you create sections in a duplicate layer while keeping the original image intact.
Whenever you need to divide images or files into sections, consider elements, such as the pixel dimensions and the appropriate size of sections. For my next set of new tutorials, I will explain the processes so you can follow them to split images accurately.

The Slice tool in Photoshop conveniently divides an image into equal portions without you needing to work out numbers.

Go to the File menu at the top left corner of the Photoshop interface and select Open. Alternatively, you can use the shortcut Ctrl + O if you use a Windows computer or Command + O if you use a Mac to open the file browser.
In the file browser, locate the folder where your photo is stored. Navigate through the folders and select the photo file you want to import. Click on the selected file and then click the Open button at the bottom right of the file browser window. Photoshop will open the photo in a new document window.
The background layer is created automatically when you open a new document or import an image with a single layer. The Background layer is locked by default to prevent accidental modifications. Creating a copy of the background layer is a good idea, so your edits can be non-destructive.
You can duplicate it by selecting it in the Layers panel and pressing Ctrl + J on your Windows computer or Command + J using a Mac. Alternatively, you can right-click it in the Layers panel and choose Duplicate Layer from the context menu that appears. The duplicated layer will appear above the original Background layer.
The New Guide Layout feature of Photoshop lets you form rows, columns, and margins to serve as guide layouts or presets when splitting images.
Guide Layout allows you to establish a grid system for your slicing, which helps create balanced and organized slices by setting up guides along specific vertical or horizontal lines.
Keep the Gutter value zero in both columns and rows. This value determines the distance between the guides you want to avoid while splitting the picture. Click on OK.
The Slice tool lets you create a square or rectangular area you want to preserve.
Photoshop will now show a number of sections with a blue selection around it. Alternatively, if you want to automatically slice your image into equal-sized slices, you can use the Divide Slice option in the Options bar.

With the Slice tool selected, enter the desired number of slices you want horizontally or vertically, and Photoshop will evenly divide the image into the specified number of slices.
Save these divided sections separately into a folder with the appropriate file format on your computer.
The Marquee tool is a selection tool used to create rectangular or elliptical selections in an image or document. Since it allows you to isolate and work with specific areas of an image, and apply effects or edits to the selected region, you can divide an image into two equal parts.
In this method, I will use the New Guide option of Photoshop to help with the middle point. It's also important to remember to create the selection on the original layer every time you make changes and not the new layer with the cut-off sections.
Whenever you make a new layer, you can drag a photo onto the canvas, which will launch as a new layer.
Creating a duplicate layer allows you to work on the sections without changing the original image permanently.
Open the image you intend to split in half in Adobe Photoshop CC. Next, make a duplicate layer by right-clicking on the background layer and clicking Duplicate Layer. You can also press CTRL/CMD + J. You don’t want to end up with a split image and lose the original.
Go to the View menu, and select the New Guide option. From the Popup that appears, select whether you want a horizontal division of the image or a vertical. For example, input 50% in the position value. You will see that a guiding line will appear in the middle of the photo.
The Rectangular Marquee tool lets you make rectangular selections with a photo. The selections isolate parts you need to work on to keep the rest of the picture intact.
Select the Rectangular Marquee tool from the toolbar. Drag and make a selection according to the guide and select half of the image. Press CTRL + J (Windows) or CMD + J (Mac) to make this selection a new layer.
Hide the other layers to view the half section and use it for any purpose. For example, do this when applying two different Effects/Masks/Gradients to the split sections.
The Ruler tool helps you measure distances, angles, and positions within an image. It allows you to place rulers on your document and make precise measurements, so it can help you make slices with precise measurements.
Do the following steps after importing the image and duplicating the background layer in Photoshop.
The Rectangular Marquee tool in Photoshop isn't a good option if you want to split a picture in half since it only creates vertical lines. In comparison, the Polygonal Lasso tool lets you work on a photo's corner to produce a diagonal split.
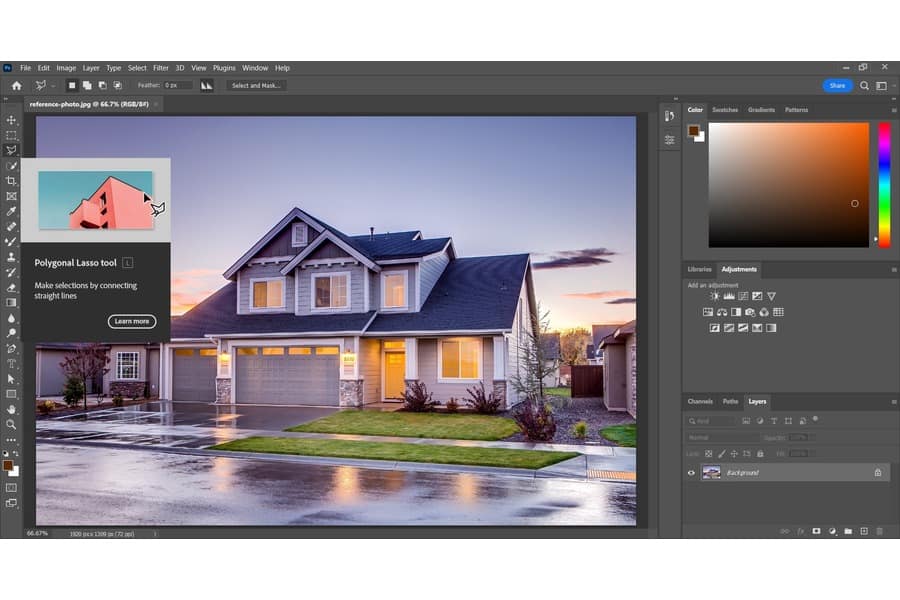
Right-click the icon under the Lasso tool, then choose the Polygonal Lasso tool from the drop-down options.
With the Polygonal Lasso tool selected, drag your cursor to make a selection. Another way is to click on your mouse and create an anchor point with the Polygonal Lasso tool to alter the selection's shape.
Move your cursor to the next desired point and click again. Photoshop will draw a straight line segment between each point you click. Continue clicking at each point to create additional straight-line segments, outlining the shape or area you want to select. Each click will create a new anchor point.
Bring the cursor close to the starting point to close the selection and connect the last anchor point with the starting point. When the cursor is near the starting point, a small circle appears next to the cursor. Click to close the selection, and the last segment will connect with the starting point, forming a closed shape.

It's time to split the image once satisfied with the selection made by the Polygonal Lasso tool. To do this, go to Layer, click on New, and select Layer via Cut. In effect, Photoshop will cut the photo in half, putting the selected half on a new layer.
You can also use the keyboard shortcut Shift + Command/Control + J. From here, you should see the layer panel adjust accordingly.
If you choose Layer via Copy, Photoshop will copy the picture and produce a new layer without removing the selected half from the original photo.
Whether you use the Marquee or Polygonal Lasso tool, Photoshop lets you export the split pictures into separate layers or individual files while ensuring quality image format. This feature divides a single photo into two or more files with your chosen file type.
After splitting your picture, go to the top bar, and click on File. Next, expand the Export options, and click on Layers to Files.
After that, choose the file format you want to export the files. You can use JPG, PDF, PSD, TIFF, or PNG as the file format.

The next step is to choose the location where you need to save the exported layers as separate images. Then, click the Browse option in the Destination section to select a location from your laptop or computer.
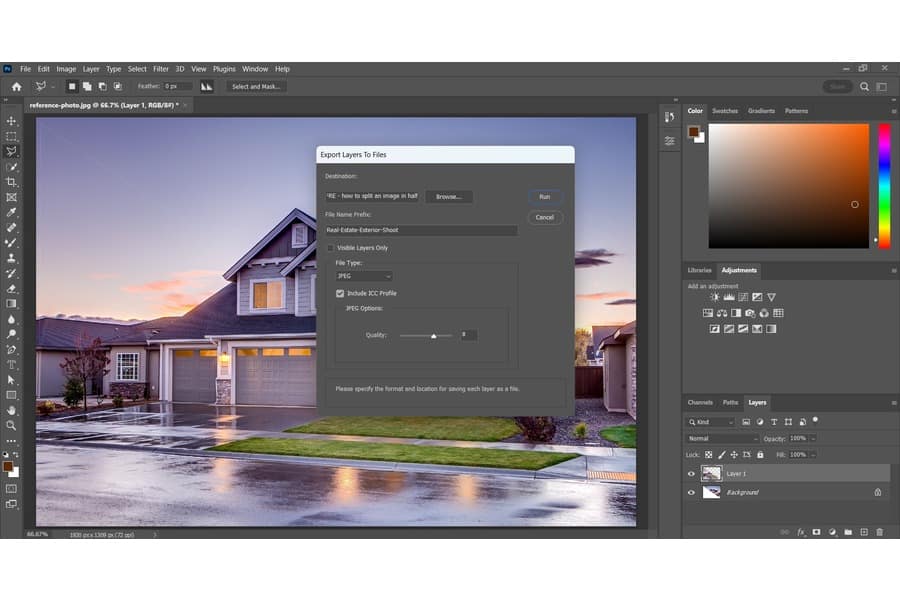
Set the File Name Prefix for the exported files. This will serve as the name of the exported layers or files. For example, Real-Estate-Exterior-Shoot.
The last step is to click on the Run command. This will instruct Photoshop to export your split photo into separate files in your export location.
Splitting the image is a frequently used functionality, especially in real estate
Usually, the images used for marketing material like flyers and brochures require displaying interior and exterior views in varying graphic design effects. You can split the view in half and apply two effects on each section, like a day and night view or a cool and warm color gradient.
Some agents may need to upload multiple sections of an image on Instagram. You can view the image like a puzzle when you open the Grid. Styling the Instagram grid layout is a prevalent tactic for promoting particular properties. Other benefits include:
With the advent of image editing software like Adobe Photoshop CC, you can divide files or images accurately in minutes. You can create as many sections of the image as you want using the Guide Layout, as well as the Slice, Ruler, and Marquee tools.


