


In today’s competitive real estate market, static photos are no longer enough. Buyers expect dynamic, engaging content that brings properties to life. Enter Reptov, a powerful new platform that transforms ordinary listing photos into professional marke ...


As an Amazon Associate we earn from qualifying purchases.
Besides providing a feature-loaded interface to create all sorts of graphics, Photoshop includes organizing features that help improve my workflow. Among these is the ability to organize layers in groups, which keeps your Layer panel clutter-free. Here is an in-depth guide on how to group layers in Photoshop for a more streamlined and efficient workflow.
Quick Navigation
If you frequently do Photoshop tasks that involve too many layers, grouping them will give you many advantages. By making groups, you will be able to categorize each part of your illustration for quick editing. Layer groups shrink up your layers panel, making re-editing easier for you or any other person who may handle the image.
As an example, suppose you are creating a flyer with separate content elements for header and body. You can create separate groups for both sections containing layers of each. It will tremendously help you with the editing process.

One thing to keep in mind is that you can create groups from layers that are placed in consecutive order in the Layer panel. Creating groups of scattered layers will negatively impact your layout.
One of the quickest ways to form a group of layers is the keyboard shortcut CTRL / CMD + G. all you need to do is to select the layers and press this keyboard shortcut.
Select the layers by clicking on the first layer, and while holding down the SHIFT key, click on the last layer. You can also press and hold CTRL (Windows) and CMD (Mac) while clicking the layers to select them. If you select a wrong layer, click on it again to deselect.
Once you are done with the selection, press CTRL + G (or CMD + G if you use Mac). All the selected layers will be grouped.
You can’t ignore the crucial step of group naming if you really want to organize your Photoshop workflow effectively. Expand the group in the Layer panel by clicking on the small arrow beside it. Now double click on the group name, and type the new name.
Give a name to the group which identifies its contents (add a number if you plan to create similar groups).
Another grouping feature can be found in the Layer menu on top. Select the layers using any of the methods mentioned above. Go to the Layers menu, and click on Group Layers.

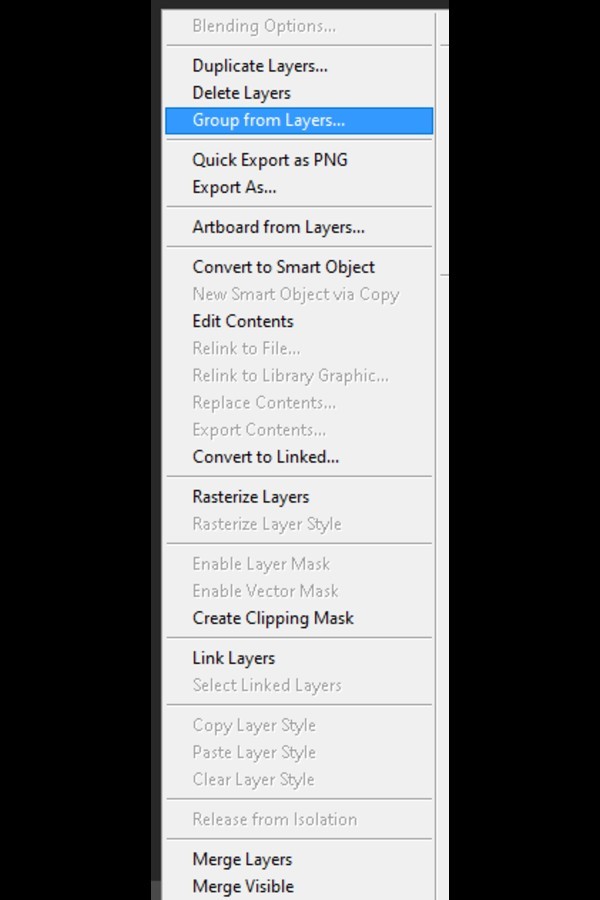
The second way to create a group is via right-clicking the selected layers. Choose any of the selection methods described above, and right-click on the layers. From the drop-down menu, click on “Group from Layers”
A simple method to group layers is by dragging and dropping them onto the icon present at the bottom of the Layer panel. Select the layers which are to be grouped. Hold down the ALT key (Windows) or Option key (on Mac) and drag the selected layers to the Create a New Group icon at the bottom.
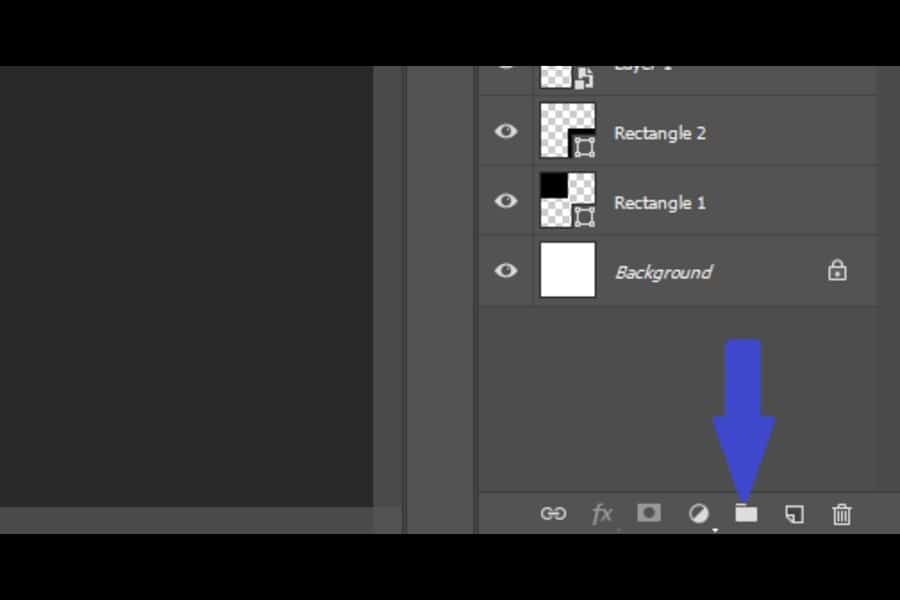
This icon, when clicked without selecting any layers, forms an empty group in the layers panel. You can drag your layers and drop them into the folder later on, but selecting the layers beforehand and forming the group is a better way to create organized group folders.

Photoshop allows me to create groups of groups, which is a blessing when you are dealing with hundreds of layers and similar kinds of groups.
For instance, you can place all the layer groups present on the right-hand side of your image in one group and name it “Right-side content groups”. In this way, navigating to the specific area’s layers will be easy for you.
All you need to do is to select groups in the layer panel and click on the menu icon present on the right side of the layer panel. Select the “New Group From Layers” option, and a new group will be created containing your selected groups.
Making a layer group gives you the flexibility to move it in the document area. With the Move tool selected from the toolbar, you need to check the Auto Select option at the top. Select Group from the settings.
Now when you select the layer group on the document area and try to move it, all the layers in the group will move simultaneously.
If you change your mind regarding a layer group, you can always ungroup it. Use the keyboard shortcut CTRL (Windows) or CMD (Mac) + SHIFT + G to ungroup the selected layer group.
Alternatively, you can select the group and go to the Layers menu. Choose the Ungroup Layers option from the drop-down menu.
If you press and hold CTRL or CMD and drag the group to the Trash can below, your group will be deleted. However, your layers which formed the group will still be intact unless you delete them separately.
Using layer groups in Photoshop has several benefits, which add to its functionality. Below, I have stated the main advantages of layers.
Before I wrap up this article, I wanted to cover some of the most common problems photographers face while working with layer groups and how to fix them.
If you are having trouble collapsing the layer group, try pressing CMD / CTRL and clicking on the arrow next to the group. To collapse all groups in the layers panel on Windows, click on CTRL + ALT and click on the arrow beside a group. For Mac OS, press CMD + Opt and click on the Expand / Collapse icon.
Having a large number of groups may result in increased file size. To reduce it, you can use the Flatten option to merge all the groups and layers into a single layer that is your background.
You can choose the option to Flatten layers under the Layer menu. An image with flattened layers has a reduced file size while retaining all the processing done on the image.
Layer groups are immensely helpful for organizing your Adobe Photoshop workflow. It keeps your layer panel neat and clutter-free while providing you ease to edit multiple layers at once. You can easily create groups and manage them using the methods mentioned in my guide to bring speed and flexibility while editing multiple layers.


