


In today’s competitive real estate market, static photos are no longer enough. Buyers expect dynamic, engaging content that brings properties to life. Enter Reptov, a powerful new platform that transforms ordinary listing photos into professional marke ...


As an Amazon Associate we earn from qualifying purchases.
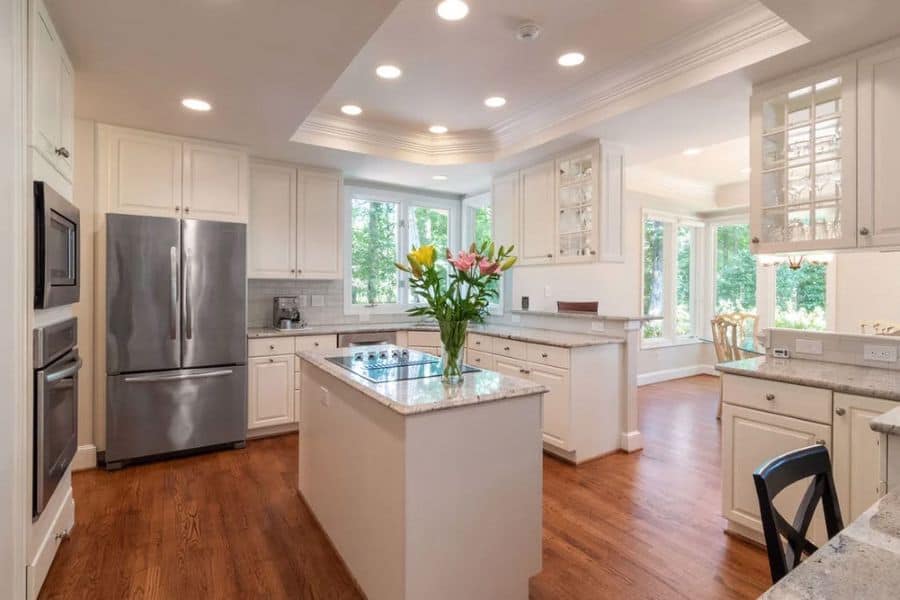
Sometimes when you try shooting with the interior lights off, you may notice that the rooms look a bit less inviting. If you shoot with the lights on, you may get some less impressive features forcing you to Photoshop the lights off. So do you shoot with interior lights on or off?
Quick Navigation
Many photographers will argue that a room looks more inviting with the lights on. The reason why photographers turn the interior lights off is the issue of controlling the white balance.
However, if you use even one small flash, the color balance of the flash dominates the room, minimizing the effect of mixed colors from the room lights. Lights are frequently switched off because ambient lighting from the windows will sometimes be more important than the artificial lighting.

When to turn the interior lights on for an exterior shoot, it depends on the time of day. Twilight shots are very beautiful with the lights on, whereas exterior shots on a bright day don't need interior lights on. Whether to shoot with light on or off depends on different factors
If the color of all the bulbs match, and none are Fluorescent you should shoot with the lights on. In this case, the shot looks good that way especially in kitchens and bathrooms. Additionally, if it is overcast or twilight outside, and the bulbs match in color balance then you should put them on.
If the bulbs do not blend well in some rooms, you can carry a few LED lights with you for table and floor lamps which you will switch with the existing bulbs to keep them matching.
In most cases, staggers are more interested in just having lights in place for viewers of the house and really don't waste time considering the photographer's issues. If the lighting is clearly installed by a lighting designer and is integral to the interior design of the structure, then you should leave them on and do your best to balance out the color using additional daylight lighting of your.
If this is a twilight shot then you need the lights on for the effect at least the landscape lights if there are any. You should turn all lights on and if any are not working or dark then you will fix them in post.
If it’s a twilight your client is commenting on then you should let them know that the glow from the windows is what’s generally used to enhance the shot. If they want a twilight without interior lights on then it is not the norm and they should let you know next time so you can deliver it as such.
Generally, you may like to have the lights on, but not because it adds more light to the room. Instead, it's a visual thing for you. It just makes the room look more inviting if there's a light on in the room.
That said, all of those different bulb types in use today can really create odd color temp shifts. For this reason, if you are on a tight schedule you will turn off specific lights that don't match the dominant room lighting color temp.
If you have more time, you'll keep lights on, but will introduce additional lighting to offset the odd color temp from existing lighting.
Shooting with the interior lights off gives your images a more natural and high-end feel. Keeping lights off, particularly for vacation rentals or real estate shots, helps prevent any kind of variation in light temperatures. Regardless of your camera, the following are instances that might require you to shoot with the lights off.
Whether to shoot with the light on or off depends on the direction of the natural light. You may tend to like shadows and rays coming across the frame rather than towards or away from it. Since the interior lighting might interfere with this effect and make the photos less appealing, it’s advisable to switch them off.
If you are not sure whether the best results will be with lights on or off, you can shoot the room with the lights off to confirm whether the natural lighting is sufficient. Usually, photos shot with sufficient natural lighting are bright and better quality than those ones shot with artificial lighting.
In most cases, this is due to the ability of natural lighting to spread uniformly and illuminate even distant subjects. This makes the photos uniformly lit even when using a zoom lens to capture both nearby and distant subjects.
A home may have some rooms whose lighting is warmer than the others and may distort the color of the walls, giving them an unnatural look. For instance, you may be living in a room with green-colored walls and yellow interior lighting.
If you turn on the lights, you may realize that the green walls change into a bluish shade. If that is your situation, you may turn off the lights and shoot with ambient light. If you adjust the color accuracy and exposure after shooting, the result will be more appealing.
A spotlight or searchlight is a device that projects an intense beam of light directly onto a person or place. Usually, some surfaces, such as bathrooms and kitchens, are not appealing with the spotlight effect.
These spotlights effects tend to form without consideration of whether the source of light is cool or warm. Although they do appear on lighter surfaces as well, they will mostly appear on dark surfaces. In this kind of situation, it's advisable to switch off the lights.
Most interior design magazines showcase their property images with interior lights switched off. For editorial real estate images, seasoned photographers normally use natural lighting to shoot the space.
However, if you are shooting editorial photos for putting on a magazine, you might need to shoot in good ambient lighting with the interior photos switched off. Usually, this will require you to shoot during the daytime.
Natural light creates a more appealing photo and helps showcase the subject in a more interesting and dynamic way. Having the natural light as the backlight of your image helps you avoid creating large shadows, resulting in a nicely lit picture.
The first few hours after sunrise or the last hour before sunset are the ideal times to capture photos. In
Do you shoot with interior lights on or off? Whether to switch off the lights or not depends on your shooting style and the quality of the interior lighting. Unless you want to use interior lighting to create some dramatic effects, it’s advisable to shoot using natural lighting.


Tens years, one complaint. I would tell her you give your clients ehdt they want, if that isn't what she wants, then tell you ahead of time. I deal with realtors that want to frame every shot by telling them that they have ten minutes to take me through the home and point out there shots then leave me alone and I will shoot it my way and they can use what they like and discard the rest. BUT they.didnt hire me for the day. I am sure some never called again but I don't really care as they stress me out and waste my time. And time is money.
I shoot with them off and can always fake it in Photoshop if needed. But no complaints so far.
An expert architectural photographer told me that if I am required to leave lights on, to increase the flash percentage to diminish electric light color cast. I also saw an article where the photographer, when shooting twilight exteriors, put his own work lights in each room. Just a plain old utility light somewhere in the room, but not visible. Maybe bouncing light off a wall? That way, all the rooms are somewhat evenly lit with the same bulb, and will balance easily after photoshop tweaking. You could do it with fluorescent light sleeves like this. I haven't tried it, but it seems like a good idea!
http://www.leefilters.com/architecture/colour-details.html#205
Yes.
And now for my typical novel length answer:
It depends. My usual approach is to make images with the lights off and make one frame that is exposed to leave some detail in the light fixture and not kill it to a glowing filament. It takes away a variable when I want to have a light on to show off the fixture but I'm not using the light from that fixture as a component of my exposure. If I have a bright room due to window light, once I've added a flash or two I might not have to make a separate exposure to have a practical light not be too distracting. Color cast from having different types of lamps in one room is easier to correct if they are on a separate exposure. I do have a light bulb kit, but changing lamps is not something I'll do on an RE job. It can be faked well enough in post. Even with a box o' bulbs it's easy to wind up in a kitchen full of CF can lights that have different color temperature lamps in them and who knows what base type they will have? Even with LED being the most obvious choice, builders are still stuffing CF can lights in and rarely putting in a full set of lamps. Grrrrr.
One of the dead giveaways to spot HDR images is that when light fixtures are casting shadows all around the room. The same thing is an issue with other workflows, just not as bad but if you want to avoid it, make a separate frame. Using the lights on a layer in PS set to lighten mode can be a screaming quick way to switch the lights on and you get an instant dimmer with the opacity. If you have shadows from the fixture or light spill you don't want, pop in a mask.
If you can get an image with lights on that doesn't require a trip through Photoshop, that can be the easiest. If it looks like a composite job is what you are going to have to do, get the exposures that make it as fast as possible with the workflow that you envision using. Nothing says you can't have lights on in one room and off in the other. What looks the best and does your customer have a preference?
Like so many answers in this field it depends. It depends on a few or many factors. For example, if the color of all the bulbs match, and none are Flourescent, and if the lighting is either interesting, a part of the interior design like said chandelier, necessary to provide light, then I will put them on. As long as the shot looks good that way especially in kitchens and bathrooms. Or if it is overcast or twilight outside, then as long as they match in color balance I will put them on. I bring my own 5000k LEDs with me for table and floor lamps which I will switch with the existing bulbs to keep them matching. Even with staged houses, staggers are more interested in just having lights in place for viewers of the house and really don't waste time considering the photographer's issues. If the lighting is clearly installed by an lighting designer and is integral to the interior design of the structure, then I will leave them on and do my best to balance out the color using additional daylight lighting of my own, usually LED video lighting since I am also shooting video at the same time.
And if I am not sure whether the best results will be with them on or off, I shoot the room both ways. Those damn green tinted Flourescent bulbs so often under cabinets in the kitchen drive me nuts so I usually turn them off. Then I can, if I wish, put the version with the lit bulbs on a layer under the unlit version and use the eraser tool to let the lighting come through after I have applied the color correction to the lighting. Takes time so I make sure I am getting paid enough to make this option worthwhile.
For twilight shots of the exterior I usually put 650 watt tungsten lights in each of the facing rooms that have windows supplementing with some clamp on hardware store reflector units with LED bulbs warm when my 5 Smith Victor units are not enough. That also allows me to shoot earlier in the twilight to get mor of the light from the sky. And I like to have the exterior lights on whether it is night, twilight or daylight since very often parts of the exterior are in shade even in the day time like recessed porches and entry ways. Those exterior lights add a nice tough. I find realtors like to turn on all the lights before I arrive and often I then have to go around turning them off. I hate those old fashioned ceiling lights especially the ones on fans.
But it's the same with fireplaces. If possible I like to have them burning either with logs or fake gas. Much better to have a warm and friendly fire going rather than a dark hole in the middle of the room. Same with the larger TVs. They make a large, black dead space in the middle of a shot. So I turn the on as well usually to a golf channel or something without hot primary colors and faces. So for the fireplaces, I bring along a couple of those infused logs that light quickly that I can supplement with real wood and always make sure I have a 12" gas log key since so often the gas log fireplaces have their keys mislaid and some are so deeply recessed, a normal key won't reach. I seem to travel around with half a hardware store packed in my cases along with a small step ladder and masking and duct tape and rubber boots as well as slip on shoes that are easy to take off before entering the house. A can of dulling spray sometime comes in useful when those lights create specular highlights as well. Sometimes I feel like Gabby Hayes with my rattling chuck wagon. A little off the subject I know, but there are always many things to consider along with whether to keep the lights on or off.
The OP stated exterior with lights on... don’t know whether this is daytime or a twilight exterior shot...
daylight exteriors don’t matter as generally interior lights will not show through the window reflections but i can see if it’s a light that is just peeking through to be distracting... i would have to concede to editing it out if asked .. not hard work as there should be plenty of reflections in window glass to clone with... i leave them however they are... as i usually try for an exterior right when i arrive or if sun placement might improve by end of shoot i’ll wait but i don’t thunk about it too much as sin will generally overpower interior light on exteriors... what drives me nuts is open closet or bathroom doors that are close to windows... i like the windows on exterior shots to be fairly deep or dark to add some depth.
If this is a twilight shot then you need the lights on for the effect at least the landscape lights if there are any... all lights is my preference and if any are not working or dark then i’ll fix in post...if it’s a twilight your client is commenting on then you should let them know that the glow from the windows is what’s generally used to enhance the shot ... and if they want a twilight without interior lights on then it is not the norm and they should let you know next time so you can deliver it as such.
I generally like to have the lights on, but NOT because it adds more light to the room. Instead, it's a visual thing for me. It just makes the room look more inviting if there's a light on in the room. That said, all of those different bulb types in use today can really create odd color temp shifts. For this reason, if I'm on a tight schedule I will turn off specific lights that don't match the dominate room lighting color temp. If I have more time, I'll keep lights on, but will introduce additional lighting to offset the odd color temp from existing lighting.
I used to have my agents turn on all lights for me before I arrived on a day shoot, but night shoots, all lights go on.
Since my Atlanta workshop, little by little I've been keeping them off and had to re-train my agents that the images look more natural with the lights off. I now point out the many different colors each lightbulb produces and how distracting they look. It has taken some time to get them to agree to this, but so far no complaint.
when I arrive at a location, I look to see if the lights are on dimmers. if so, I keep the lights as low as I can with just a slight glow. I also shoot an exposure for the lights only. When I shoot an interior bathroom that has no windows, or dark shades, I normally do a custom white balance and shoot available light.
changing lightbulbs is not an option, but have done some in the past with LEDs. when I shoot a new construction or newly re built home, I ask the agent to suggest changing to LED bulbs in the lamps and light fixtures...…………..sometimes they listen.
I'm not great with photoshop and would like someone to give me a video link to adding and blending the light exposure layer in PS if they would be so kind.
I shoot with flash, and I have all the lights turned on for the visual aspect. To me, it just does not look right to have a brightly lit room and all the fixtures dark. Since the flash largely overwhelms the room lights, they just leave little warm glows around them which is not bad.
And there is the case where you can see into an adjoining room through a doorway. This would mean having to put a speed light in the room. But having the lights on can sometimes give enough light to pull it up later in post. Otherwise the doorway is just a black pit.
@Peter, I'm replacing my tungsten work lights that I use for lighting up interiors on twilight photos to 50w LED work lights. I just got in three as a trial and haven't tried them with photos yet, but they are warm (I bought the warm white) and bright. The old work lights get so hot that it takes a long time to let them cool down so I can put them back in the car. I also worry that since they draw a fair amount of power it might blow a breaker if I have 4-5 plugged into one circuit since I will have no idea what sockets are on what breaker. Older homes can be even more of a problem. The LED lights do get hot, but not so hot that you can't briefly touch them and the heat sinks fan out to thin fins that cooled off pretty fast after I unplugged them. I'm sure that they'll be less of a fire hazard too. I'll get a photo today and post it to my photostream in the Flickr group. I paid $9 ea for them on eBay with free shipping and I'm reusing the mountings from my old tungsten work lights. The LED's should also last longer than I'll be alive so I won't be changing out those finicky lamps.
I'm with Peter—I always turn off fluorescents because of the horrible green color. Otherwise, it's situational. For more "serious" shots, I like to turn lights off and try and make the lighting more natural looking, but if there's a neat light fixture, I'll often shoot with the lights off, then turn said fixture on, adjust white balance, then shoot again, exposing for the fixture and the light spill. In post, I will composite the light on exposure (the screen blend mode usually works well) with the flash exposure, which gives me control over the color and how bright the light ends up being.
For twilights, I'll try and make sure all interior lights are on, all landscape lights are on, then I will gel my flashes with a CTO and pop flash where I need to. In post, I usually need to make some masks to balance the light from the different rooms, or adjust the color temp if some rooms use something other than a tungsten bulb (goddamn CFL's... BARF).
Hey Jack, so yes Lighting plays a major part in the Real Estate Photography, based on your client the needs keep changing so few of my clients want the light on and few need it off and most of the times it will be our job to add a fake light through Photoshop on them. Just go with your clients needs and if the client leaves it upon you then just go with the Lights on/off based on the natural lighting available which will enhance the photo.
I used to shoot all lights on, as I am a realtor and that's pretty much realtor 101. Now that I have officially made the metamorphosis to photographer, I tend to role model higher end interiors photography which is almost always lights off.
Is there a way to marry the two? There is...to me at least. The answer is that it all depends on the shot. Moreso, it depends on the direction of the natural light. I tend to like shadows and rays coming across the frame rather than towards or away from it. If a lit fixture fits that mold, I might leave it on. Typically they do not.
I also try to pay attention to representing the space as someone would live in it. No, that doesn't mean food wrappers and undershorts on the floor, but it also doesn't mean photoshopping fire into a fireplace when it's high noon in July or blazing every light in the home during the day. (be careful with the fire in the fireplace thing...once agents know you can do it they expect it every time)
I want the space to look how it does, but better. Orangey yellow lights rarely do that IMO.