PFRE is the original online resource for real estate and interior photographers. Since 2006, it has been a community hub where like-minded professionals from around the world gather to share information with a common goal of improving their work and advancing their business. With thousands of articles, covering hundreds of topics, PFRE offers the most robust collection of educational material in our field. The history of real estate photography has been documented within these pages.
In today’s competitive real estate market, static photos are no longer enough. Buyers expect dynamic, engaging content that brings properties to life. Enter Reptov, a powerful new platform that transforms ordinary listing photos into professional marke ...
For over a decade, photographers from around the world have participated in PFRE’s monthly photography contests, culminating in the year-end crowning of PFRE’s Photographer of the Year. With a new theme each month and commentary offered by some of the finest real estate & interior photographers anywhere, these contests offer a fun, competitive environment with rich learning opportunities.
PFRE prides itself on the depth and breadth of the information and professional development resources it makes available to our community. Our goal is to help real estate and interior photographers be successful while bringing the community together and elevating the industry as a whole.
As an Amazon Associate we earn from qualifying purchases.
A good amount of light is essential for perfect shots, but you can’t always get the ideal lighting scenario you want. In some photos, there may be sections that are overexposed, obscuring important details. Understanding different techniques on how to fix overexposed areas in Photoshop will help you amend such photos with ease.
How to Fix Overexposed Areas in Photoshop Using 4 Methods
There is nothing more annoying than a ruined photograph. Often, bright sunlight, too much flash, or glare from reflective surfaces result in blown-out whites, also known as overexposed images, affecting the overall quality of the picture.
Adobe Photoshop CC has multiple features to tackle the areas obscured due to overexposure. All of these methods are easy and quick, proving how efficient Photoshop is for enhancing your photos.
It is worth mentioning here that images shot in RAW can be recovered in a better way with these techniques as compared to JPEG images. This is due to the fact that RAW images have much more information stored in them as compared to other formats.
Here are four different ways to help you fix overexposed sections in your images, laid down step by step.
Method 1: Fix Overexposed Areas Using RGB Channel Selection
The first technique is by far the most ingenious way to rectify overexposure. The technique involves selecting areas in your images based on luminosity. After that, you can apply the Multiply blending mode to tone down the exposure in those chosen areas.
Open the image in Adobe Photoshop CC.
Select the Background layer in the Layers Panel. Right Click on the layer, and select Duplicate.
Go to the Channels panel, which is present beside the Layers panel. If it isn’t showing on your interface, go to the Window menu, and make sure the Channels option has a checkmark beside it.
Once on the Channels panel, press CTRL (on Windows) or Command (on Mac) and select the RGB layer. This will make a luminosity-based selection in your image, and all the bright areas will be chosen.
Now to put this selection into its own layer, press CTRL / CMD + J.
Select the Multiply option from the blend mode dropdown menu. You will see that the overexposed areas which obscured the details previously are toned down.
Method 2: Fix Overexposed Areas Using Shadows/Highlights Adjustment
Another commonly used method to correct the exposure is using the Shadows/Highlights adjustment. This method affects the whole image, so it works best on images with a maximum area overexposed.
Open the image which needs editing in Adobe Photoshop CC.
Go to the Filters menu on top, and select Convert for Smart Filters. This will convert your image to smart filters and enable re-editing later on. You can skip this step if you do not want non-destructive editing.
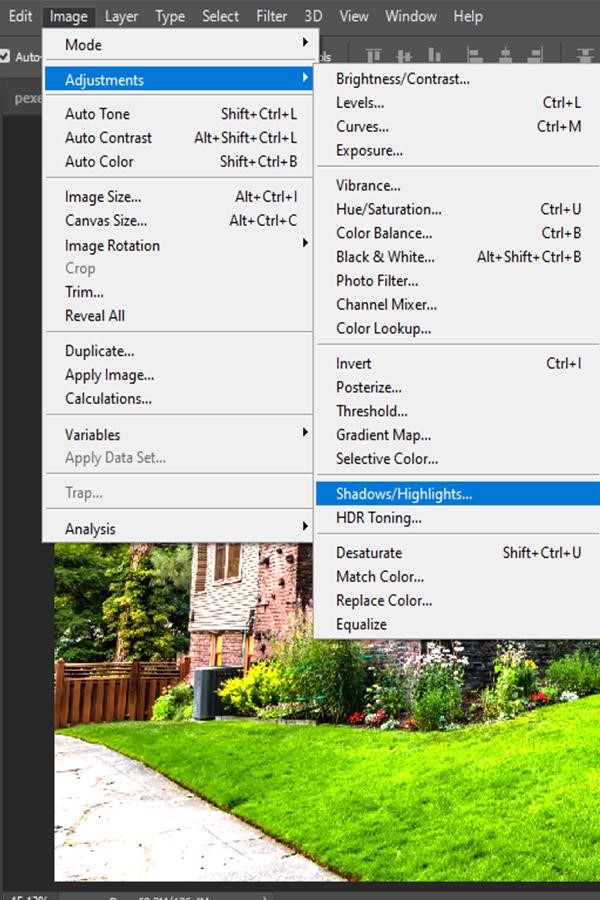
Go to the Image menu, and hover over the Adjustments option. From the extended submenu, select the Shadows/ Highlights option.
A window will open with sliders for Shadows and Highlights. Increase the Highlights slightly to recover details from overexposed areas.
Decrease the Shadows slider completely, and if you think the darkness is overdone, keep increasing it slightly until you get the desired effect.
Method 3: Fix Overexposed Areas Using Adjustment Layers
Adding Curve, Levels, Exposure, and Brightness/ Contrast adjustment layers to the image is one of the easiest methods in Photoshop to correct exposure. This gives you better control over effects and allows flexibility to hide the layers to assess further adjustments.
Make a duplicate layer of the background layer by selecting it in the layer panel. Press CTRL + J on Windows or CMD + J on Mac. a duplicate layer will be created on which you can work upon.
Add an exposure adjustment layer. Click on Create a New Adjustment Layer icon below the layers panel, and select Exposure. From the Exposure adjustment window, bring down the exposure slightly until you see some details recovered.
If adjusting the Exposure causes way too much darkening, select another adjustment layer and select Brightness/Contrast.
Adjust the Brightness to recover the darkness caused by lessened exposure. You can also bring the contrast up and down as required to bring further improvement.
For this image, I also used an extra adjustment layer of Curves. Click on the Create a New Adjustment Layer and select Curves.
Bring down the curves slightly from the lower level.
Group the adjustment layers you have added. Press and hold CTRL/CMD and select all the adjustment layers. Now Press CTRL/CMD + G to group these layers.
Click on the visibility icon beside the layer group to view the before look. Click on it again to see the after look.
Method 4: Fix Overexposed Areas Using Radial Filter
The Radial Filter is one of the most efficient features in Photoshop for targeted adjustments.
To target specific areas to minimize exposure, you can use the Radial Filter option.
This method works best when you fear that editing the whole image might ruin the other areas of the image. The Radial Filter will form elliptical selections on the overexposed areas, after which you can use the adjustments to edit these selections.
Open Adobe Photoshop CC, and import the image.
Go to the Filter menu and select the Camera Raw Filter option.
Select the Radial Filter icon which is present just above the image.
Now press and drag your cursor around the area that needs to be selected.
Once the radial filter is created, scroll down the left panel and click on the Inside Effect button. This will make sure that any adjustments you make affect the inner side of the filter.
Now adjust the Exposure slider and bring it down.
Increase the Highlights a bit.
Most of your details in the white area will be recovered after adjusting these two sliders, but you can also work with the Whites, Blacks, and Shadows if required.
Conclusion
Correcting the exposure in certain areas of your images will be one of the most common practices while working in Photoshop. This is why it is necessary to learn a variety of tools and techniques to accelerate your workflow. The next time you face an issue of overexposure, practice any of these methods to deal with the matter effectively in less time.