


Congratulations Dave Koch, September 2025 PFRE Photographer of the Month! The theme this month was "Stairwell". Dave Koch - Entry 1099 Alyssa Huang - Entry 1095 Paul-Dan Dragoman - Entry 1098


As an Amazon Associate we earn from qualifying purchases.
While editing an image in Photoshop, your workflow consists of numerous actions for which you have to switch between layers. To work individually with a layer, Photoshop provides several tools which let you select and deselect at your convenience. Learning how to deselect in Photoshop using different methods can help you improve your post-production workflow.
Quick Navigation
A typical process in Photoshop involves creating multiple layers on the document area. Photoshop counts each element as a separate layer and lists them down in the layer panel. This feature is an essential part of Photoshop, facilitating the fine-tuning of elements as you can treat each of them individually.
If you are working on a layer, you need to deselect it before moving on to the next one. Therefore, the first thing you need to master in Photoshop is to select and deselect the layers. This way, you will quickly swap while working with them, customizing each layer with precision.

Not knowing how to deselect will cause unintentional modification in other layers, which might disturb the whole design. You will have to rectify the unrequired edits, which is a time-consuming task. To avoid such an occurrence, read on to get the hang of deselecting in Photoshop.
First, you need to identify which layer is the active one in order to deselect it. In Photoshop, layers can add up quickly. Also, many of them may be identical, making it difficult to spot the selected one. The identification of the currently active layer can be made by looking for a moving dotted line, also known as marching ants, on its border.
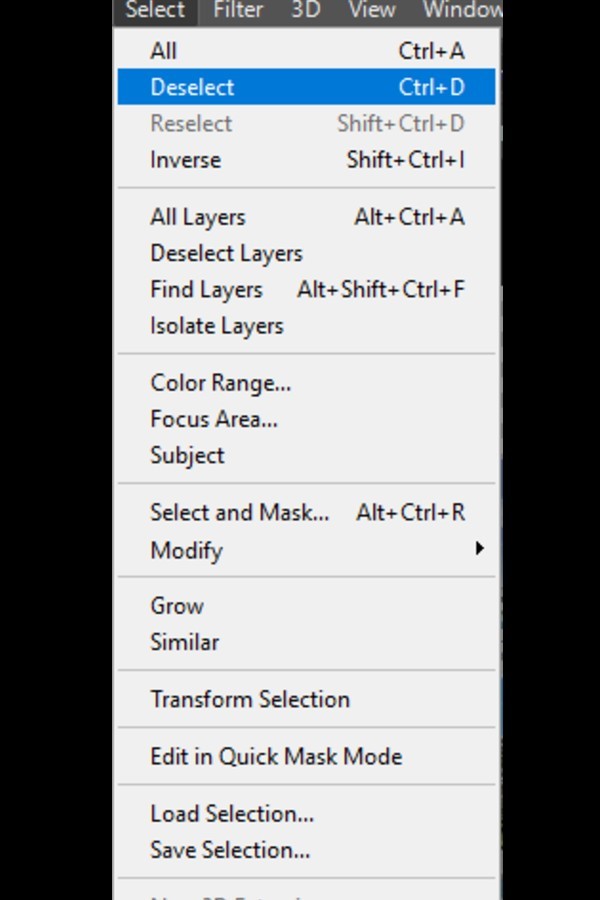
There are three ways through which you can deselect an active selection. All three of them are straightforward, and there is no guessing game involved. Either of them will become a common functionality for you, easing your image processing tremendously.
You can also deselect layers in the layers panel by clicking on the empty portion at the end of the panel.
If you currently have a single layer selected from the layers panel, deselect it by clicking in an empty space in the panel.
On the other hand, the deselection of a single layer from multiple layers is simple. Hold down the CTRL key on Windows or CMD key on Mac. Now click the layer to deselect it.
Here is a little trick that will help you with a decluttered view while you are working. You can actually hide a selection without deselecting it.
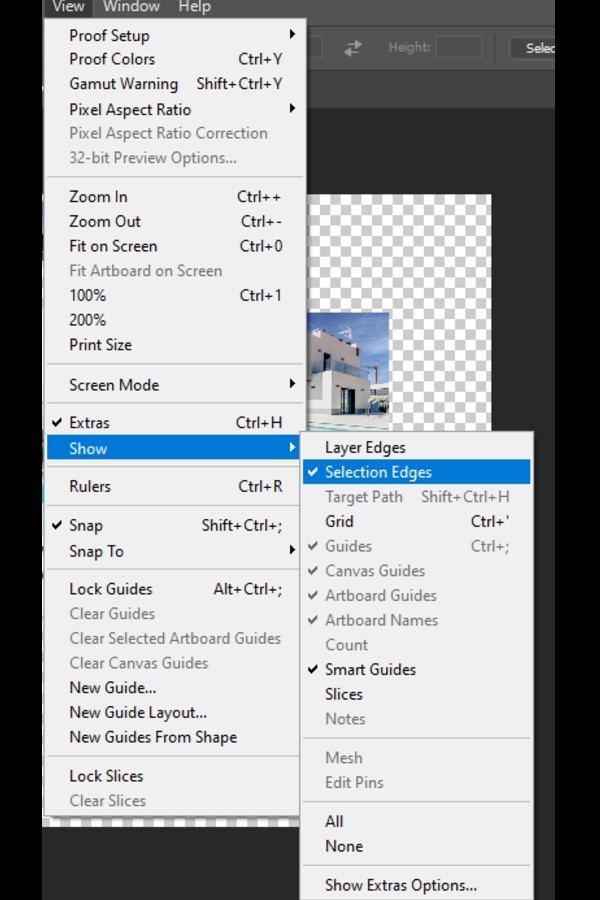
To hide a selected layer, go to the View menu. From the drop-down menu, expand the Show option and uncheck the option for Selection Edges.
Another method to hide the selection is to press CTRL + H on Windows or CMD + H on Mac.
You may need to hide a selection to streamline Photoshop's interface at any point during your workflow.

If you are new to Photoshop and its functionality, learning the selection methods and tools is vital to get the hang of the software quickly.
While I have discussed the selection and deselection methods in Photoshop, I cannot leave the amazing selection tools unmentioned. Photoshop CC provides several tools for selection in its feature-packed toolbar. Each of these offers a unique level of intricacy and can be used for the selection functionality in your workflow.
The Marquee tool makes the selection in its literal meaning, that is, canopying all the elements that come under its selection. You can form a Rectangular Marquee, Elliptical Marquee, Single row vertical, or horizontal Marquee. The dotted line rectangle is the icon for the Marquee tool in the toolbar.
Just below the Marquee tool, you can spot the Lasso tool, which lets you form a freehand selection around objects. It is a great tool for precise selection. You can choose the regular Lasso tool, Polygonal Lasso tool, or Magnetic Lasso tool as per your selection requirement.
The polygonal tool will form a selection edge with straight lines. In comparison, the Magnetic Lasso tool forms a selection automatically by tracing it as you move the cursor along the borders of the object.
The rectangular icon with a dotted circle in between is the icon for Quick mask in the toolbar. You can either opt for it in the toolbar or press Q to activate it. It lets you paint over an area to form a masked selection which will be shown in red. This tool is very useful for the efficient selection of small details in an image.
If you want to select a section in the image according to tones, the Magic Wand is the right tool for that. It detects the color tones while making selections. You need to select a pixel of the selected area, and the Magic Wand will select the consistently colored section depending upon the specified Tolerance value.
The crop tool is used to get rid of areas that you do not want to be a part of your final image. Making a selection with the cropped tool will retain the area coming inside the selection. This feature is frequently used while removing backgrounds and any unnecessary details.
As you adjust your perspective by cropping, you will be able to create an image that focuses on the main subject.
I hope that the detailed walk-through of the deselection and selection features in Photoshop will assist you in your creative workflow. Understanding these methods gives you the optimum functionality to create better images. Using the right tools for selection and deselecting a portion when required will speed up your editing process.
You can also learn more about how to ungroup photos in Photoshop.


