PFRE-Logo-white-bg
Reading
blue-triangle-element

Articles

PFRE is the original online resource for real estate and interior photographers. Since 2006, it has been a community hub where like-minded professionals from around the world gather to share information with a common goal of improving their work and advancing their business. With thousands of articles, covering hundreds of topics, PFRE offers the most robust collection of educational material in our field. The history of real estate photography has been documented within these pages.
All Articles
blue-triangle-element

Latest

Image banner for the March 2024 PFRE Photographer of the Month Winner Alex Vincent, with a featured image of his winning photo titled "Kitchen."

Congratulations Alex Vincent, March 2024 PFRE Photographer of the Month! The theme this month was "Kitchen". Alex Vincent - #906 Yvonne Raaijmakers - #909 Peter Wingfield - #902 Here's what Alex has to say: Thank you for the award of Photographer of th ...

Contest
blue-triangle-element

OVERVIEW

For over a decade, photographers from around the world have participated in PFRE’s monthly photography contests, culminating in the year-end crowning of PFRE’s Photographer of the Year. With a new theme each month and commentary offered by some of the finest real estate & interior photographers anywhere, these contests offer a fun, competitive environment with rich learning opportunities. 

Contest Rules
blue-triangle-element

CURRENT CONTESTS

View / Submit
blue-triangle-element

PAST CONTESTS

View Archive
Resources
blue-triangle-element

Resources

PFRE prides itself on the depth and breadth of the information and professional development resources it makes available to our community. Our goal is to help real estate and interior photographers be successful while bringing the community together and elevating the industry as a whole.
blue-triangle-element

Conference News

No items found

How to Print a Large Image on Multiple Pages

Published: 30/10/2023

As an Amazon Associate we earn from qualifying purchases.

Some real estate photography clients may request that you print your photos on a large poster or banner for their listings. If you are working on a large banner and you don’t know how to print a large image on multiple pages, Photoshop is the best option as it can print without sacrificing image quality.

How to Print an Image on Multiple Pages in Photoshop

To print a large image on multiple pages in Photoshop, you can use the Slice tool to divide the pictures into individual prints. You may also manually copy selections to print a large image in multiple sheets if you're using an older Photoshop version.

You can only print a small image poster size using the regular way of printing. You need to take care of a few things to ensure good quality when you print large images.

Using the Slice Tool

This tool allows you to cut an image into different sections, which you can then export as individual image files. That means you can use this tool to divide up a large photo into smaller slices, then cut and paste the portions into different pages.

Determine the Image Size

Go to the top menu bar and click on File. From the drop-down menu that appears, select New to open the New Document dialog box. Alternatively, you can open the window by hitting on Control + N on a Windows computer or Command + N on a Mac.

Define the dimensions of your canvas by selecting from the predefined sizes or inputing custom dimensions. You can use the following steps to determine the canvas size you need.

  1. Depending upon the paper size your home printer can handle, decide the number of sections you will divide your image into.
  2. Divide the image size by the maximum paper size.
  3. This will give you the number of sections for the photos that you need to print.
  4. Choose a large format printer for better results. 

Use the Divide Slice Tool

The tool lets you cut and print large photos in a non-destructive way. Generally, this tool allows you to save parts of the large photo separately using the following steps.

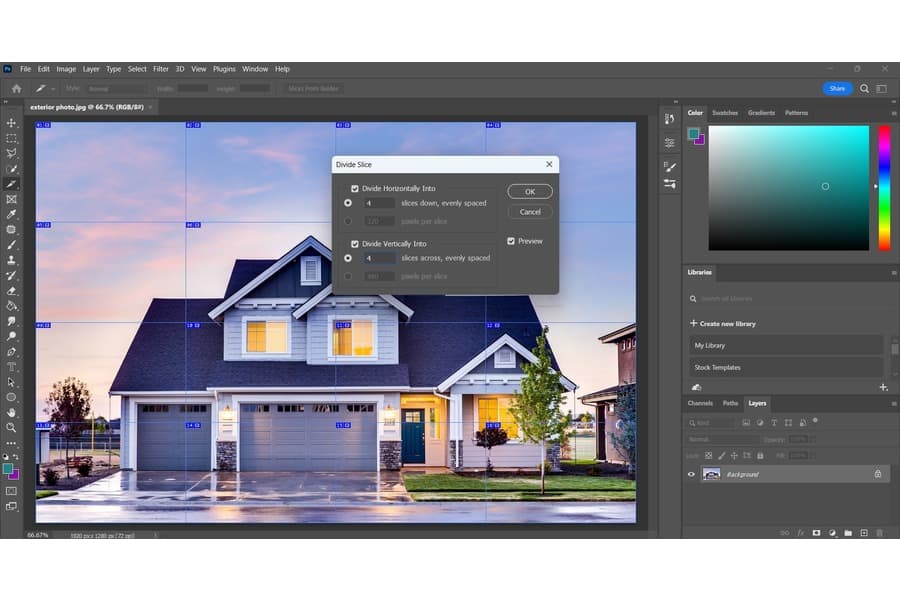
Open image and use the Divide Slice Tool in Lightroom
  1. Right-click on the Crop tool in the toolbar and select the Slice option. (The Crop tool looks like two right angles or L-shaped rulers forming a rectangle).
  2. If you had selected this tool earlier for an image, it would be shown in the toolbar instead of the Crop tool.
  3. Then, right-click on the image and click on Divide Slice.
  4. In the dialog box, check the boxes for Divide Horizontally Into and Divide Vertically Into.
  5. Input the number of sections you need for the horizontal and vertical values to print an image. In this example, I will divide the large photo to reproduce four slices horizontally and four vertically. This will result in 12 large photos.
  6. Set the resolution for the horizontal and vertical sections of the large photos.
  7. Click on OK.
Choose the Settings in the Divide Slice Tool Dialog Box in Lightroom

Save and Print the Image

The next step is to save the photo so you can make edits such as combining with other photo layers, changing blending modes in relation to the layers underneath or applying effects on the individual photos.

Saving the image in Lightroom
  1. Navigate to the Photoshop top menu bar, click on the File menu, and expand the Export option.
  2. For example, click on Save for Web (Legacy).
  3. Alternatively, press ALT + SHIFT + CTRL + S on a Windows computer or OPT + SHIFT + CMD + S on a Mac.
  4. Choose the Preset as JPEG and Maximum from the drop-down.
  5. Click on Save.
  6. Usually, Adobe Photoshop will create a photo folder with the photos that you have sliced. Open the file location and print the photos as usual.
  7. Once printed, you can assemble the images like a puzzle and mount them to create a large banner or poster to print as sheets.
Printing the Images from Lightroom

Manually Copying Image Selections

When you update the software to the latest version, you can use this technique to print a photo on several sheets.

Divide the Image Into Sections

After opening the image in Adobe Photoshop, assess the maximum print dimensions for images in your printer.

  1. Divide the photo into the required number of sections.
  2. Choose the Rectangular Marquee tool from the Photoshop left toolbar.
  3. Draw out a selection corresponding to the photo size of the individual section.
Divide image into sections using Marquee Tool in Lightroom

Copy Sections Into New Files

Copy the photo selection that you made. Go to the Edit menu on the Photoshop top menu bar and click Copy. Again, go back to the Edit menu and click New to open a new workspace. Paste the selection on the new document without changing other settings such as sizing settings. 

Photoshop automatically fits the photo according to the segment that you copied. Click on OK to commit the changes for that selection. Repeat the same procedure for your created sections by pasting them into new files.

Copying sections into New Files as separate images in Lightroom

Print the Files Individually

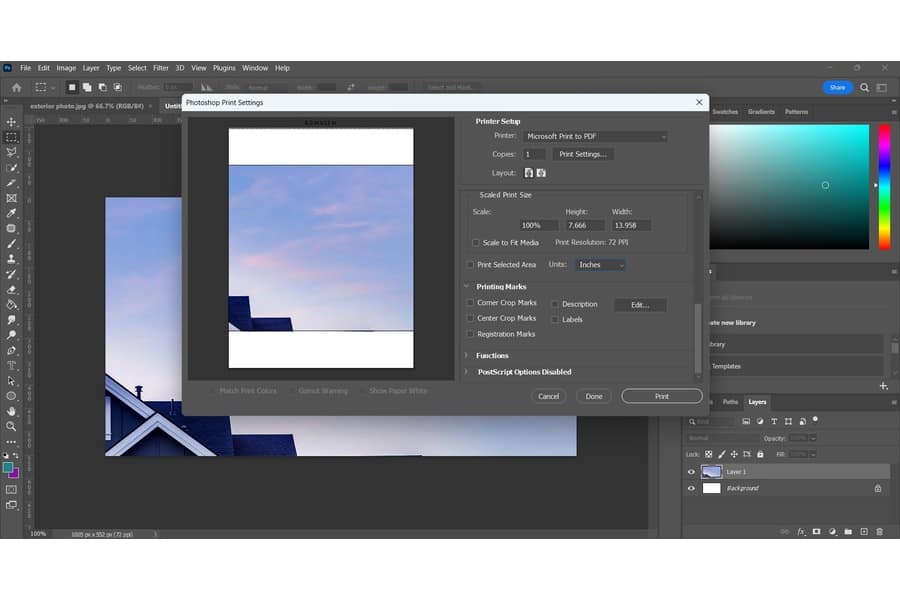
Since you will be working with different files, you can use the normal Photoshop printing procedure to reproduce the files individually. This method retains the highest photo quality when you print the sheets.

  1. Go to the menu on the top bar and simply select Print.
  2. Select the quality, settings, and paper type in the dialog box that opens up.
  3. Ensure the print resolution is set to at least 150 DPI if it’s for normal use. Choose 300 DPI if the photo is to be used for professional purposes such as showcasing the real estate property.
  4. Set the orientation from the print settings. Choose Landscape or Portrait depending upon your requirements. Note that in Portrait mode, the height of the document will be greater than its width, while in Landscape mode, the width of the page will be greater than the height.
  5. Click on Print.
  6. Print the tile scale segments (now individual images) one by one.
  7. Put together the individual printed sheets to form the complete photo.
  8. You can cut away the white margins or use them to overlap the next segment when you piece the sheets together.

Note: Some of the Photoshop settings depend on the printers connected to the computer. For instance, higher-end photo printers may support very high resolutions, while everyday office printers might have a lower DPI.

Determining the Print Resolution and Orientation in Lightroom

Related Questions

How to Print Multiple Images on One Page in Photoshop?

You can print multiple images on a single page in Photoshop using the built-in Contact Sheet II feature. Choose Automate from the main menu and then select Contact Sheet II. Choose the folder with the images you want in your contact sheet, set the page size, resolution, mode and bit depth. Define the image arrangement and then print.

What Is the Best Resolution for a Large Print?

The best large-format photo resolution in Photoshop depends on the viewing distance and the print medium. For instance, 300 ppi is suitable for prints that will be viewed up close, such as framed prints, photo books, or magazines while 100 to 240 ppi is great for banners, posters, large framed photos, or signage that will be viewed from a distance

What Is the Best File Format for Large Prints?

A PDF file and TIFF are among the best digital formats for printed images on several sheets. While these are typically heavy, they avoid conversion issues concerning color and sizing, ensuring clarity on a printed photo. However, Photoshop allows you to print high-quality photos without having to export to PDF first.

Conclusion

You can use the Slice tool or manually copy selections to print using Photoshop. Learning how to do this properly lets you print large images without sacrificing quality and resolution. Simply divide the photo into different portions, save them as individual photos and then use the normal Photoshop printing procedure.

Vendors

Rela Logo
CS6 PSE Logo
HD Photo Hub Logo
FullFrame Logo

Learning Topics

.
magnifiercrossmenucross-circle