


Congratulations Alex Vincent, March 2024 PFRE Photographer of the Month! The theme this month was "Kitchen". Alex Vincent - #906 Yvonne Raaijmakers - #909 Peter Wingfield - #902 Here's what Alex has to say: Thank you for the award of Photographer of th ...


As an Amazon Associate we earn from qualifying purchases.
Homeowners and agents want to sell properties at their target prices, so they hire a professional real estate photographer who can take enticing and high-quality pictures to market listings. That’s why I'm going to discuss real estate
Quick Navigation
Real estate photos need to make a solid impression on potential buyers right away. You can achieve this with the right equipment, the appropriate camera settings, and the best exposure. You must also work on composition, staging, and editing to make photos look spacious yet realistic.
The way you take photos can either make or break a property listing, and consequently, your credibility as a professional photographer. With that said, it's time to learn some tips and practices so that you can become a successful and in-demand photographer in your area.

While your real estate
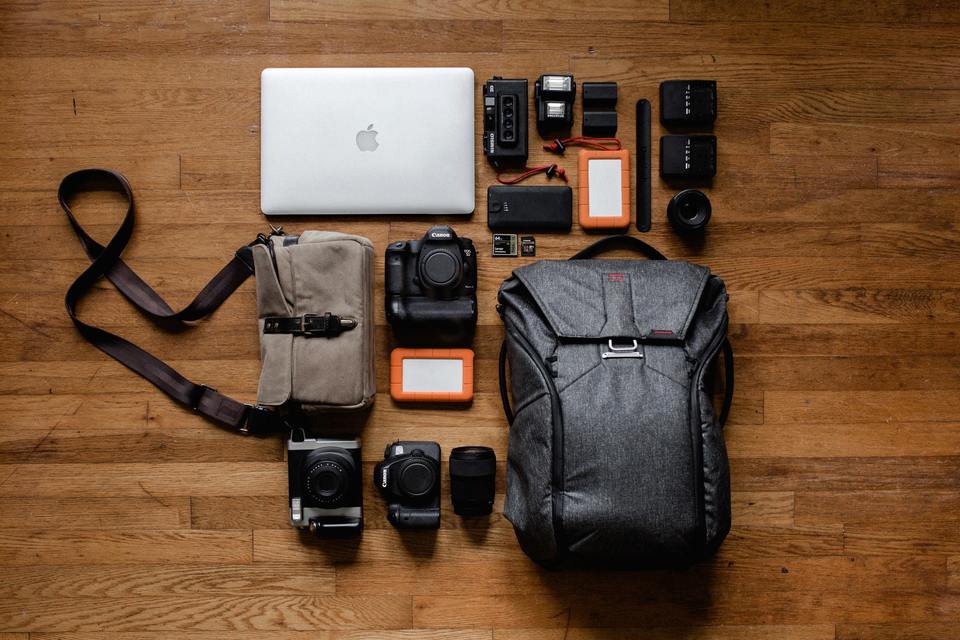
You can use standard equipment when you're just getting started in real estate photography. However, it helps to upgrade to particular tools that can deliver the demands of the real estate industry.
It would be better to use a full-frame DSLR or mirrorless camera for real estate
In addition, make sure to pick a camera with interchangeable lenses so that you can use specialty lenses. Your choice of camera for real estate photography must also have excellent ISO performance for low-light or twilight shooting.
Being a great real estate photographer means shooting around properties quickly while covering the most space you can. You need a lens with a focal length that's wide enough to capture a place entirely without causing distortions in photos.
There are various lenses, yet it's better to use tilt-shift and wide-angle lenses for real estate photography. These lenses have a broad field of view, letting you capture exterior and interior pictures in a single frame.
It's ideal to use 24mm and 16-35mm wide-angle lenses. Likewise, you can try 17mm, 10-24mm, 16-28mm, 18-35m, and 17mm-40mm zoom lenses.
Sharpness, height, and straight lines are fundamental elements of real estate
One of the best tips to remember in real estate
You need a consistent angle and height when shooting bracketed photos for HDR. In this way, you can stitch them into an evenly exposed photo in Photoshop and Lightroom.
In general, one high-quality flash is enough for a small room, whereas you would need to add strobes for bigger spaces. While you can use natural light for real estate
For off-camera flashes, you would also need to attach a flash trigger for your camera and flash units so that both pieces of equipment would fire off at the same time as you press the shutter.
If you're taking photos at slow shutter speeds or you want to avoid repositioning your flexible tripod, you can use a remote trigger for touch-free operation.
Direct flash often creates harsh light, resulting in dark shadows in photos. Therefore, you would need modifiers to soften the exposure.
Particularly for interior
Like in other kinds of
Since you would encounter different property sizes, it's beneficial to use a stand with rollers for portability. You also need universal heads for attaching a variety of lights and equipment.
There are situations where a drone works better to emphasize the vastness of a property or neighborhood. However, you should be a professional or licensed drone pilot to use a drone to offer aerial
Polarizing filters come in handy for real estate
You don't need to have a polarizing filter right away. However, bringing one helps manage reflections, suppress glare, darken skies, and enhance color saturation.
As you rotate the filter, you see reflections in glass, water, mirrors, and non-metallic objects appear and disappear. Keep in mind that you have to use the appropriate filter size for your lens.
The use of camera settings shows the difference between a professional photographer and a beginner. Your shooting gear will be useless if you can't apply the correct camera settings.
Since properties have varying features and spaces, there's no one-size-fits-all approach for camera settings, especially regarding exposure.
With that said, it's good to have a starting point that you can modify depending on the situation. Keep your camera in manual shooting mode because you would need to change these settings.
Keep the range between f/2.8 to f/7.1 because the wider the opening, the more light you allow to reach the camera sensor. You can also try a shallow depth of field if you want to highlight some details, like furniture.
Compared to photographing moving subjects, you can keep the shutter speed between 1/60 and 1/2 of a second since you're dealing with motionless objects. Remember that the longer the shutter speed, the more you risk unwanted color casts.
You need to balance sensitivity and sharpness in photos, so try to keep the range between 200 to 400. Going beyond that may cause image noise and grain.
About 83% of buyers find professional photos useful for decision-making. Real estate photographers must provide a digital or virtual tour for them. With a walkthrough session, you can see how you should market a property and get an idea of photographing a home.
In this way, you can find the best exposure and angles to impress buyers and agents. Consequently, you can determine whether you need to remove or add objects to correct imperfections.
Make sure to ask the realtor or owners about particular features they want to highlight. Likewise, learn about the nuances you must avoid.
Professionally photographed homes sell 32% faster, spending an average of 89 days on the market, compared to 123 days of other properties.
Illumination plays a key role in capturing beautiful real estate photos that can sell this fast. Keep in mind that it can impact the brightness, contrast, mood, and atmosphere.
Thus, you can only produce professional-looking pictures if you know how to control lights to create vibrant colors and pleasing textures.
The best real estate photographers know that selecting the right time to photograph influences exposure, especially for exterior photos. If possible, schedule the shoot during the daytime so that you can get lots of bright light.
White skies work best for interior shots, so make sure to check the weather to plan your time and have a backup schedule, there are weather apps and sun and lighting applications that you can download for this.
Real estate agents request shooting at dusk because it can create dramatic color and mood in photos. While you can also consider shooting during the sunset, it would be better if the sun comes from behind you and the camera.
While it's best to use natural light, you can incorporate external light to improve the brightness and contrast of your pictures. Window and interior lights serve as constant sources, whereas flash isn't a constant light. Thus, you must change the shutter speed to darken the exposure. While you can adjust curtains to correct contrast, don't shoot straight into bright windows.
Position an additional strobe if you want to bring out details of cabinets against a dark wall. If you want to mix the color of lights, it's better to use daylight-colored window light. Then, add some tungsten-colored interior lights. Walls closest to a lamp would produce amber colors, whereas walls closest to windows would have blue hues.
Overhead bulbs and lamps radiate warm hues that can clash with cool tones entering through the windows. In comparison, LED panels and reflectors can highlight details such as wooden, textile, or metal elements.
Attaching a flash unit to your camera is among the best ways to move from one property to another faster. However, you must bounce the flash output to soften it.
If you point the flash directly into a spot, you would see a focused, harsh illumination only in that area. This typically happens when you only have a pop-up flash. Consider these pointers when bouncing light.
Compared to portrait photography, you can generally position strobes on the corners or behind you. Try other places until you achieve different exposures. After putting a diffuser, angle the flash in a way that it bounces off the ceiling, a dark wall behind you, or sidewalls.
Use 1/16th power as a starting point, then go higher depending on the necessary brightness. For larger spaces, it would be better to put flash units on stands, then angle them toward the ceiling.
A poorly shot photo can grab a buyer's attention for only 2 seconds, whereas an excellent real estate photo retains attention for 20 seconds. This is why people hire a professional photographer because they need expertise in real estate
Composition in real estate photography isn't all about pointing and shooting. You also need to position yourself strategically and your camera to make spaces appealing. Professional real estate photographers must know how to compose and angle shots. Hence, your angles and compositions should make buyers feel like they're stepping into their dream homes.
Shoot pictures of a room from a doorway to show the maximum amount of space, adding a video of a door opening might just make it more perfect. Avoid putting too much ceiling or too much room floor in a photo because you might cut the liveable area. Otherwise, it would be hard for buyers to grasp a good sense of the property.
Mind your vertical lines, especially on edges and corners from windows, door frames, and walls. You can usually ensure this using a tilt-shift lens. Use the surroundings to emphasize a feature, like a beautiful garden leading to a garden shed.
Follow the two-wall rule to avoid making rooms look like corridors. A room tends to appear narrower or longer when you shoot down the length of the space compared to showing 3 converging walls.
The ideal height for taking real estate photos is about 5 feet. For rooms with worktops, set the height of your tripod at around 5.5 feet.
Take photos from eye level to display a virtual horizon. In contrast, depth can draw a viewer's attention by having at least 3 distinct layers. For instance, show plants in the foreground, a couch in the midground, and a window in the background.
Unlike lifestyle shoots that require several props, real estate
Keep desks, coffee tables, and countertops free of clutter. Remove trash cans, toiletries, stacks of paper, and small pieces of appliances. Additionally, clean debris, dirt, and visible markings.
You can leave 1 to 3 decorative items, such as a bowl of fruit or bouquet. However, it would be better to use a single color like all white roses or red apples. If possible, work with a professional stager.
Real estate photographers must know what subjects to capture, including highlighting a property listing's features, amenities, and dimensions.
If you're struggling with composition, preparing a shot list can keep you in check and guarantee you don't miss anything. While no two properties are similar, there are usual shots you can take to improve your efficiency.
Make sure to coordinate the list with the real estate agent so that you can adjust it according to their needs and requests.
Property listings with quality photos get a 47% higher asking price per square foot. Hence, make sure to edit your photos to improve the final output.
Take advantage of free editing software trials. Lightroom is ideal for quick retouches, whereas Photoshop and Photomatix work best for heavy editing.
Unless your client requires you to remove or add objects, real estate
Presets: Using Lightroom presets enables you to have more consistent edits. It lets you quickly apply filters to many photos with one click.
Cropping: Remove irrelevant details or unwanted sections to improve composition.
Brightness and Contrast Correction: Adjusting the brightness and contrast enables you to achieve the perfect tonal values, image highlights, and shadows.
Vertical Correction: This is among the essential things in real estate
White Balance: It's also vital to capture accurate colors and not make a space look too cool or too warm, with the right white balance.
HDR Adjustment: Some of your photos may have dark corners or bright windows. You can use the best HDR software to merge a number of images with different exposures to form a single, evenly exposed photo.

Real estate
Present a contract: A picture is worth a thousand words and possibly thousands of dollars in the real estate industry. Thus, it's crucial that you legally protect both yourself and your clients. Make sure to get fairly compensated for your work and that clients receive the products and services they availed.
Pack your things properly: You may need to bring around lots of equipment, so it would be better to organize your gear by section, type, and importance in a sturdy bag. Bring extra batteries, chargers, memory cards, flash card, sd card reader or an extra camera.
Follow the specifications: While you can be free to apply your real estate
Meet deadlines: Be sure to set a realistic timeline that would benefit both parties. This is also why it's crucial to have efficient shoot and post-processing workflows so that you can turn over photos on time or even earlier.
Don't come to the shoot unprepared: Finally, make sure to research and plan all the things you need to do before, during, and after the shoot.
When it comes to real estate
Quality photos help agents market their listings on websites to attract potential buyers to view and buy a property. Some buyers don't have free time to consider a property right away, so they need online visuals. Accurate depictions of properties set memorable impressions for photography clients to make faster buying decisions.
Avoid scheduling a photoshoot in bad weather, editing photos heavily, and taking photos from a single angle. Doing so can prevent you from delivering quality photos.
Real estate


